Oh my, those Zany Zebras (152536) are so much fun! Aren’t they just the cutest? Last Friday I shared a #simplestamping card a child could make. Check it out! Today I’m sharing the card I made for a swap with an online demonstrator group. This card is quite a step up from the simple stamping one I shared on Friday.
For this card I started with a Misty Moonlight cardstock base. Misty Moonlight is one of the beautiful new 2020-2022 In Colors. You can see the other colors here. I used one of the Stitched So Sweetly dies to cut out piece of Ornate Garden Specialty Designer Series Paper to serve as a background for the zebras. The zebras and greetings were stamped with Memento ink on Whisper White cardstock and hand cut out. Finally I added a bow from the Bumblebee 1/4″ gingham ribbon.
Supplies Used
Misty Moonlight cardstock, 8 1/2″ x 5 1/2″ folded in half for card base
Whisper White cardstock, scraps
Ornate Garden Specialty Designer Series Paper, scrap
Stitched So Sweetly Dies
Bumblebee 1/4″ Gingham Ribbon
Memento ink pad
Since those Zany Zebras are so much fun, I have fancy-fold card using them coming in another post this week. Check back on Friday. You won’t want to miss this post.
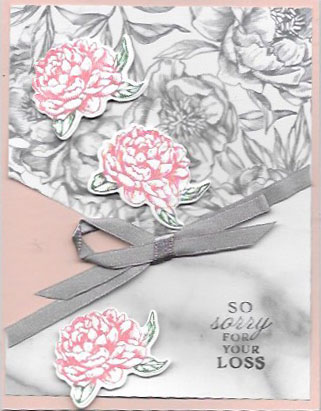
I chose one of the gray granite floral designs for this card. I cut a 5 1/4″ x 4″ piece of the dsp on the diagonal with the intention of just flipping one piece over and lining it up with the front side. Well….that didn’t work as the cut then went the wrong direction as you can see. This is one of those ‘happy’ mistakes because I like the way the card turned out better than I had planned. I debated about using one larger flower and covering the triangle where the card base shows but ended up with the three smaller flowers instead.
This Peony Garden Designer Series Paper has several designs that lend themselves beautifully to being colored in with Stampin’ Blends. However for this card I wanted to just have the three smaller flowers add the color.
Two of the sayings in the Prized Peony stamp set speak to the passing of someone dear. This card is going to a long-time friend whose sister just passed away. The stamp for the inside says “My thoughts are with you.” I love it when a stamp set has a greeting for the front of the card and one for the inside.
Supplies to make this card
Petal Pink cardstock – 11″ x 4 1/4″ scored at 5 1/2″ and folded for card base
So I’m still loving the Peony Garden Suite. Have I convinced you to love it too? Then contact me or visit my online store to order the suite for yourself. Remember to use the host code when you order for a small gift from me and remember to keep track of your order on my Customer Appreciation sheet.
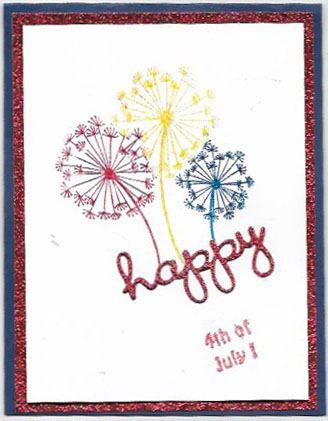
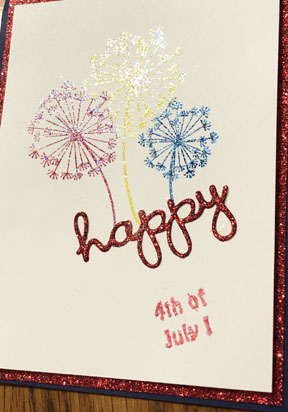
Here is my Happy Fourth of July Card for you. When you don’t have star stamps or dies, you have to be creative to make a Fourth of July card. This stamp set is Dandelion Wishes (151345) and the dandelion seed heads look a lot like mini fireworks to me. I stamped the image in Versamark…no, I first used markers to color the stamp and then stamped it in Versamark. Big mistake! I should have stamped first in Versamark and then colored with the markers as my Versamark pad got red, blue, and yellow ink on it. Anyways, I then put retired Iridescent Ice embossing powder on the image and heat embossed it. I also did this with the greeting. The glitter from the embossing powder doesn’t show up in the above photo but check out this close-up one.
You can use a similar technique to emboss an image in any color you want. First ink the stamp with Versamark and then ink with your desired color. Stamp the image and emboss with clear embossing powder.
Supplies To Make This Happy Fourth of July Card
Night of Navy Cardstock 11″ x 4 1/4″ scored at 5 1/2″ and folded for card base
Retired red glimmer paper 5 1/4″ x 4″
Whisper White Cardstock 5″ x 3 3/4″
Dandelion Wishes and retired More Great Greetings stamp sets
Versamark Ink and Pacific Point, Real Red, retired Pineapple Punch Stampin’ Write Markers
retired Iridescent Ice embossing powder, heat tool, Well-Written Dies (151816)
Stampin’ Seal, Stampin Dimensionals
So here’s to a great Fourth of July! Stay safe, keep your distance and mask up!
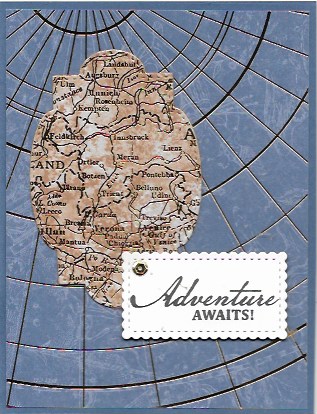
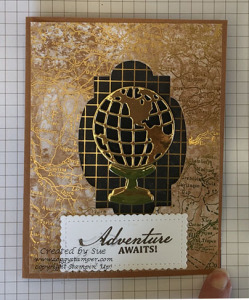
Here is another World of Good Graduation Card I created with the World of Good Suite (154140) of products. I had to make seven of these so this design is less intricate. Actually, I had the cut out portion of the card I posted on Saturday lying on my Big Shot table and decided to make good use of it.
The World of Good Suite is found on pgs 24 – 26 in the 2020 -2021 Annual Catalog. I love this suite for a couple of reasons. You can quickly create exceptional cards with the stunning World of Good Specialty Designer Series Paper that has several designs embossed with Brass foil. Brass foil sheets are part of the suite. These foil sheets coordinate perfectly with the dsp. The Beautiful World stamp set has great sayings as well as a vintage look to the images. Finally, the World Map Dies perfectly cut out the images eliminating the need of hand cutting.
These are the supplies I used to make Another World of Good Graduation Card: -The card base is the lovely new Misty Moonlight, one of the new 2020-2022 In Colors 8 1/2″ x 5 1/2″ and scored at 4 1/4″. – The second layer is the misty moonlight pattern of the World of Good Specialty Designer Series Paper 5 1/4″ x 4″. – The next layer is the Cinnamon Cider map pattern die-cut with the largest shaped die of the Stitched So Sweetly Dies. – Stamp the greeting from the Beautiful World stamp set with Memento ink and cut out with a rectangular Stitched So Sweetly die. – Adhere this with Stampin’ Dimensionals. Add a small Gilded Gem.
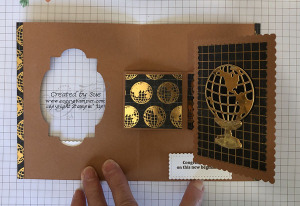
This Stunning World of Good Grad Card is made with the wonderful World of Good Suite of products. This suite is shown on pgs 24 – 26 in the 2020-202 Annual Catalog and includes the Beautiful World stamp and dies bundle (154091), brass embossed World of Good Specialty Designer Series Paper (152491), Faux Suede Trim (152472), World of Good Memories & More Card Pack (153600), Old World Paper 3D Embossing Folder (153200), Antique Corners & Slides (152471) , and Brass Foil Sheets (153057). You can order all of this with just one number (154140).
I used the rectangle Rocker technique to make this card. When you open the card, the image behind the cut-out window on the card front rotates to the right. Interactive cards are such fun to make and receive. Watch the video below to learn how to do the technique.
The cutting measurements of the papers are: –Cinnamon Cider Cardstock (153078) 8 1/2″ x 5 1/2″ scored at 4 1/4″ for card base; 5 1/2″ x 2″ scored at 1/2″, 2 3/4″, and 4″, 3″ x 2″ scored on all sides at 1/2″ for mechanism: and 4 1/4″ x 3 1/4″ for moving panel –Basic Black Cardstock ( 121045) scrap –Whisper White Cardstock (100730) scrap –Brass Foil Sheets (153057) scrap – World of Good Specialty Designer Series Paper (152491) Cinnamon Cider embossed map design 5 1/4″ x 4″ Checkered Black design 4″ x 3″ Black with globe design 2″ x 1-7/8″, 1-7/8″ x 1″
You can order the supplies I used to make this Stunning World of Good Grad card by visiting my online store or clicking on the links to be taken to each item’s location in my store.
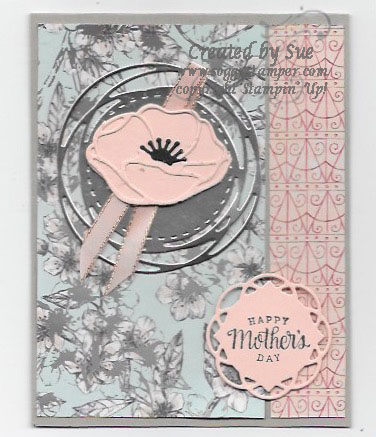
I’m sharing My Lovely Mother’s Day card with you all to wish all the moms and women who serve as mother figures a very Happy Mother’s Day. Although we can’t go out to dinner or have family members that don’t live with us come visit I do hope you find the day filled with countless blessings.
This Mother’s Day card came about because I had the pieces of Parisian Blossoms Specialty Designer Series paper planned and already cut for another project. I added the swirly circle cut from Champagne Foil Sheets and the label cut from Petal Pink cardstock using dies from the Painted Labels Dies. I also added the poppy cut from Petal Pink and Basic Black cardstock using dies from the Poppy Moments Dies. A length of Petal Pink Metallic-edged ribbon grounded the poppy. The greeting is from the retiring Tea Together stamp set.
Instructions: 1. Adhere the floral side of the DSP to the left side of the card. 2. Flip the 1″ strip to the reverse side and adhere to card. 3. Cut out the poppy pieces, the label, and the swirly circle using the appropriate dies and die-cutting machine. 4. Adhere the Champagne Foil swirly circle to the card front with SNAIL adhesive. 5. Put the pieces of the poppy together with Multipurpose Liquid Glue. Put a couple strips of SNAIL on the back of the poppy and adhere the looped ribbon to the SNAIL. Add to the swirly circle with Stampin’ Dimensionals. 6. Stamp Happy Mother’s Day on pink label with Memento ink and adhere to card front with Stampin’ Dimensionals.
Now it is your turn to share your Mother’s Day card you created. Email me a photo of it. I’d love to share it here on my bloig.
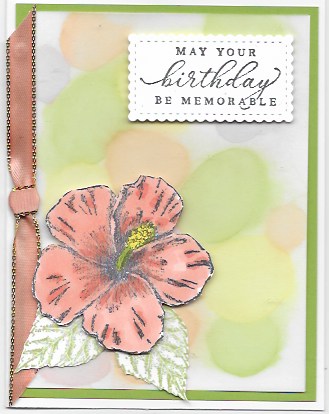
This Easy Faux Bokeh Technique is fun to do and makes a wonderful background! The bokeh effect comes from photography where the background is out of focus with pinpoints of light like this. The focus is distinctly on the main image.
Easy Faux Bokeh Technique
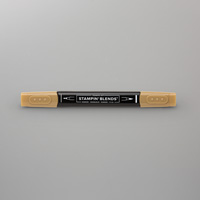
Supplies: Cardstock Vellum At least three colors of Stampin’ Blends – darker colors show up better – I used dark Pumpkin Pie, dark Granny Apple Green, and dark Pineapple Punch paper towel
Instructions: 1. Make a circle with one of the stampin’ blends and immediately burnish with the paper towel. Don’t even take time to recap the marker. Otherwise, the edge of the circle will dry and you won’t get the blurred effect. 2. Repeat this step several times with the first color randomly on the piece of cardstock vellum. 3. Change colors and repeat as desired.
To Make Sample Card
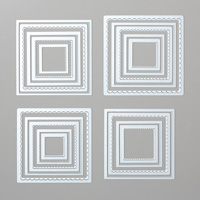
Supplies: Stamp Set – Timeless Tropical Inks – Memento and Pear Pizzazz ink pads Stampin’ Blends – Dark Pumpkin Pie, Dark Pineapple Punch, Dark Granny Apple Green for bokeh background; Calypso Coral Combo, Dark Granny Apple Green, Dark Pineapple Punch Cardstock – Whisper White 11 x 4 1/4″ scored and folded at 5 1/2″ for card base, 5″ x 3 3/4″, scraps for flower, leaves and greeting; Granny Apple Green 5 1/4″ x 4″; cardstock vellum 5″ x 3 3/4″ Accessories – In the Tropics Dies, Stitched So Sweetly Dies (next to the smallest rectangle), SNAIL adhesive, mini glue dots, Stampin’ Dimensionals, Gold Metallic Edged Ribbon colored with Light Calypso Coral Blend
Instructions: 1. Adhere Pear Pizzazz cardstock to Whisper White card base with the SNAIL 2. Do the technique on the Cardstock Vellum 3. Adhere the vellum to card front with SNAIL adhesive placing the adhesive in areas that will be covered up with the other elements. 4. Color length of gold metallic edge ribbon with the light Calypso Coral blend. Then tie an overhand know and adhere to left side of card with glue dot. 5. On Whisper White scraps stamp the leaves with Pear Pizzazz ink and the hibiscus flower with Memento ink. Color in the flower with the blends. Then cut out with the appropriate dies. 6. Stamp greeting on another scrap of Whisper White with Memento ink. Cut out with next to the smallest Stitched So Sweetly rectangle die. 7. Adhere the leaves to card front with SNAIL and the flower and greeting with Stampin’ Dimensionals.
If you need any of the supplies I used for this card, visit my online store. Use the host code when you order and I’ll send you a small thank you gift.
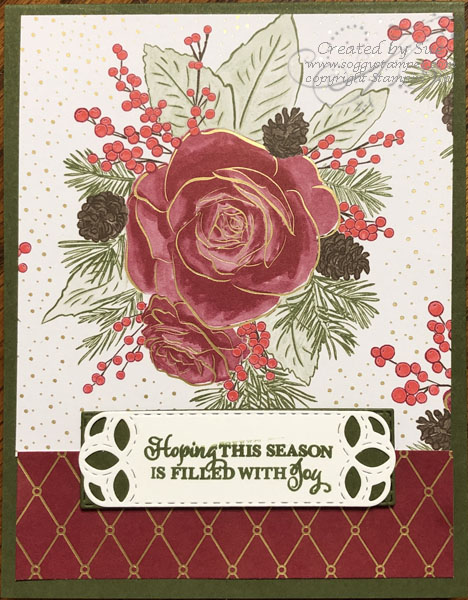
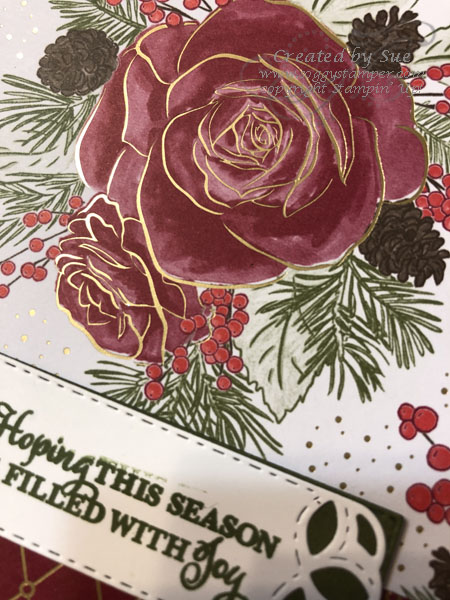
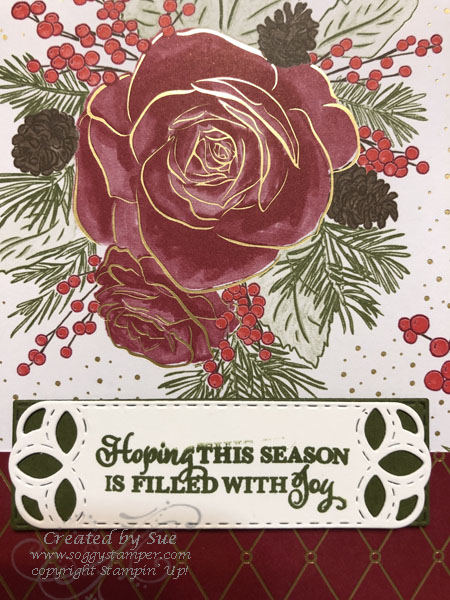
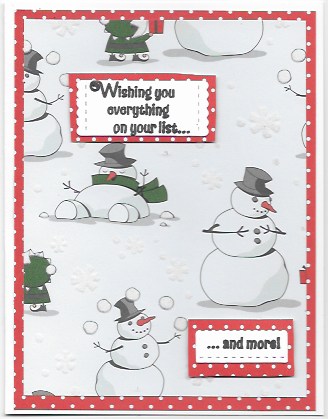
This easy-peasy Christmastime Is Here card was created in no time. When you use the beautiful Christmastime Is Here Specialty Designer Series paper (152154), the paper is the star of the card! Notice the gold embossed splatters and edges of the rose on this designer series paper. I love, love, love it!
The card base is an 11″ x 4 1/4″ piece of Mossy Meadow cardstock which I scored and folded at 5 1/2″. I trimmed down a piece of the large rose print to 4″ x 4″ and added a 4″ x 1″ piece of the gold-embossed Cherry Cobbler design at the bottom. Since the dsp is so beautiful, all this card needed was a greeting.
The greeting comes from the Bells Are Ringing stamp set (150476) I stamped it onto Whisper White cardstock with Mossy Meadow ink. Then I cut it out with one of the Stitched Labels Framelits dies (146828). I backed the label with a piece of Mossy Meadow cardstock to show off the pretty ends of the label.
Check out all the products that are part of the beautiful Christmastime Is Here Suite in my online store. These products are only available during November and are on an ‘as long as quantity lasts’ basis. You must order early, like today to be sure you will get the supplies needed to make this Easy-Peasy Christmastime Is Here card for yourself. I will be sharing more projects using this suite so come visit my blog often.
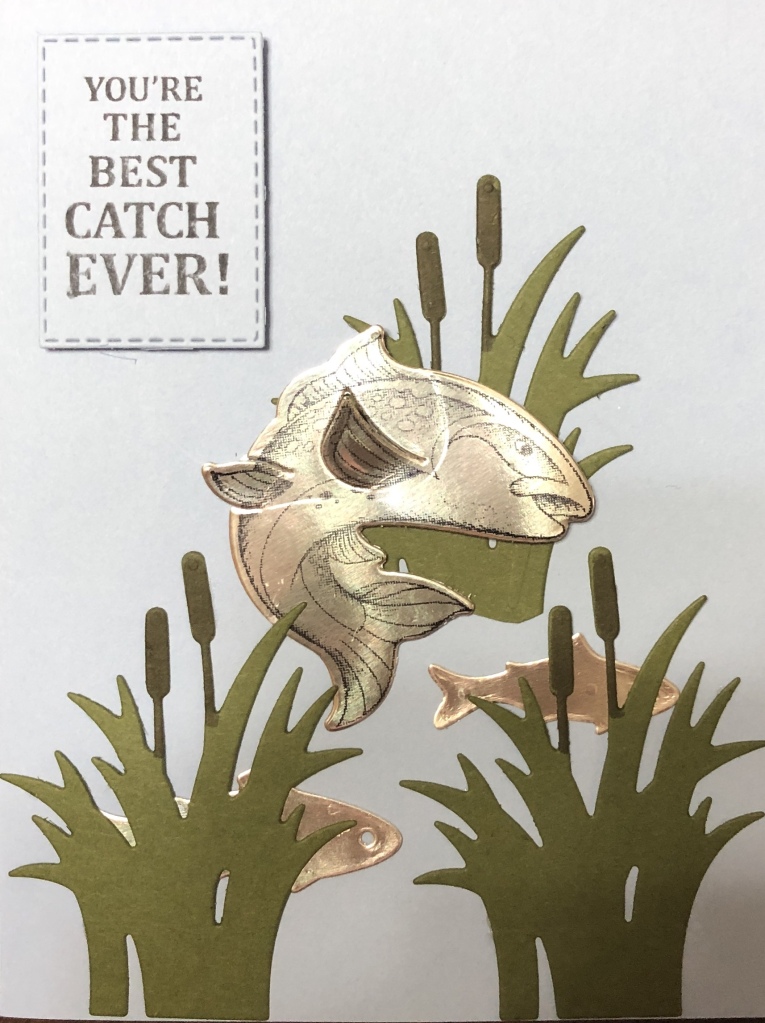
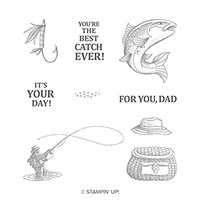
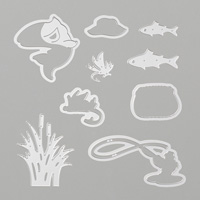
This anniversary card uses the Best Catch stamp set (148598) found in the 2019-2020 Annual catalog on pg 150 and the coordinating Catch of the Day dies (148815). Today is our 55th wedding anniversary and I wanted a quick card for my husband. Since he loves fishing, this Best Catch stamp set was the perfect choice.
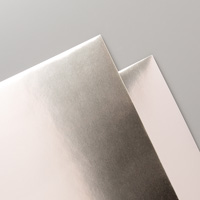
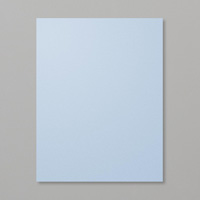
The card base is 8 1/2″ x 5 1/2″ Seaside Spray cardstock folded in half. I cut the cattails out of Mossy Meadow cardstock and colored the actual cattails with an Early Espresso marker. I stamped the large fish onto a piece of Champagne Foil Sheet with Black Stazon ink. Then I cut it out and one each of the smaller fish dies.
I originally stamped the greeting directly on the cardfront with Memento ink and, of course, messed it up! So I stamped it on a scrap of Seaside Spray cardstock and cut it out with the single rectangle of the Stitched Rectangles dies and popped it up with Stampin’ Dimensionals. So often correcting/covering a boo boo enhances the design of the card!
You can recreate this Best Catch Stamp Anniversary Card by clicking on the images below to go to their place in my online store. If you earned any $5 bonus coupons in July that you haven’t redeemed yet, you have only three more days to do so. They could be used to order these supplies. 🙂
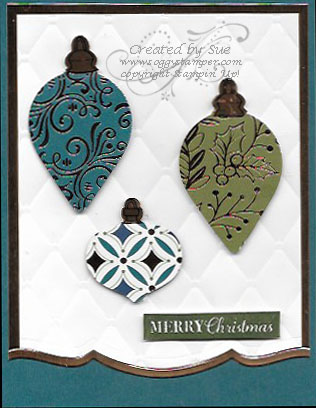
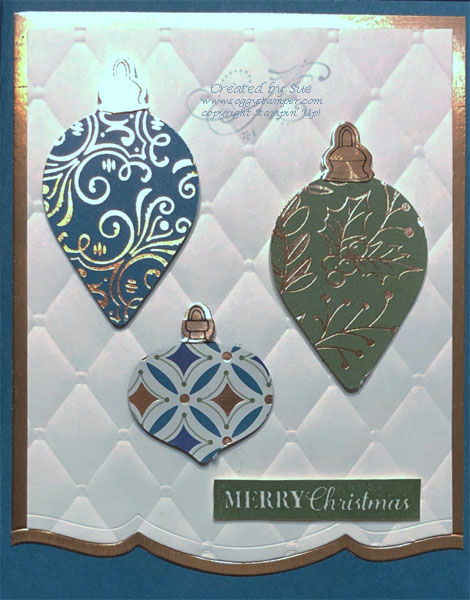
This is my first Christmas Gleaming card of the season. Demonstrators are allowed to preorder items in August from the upcoming 2019 Holiday catalog. You could too if you were to join me in being a demonstrator. Contact me, sue@soggystamper.com, or click here for more information.
I created this first Christmas Gleaming card using the Christmas Gleaming bundle which is a stamp set and two ornament punches. Yes two! I punched the ornaments from three patterns of the Brightly Gleaming Specialty Designer Series Paper. This paper is so gorgeous! One side of papers has copper foil accents. I stamped the tops of the ornaments on copper foil sheet scraps and punched them out. Then I glued them to the tops of the ornaments.
The base of this card is an 8 1/2″ x 5 1/2″ piece of Pretty Peacock cardstock. I used the edge trim from the Magnolia Memory Dies to cut and emboss the bottom edge of a 5 1/4″ x 4″ piece of Copper Foil Sheets and adhered it to the card base. I used the same die on a 5″ x 3 3/4″ piece of Very Vanilla cardstock. Then I embossed it with the Tufted embossing folder.
To complete this Christmas Gleaming card, I adhered the ornaments with Stampin’ Dimensionals. Then I stamped the greeting on Very Vanilla cardstock with Mossy Meadow ink and cut it out by hand. I popped this greeting up with Stampin’ Dimensionals as well. Since the card base is dark, I added a 5 1/4″ x 4″ piece of Very Vanilla to the inside.
Are you eager to see what other exciting things are in this Holiday catalog? Just email me your address and phone number so we can discuss how you can get one for free.
I love this Beautiful You Graduation card! I got the idea from a Pinterest post by Sharon Armstrong who had also seen it on Pinterest. One of our granddaughters graduates from Ballard High School in Seattle tomorrow and I needed to make her a card. I love the freedom expressed by the lady in the image and imagine Chloe feels the same way. It is a tradition to write the name of the college you will be attending on the graduation cap so Chloe’s says WSU for Washington State University.
The measurements for this Beautiful You Graduation card are as follows: -Real Red Cardstock 8 1/2″ x 5 1/2″ for card base and 3/8″ x 3/8″ piece for graduation hat – Basic Black Cardstock 5 1/2″ x 4″ – Whisper White Cardstock 5″ x 3 3/4″
The image of this Beautiful You Card was stamped with Memento Ink and is colored with Real Red and Light Soft Suede Stampin’ Blends.
Supplies for the Beautiful You Graduation Card:
If you need anything to make this Beautiful You Graduation card, click on the images below or visit my online store.
I love this Best Bunny Bundle Easter card! I don’t usually order retiring product once the retiring list comes out but I’ve seen so many cute cards created with the Best Bunny Bundle that I had to have it. The Best Bunny Bundle comes with the Best Bunny photopolymer stamp set and the Bunny Builder Punch.
I wanted to have a leafy background to my card and this pattern of the retired Frosted Floral Specialty Designer Series Paper fit the bill perfectly. Although it doesn’t show in the photo, this paper has a pearlized sheen to it which makes it very special. I have hoarded it.
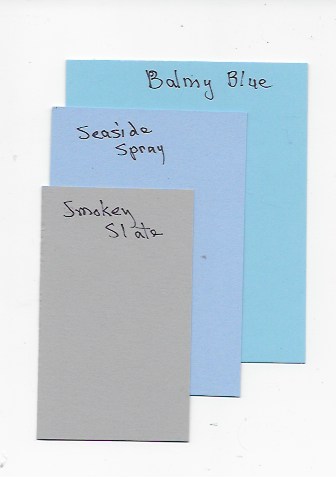
The card base and the oval Stitched Shapes die-cut are from cardstock in one of the new 2019-2020 InColors, Seaside Spray. It is a great color for skies. It also has a grey tone but not enough to fill out the grey color palette. See the comparison below. I already love the Seaside Spray color and will be using it a lot. You will be able to order it beginning June 4th.
The ‘Happy Easter’ is from the retired Teeny Tiny Wishes stamp set. So there you have it…something new, Seaside Spray cardstock…something current but soon to retire, Best Bunny Bundle…and something old, the dsp and greeting. I urge you to order the Best Bunny Bundle (148378) before it sells out! While you are in my online store, check out the rest of the retiring items. There are a lot this year and some are already sold out. This is truly your last chance to get some of them. Other stamp sets are retiring in the wood and clear mount version and will continue as cling mount. Here is the link.
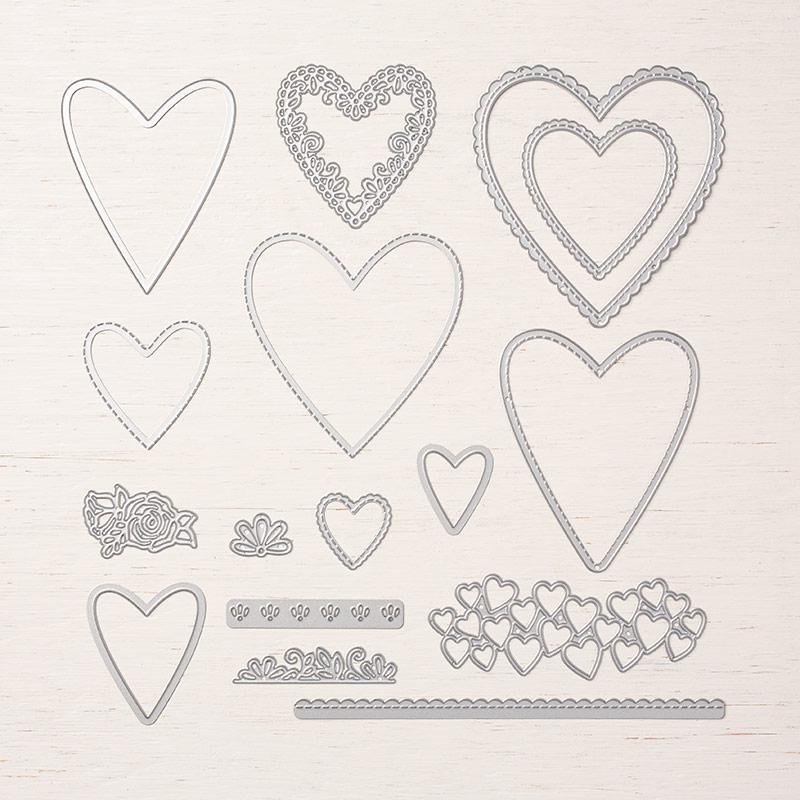
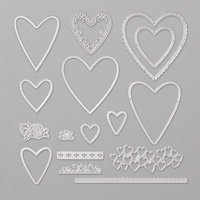
I really love the intricacy of this Be Mine Stitched Framelits set of dies! I wasn’t going to get it at first but seeing all the wonderful cards created with it, I yielded to temptation and purchased it. Just look at all the heart die you get with the set
I used one of the patterns of the beautiful All My Love Designer Series Paper for a background layer over Sahara Sand card base. I cut the lacy heart from Lovely Lipstick Foil paper and added a block of it behind the Whisper White hearts. The greeting was cut from Basic Black cardstock with one of the Sunshine Wishes dies to serve as an accent and make the greeting stand out. I have shown the products I used below. Click on the images to find them in my online store if you need any of them to create this card yourself. Remember that if you use my February host code when ordering, I’ll send you a small gift for ordering.
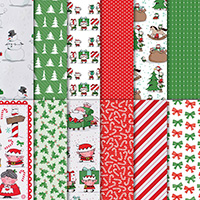
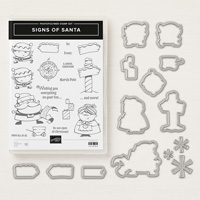
The Santa’s Workshop Specialty Designer Series Paper is so much fun to use in creating cards. Actually, all you have to do is mount a piece of the paper to your card front and add a greeting and your card is finished! The paper does all the work for you. This paper is special because it has flocked snowflakes on it. You can order it and the corresponding Signs of Santa Bundle from my online store by clicking on the images below.
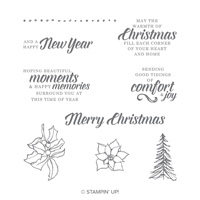
One of my favorite kits from the new Holiday catalog is the Timeless Tidings Project Kit (148028). This is a card kit with all the supplies you need except the stamp set, ink, and adhesives to make 20 gorgeous cards. Even envelopes with gold edges are included in the kit! You either have to order the Timeless Tidings stamp set (w-148939, c-148936) to complete the cards or come to my Timeless Tidings class scheduled for Saturday, October 13 at 10:30 am at my house. I’ll provide the ink, adhesive, and the stamp set. Contact me if you want to come. The fee of $35 includes your own kit and a light salad lunch and must be paid by October 1st so your kit will arrive in time.
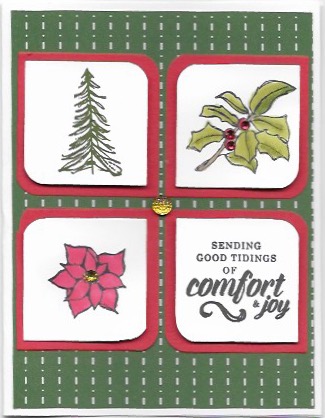
Should you order the stamp set as well as the kit, here is an alternative use for the set.
I have had a card on my stamping desk for at least two years that used this basic design meaning to copy it. Now is the time. I stamped four images from the Timeless Tidings stamp set on Whisper White cardstock with Memento ink, colored them with Stampin’ Blends, and cut them out with the #4 Layering Square framelit (counting the smallest as #1. Then I cut out four squares using the #5 framelit from Real Red cardstock. I used the corner rounder punch found on the Detailed Trio Punch (146320) on two opposite corners of all the pieces. I adhered the Real Red pieces to the cardfront with SNAIL adhesive and added the Whisper White layers with Stampin’ Dimensionals. The background layer on the cardfront is one of the patterns in the Santa’s Workshop Specialty Designer Series Paper (147809). I colored three small rhinestones with Dark Cherry Cobbler Stampin’ Blend and one with Dark Mango Melody Stampin’ Blend and adhered them to the images as shown. The center gem is a clear Faceted Gem (144142) which I colored with the Dark Mango Melody Stampin’ Blend. You could also use one of the gold Faceted Gems if you have them.
You will really enjoy this quick and beautiful combination of the Timeless Tidings Project Kit and the corresponding Timeless Tidings stamp set. Order yours today here.