Petal Card Sizzix die bookmark

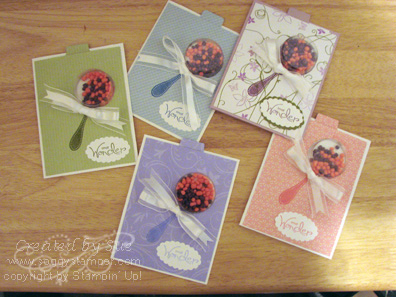
Looking for a quick and easy gift? Look no further than here. I needed a quick project for a workshop tomorrow night and remembered this little corner bookmark that my friend Margaret Raburn had posted on her blog. It uses the Petal Card Sizzix die and designer paper. I glued down two of the petals of the card to the back of the card. I then used a little mono adhesive to glue the remaining two petals together. I then stamped the image twice on Whisper White card stock with Melon Mambo Classic ink and punched them out with the scallop circle punch. I adhered one to the front of the bookmark and one to the back. This is such a quick and easy project! Thanks for visiting my blog today and do come back again. You can get the Designer Series Paper Pad  FREE with a $50 purchase during Sale-a-Bration. Visit my online store here to place your order. Blessings, Sue Erickson

                  front view                            back view                       

Corner Bookmark front Corner Bookmark back 
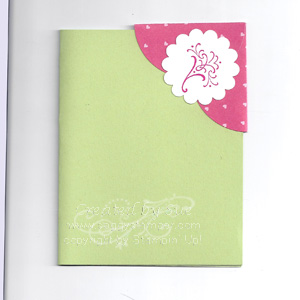
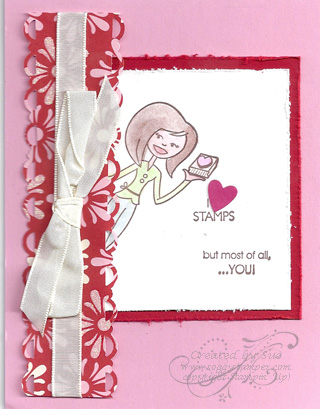
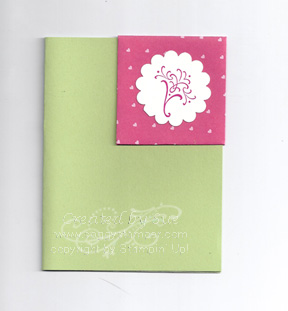
Stamp set: Wedding Sweet

Ink: Melon Mambo

Card stock: Whisper White

Other: Welcome Neighbor Designer Series Paper Pad

Scallop circle punch

Big Shot Scallop Square Purse

It is quite the rage now to make these purses using the Big Shot and the Scallop Square Clear die which you can purchase through my Stampin' Up! website. I choose springy colors for my bag. I wanted my bag to hang cross-body so I made the straps extra long. I am so delighted with the way this bag turned out!!! I sewed a couple of velcro strips on the inside to close my bag. I recommend that you use a shorter stitch length when you sew your bag to give additional strength to the seams. Big Shot scallop square purse The Big Shot can cut 8 layers of material at one time so cutting out the squares was quick. I wanted my bag to be deep enough to hold all my 'stuff' so I made the purse 3 x 3 squares per side. Altogether, I cut a total of 27 squares from 5 different patterns and colors of material. I wanted the bag to have body so I used two pieces of batting for each square. The straps are about  54" long. I had originally not planned to cut between the scallops on the selvages, but my quilting friends who have made rag quilts urged me to do so. I am glad I did. Thanks for visiting my blog. Please leave a comment so I know you have been here and do come again!

Blessings,

Sue

Cell phone butterflies

Finally…after 2 days of trying to post, I am able to get the 'compose' screen to load properly on my blog. Here is the photo I promised of butterflies cut from bulk Decor Elements vinyl and applied to, not my computer, but my cell phone! I colored the vinyl with alcohol inks. When they were dry, I ran the vinyl through Stampin' Up!'s Beautiful Wings embosslit. I love the look and so far, the butterflies are still clinging to my phone inspite of my taking it in and out of my pocket numerous times. Thanks for visiting me on my blog today. Come again soon to see what new creation I have for you.

Blessings,

SueDecor Elements on cell phone

Product used: Stampin' Up! Decor Elements white bulk vinyl, Lettuce and Wild Plum Tim Holtz Alcohol Inks, Stampin' Up! Beautiful Wings embosslit. Sorry everything in this post is not Stampin' Up! I just couldn't find a Stampin' Up! ink that would color the vinyl properly.

Vinyl Sheet Experiment

I love the skins that people have on their computers and cell phones so I experimented with Stampin' Up!'s raw vinyl sheets. I purchased the white color hoping to be able to color it myself so I could have more colors than are currently available. Also, I wouldn't have to purchase such a large amount of any one color. I found that our dye inks won't dry on the vinyl…of course not…duh! So I will try again using Stazon ink or alcohol inks. I don't think even our craft ink would dry and heat embossing it would probably ruin the vinyl. I did find that the vinyl works beautifully with Stampin' Up!'s Beautiful Wings embosslit and, as a surprise, the release backing paper was blue on the release side. So here is a card that grew out of that discovery. When I perfect the coloring of the vinyl or decide to just go with the white, I'll post a picture of my computer covered with gorgeous butterflies. Thanks for visiting today.

Blessings,

Sue

Beautiful wings condolence

Stamp set: Wonderful Words II (retired)

Paper: Bashful Blue and Old Olive card stock, Shades of Spring designer series paper

Ink: Old Olive

Other: Elegant Bouquet embossing folder, Beautiful Wings embosslit, White organdy ribbon

Baby card times 5

We had a baby shower today after church for 5 babies born to members of our church family all since November. So….what do you do for cards for 5 at one time? You make them all the same but different. I used the Something Sweet stamp set from the new Occasions mini catalog and Stampin' Up!'s round treat cups. I used a variety of ink colors and designer papers to make them the same but individualized. I used strawberry and grape Nerds candy to fill the rattles. Thanks for visiting my blog today and for looking at my cards. You can order the supplies for these cards and get the Whimisical Words stamp set I used for FREE during Sale-a-Bration! Visit my online store to make your purchase.

Baby Rattle treat cups

Stamp Sets: Something Sweet,  Whimsical Words

Inks: assorted

Paper: Whisper White, Old Olive, Almost Amethyst card stock, various designer series papers

Other: White organdy ribbon, treat cups, 1 3/4" circle punch, round tab punch, crystal effects, sticky tape

Tess gets romantic

As Valentine's Day nears, Tess decided to do a little bubble…er….heart dance for her honey! Yep, she is ready for a romantic evening complete with cheese, grapes, and wine! Thanks for visiting my blog.

Blessings,

Sue

Romantic Tess

Stamp Sets: Tote-ally Tess, Voila, I {Heart} Hearts

Ink: Basic Brown, Basic Black, Rose Red

Paper: Soft Suede, Rose Red, and Whisper White card stock, Sending Love Specialty paper

Other: Watercolor Wonder crayons, aqua painter, large oval punch, scallop oval punch, Heart To Heart punch, white grosgrain ribbon

Greeting was created with My Digital Studio

Double Embossed Metal Technique

My card for this weekend's Stamping 411 sketch uses the Double Embossed Metal technique. The tutorial is in the Feb 2010 issue of the Technique Junkie Newsletter. This newsletter is a great source of a myriad of wonderful techniques many of which can be adapted to using Stampin' Up products. For this card I used Stampin' Up!'s Perfect Details texture plate and Elegant Bouquet embossing folder to double emboss the Seafoam green metal which I bought so long ago I don't remember where. I topped the embossed metal with butterflies cut and embossed with Stampin' Up!'s Beautlful Wings Embosslit. The silver oval is from the retired silver Hodgepodge Hardware kit. I used Crystal Effects to glue the butterflies onto the embossed metal. Thanks for visiting my blog. Do come back to visit again. Blessings, Sue

Stamping 411 sketch

Ssc137 2-6-10

My version

Double Embossed Metal Butterflies

Stamp set: Short and Sweet

Paper: Close to Cocoa, Whisper White, Melon Mambo card stock

Ink: Chocolate Chip

Other: Perfect Details texture plate, Elegant Bouquet embossing folder, Beautiful Wings Embosslit, Hodgepodge Hardware, White taffeta ribbon 

Embellishments make all the difference!

Yesterday I shared a card using the stamp set Tote-ally Tess and the Beautiful Wings Embosslit that cuts and embosses 5 different butterflies at one time. Something wasn't quite right about the card but I was trying to follow a specific sketch. Tonight I modified the card slightly for a swap I am in by moving the butterflies and adding a bow where the two little butterflies had been. I am really happy with the new version.

Yesterday's card        

Butterfly Kisses from Tess   

Today's Card:

Tess's Butterfly Kisses

Stamp Sets: Tote-ally Tess, Whimsical Words

Paper: Orchid Opulence, Chocolate Chip, Whisper White and So Saffron card stock, Shades of Spring Designer Series paper

Inks: Basic Brown and Chocolate Chip

Other: Beautiful Wings Embosslit, Scallop Trim border and corner punches, Watercolor Wonder crayons, Aqua Painter, Gold Shimmer paint added to rubbing alcohol in a spray bottle, Certainly Celery grosgrain ribbon

Thanks for visiting my blog. I love to receive comments and hope you will visit again.

Blessings,

Sue

Tess Sends Love and Butterfly Kisses

I'm still loving this stamp set Tote-ally Tess! This time Tess is sending you love hearts and butterfly kisses. The Stamping 411 sketch this weekend is this:

Ssc136-1-30-10

The first card I have made for this challenge also meets the challenge on Utah Divas International to featur Stampin' Up!'s new set I {Heart} Hearts and the second card is for a swap I joined featuring some of my favorite new toys from the Occasions Mini Catalog. I hope you enjoy the cards and thanks for visiting! Blessings, Sue

I {Heart} Hearts and Tess

Stamp Sets: I {Heart} Hearts, Tote-ally Tess, Teeny Tiny Wixhes

Card Stock: Pretty in Pink, Rose Red, Whisper White

Inks: Basic Brown, Rose Red, Versamark, Creamy Caramel marker

Other: Small heart punch, Word Window punch, Organza Ribbon, Watercolor Wonder Crayons, Spritzer tool , Aqua Painter

Butterfly Kisses from Tess

Stamps: Whimsical Words, Tote-ally Tess

Paper: Orchid Opulence, Chocolate Chip, So Saffron and Whisper White card stock, Shades of Spring Designer Series paper

Ink: Basic Brown, Chocolate Chip

Other: Scallop Trim punch, Scallop Corner punch, Beautiful Wings Embosslit, Gold Shimmer paint mixed with alcohol in a spray bottle (though the shimmer doesn't show up on the scan), Watercolor Wonder Crayons, Aqua Painter

Tote-ally Tess, Totally Cute

I love this new set from Stampin' Up! Tess is so cute! I hope this get-well card will cheer up a friend who has cancer.

 Did you know you can order this set either in the traditional wood mount or in Stampin' Up!'s new clear mount stamp set? You get the same deeply etched rubber and cushion we are accustomed to from Stampin' Up! either way. The difference is that the clear mount stamps are repositional and are stored in cases similar to DVD cases. You mount them on clear acrylic blocks that are the exact same shape and thickness as our familiar wood blocks. An advantage is that you can see through the clear block for better placement and the index is printed on static cling so you can mount it directly on the cushion and still get your stamp to stick to the acrylic block. You just have to be a little gentler when scrubbing your stamp because you can scrub the stamp right off the block. Think of the more stamps you can store on the same amount of shelf space!!!

You can order a set of clear acrylic blocks and the supplies needed to make this card from my online store or by emailing me.  Tote-ally Tess Get Well

Stamp sets: Tote-ally Tess, Curvy Verses

Card Stock: Old Olive, Barely Banana, Whisper White

Ink: Basic Brown

Other: Shades of Spring Designer Series Paper, Watercolor Wonder Crayons, Aqua painter, Scallop Trim punch, Old Olive Grosgrain ribbon

Thanks for visiting my blog! Do come visit again.

Blessings,

Sue 

Stamping 411 Saturday Sketch Challenge

I love playing along with the Stamping 411 operators and their Saturday Sketch Challenges. This weekend's sketch is this:Ssc135[1]

Tote-ally Tess 2 

Here is my version:

Stamp Sets: Tote-ally Tess, Things I Love

Card Stock: Pretty in Pink, Whisper White, Real Red

Ink: Basic Brown

Other: Watercolor Wonder Crayons, Aqua Painter, Sending Love Specialty Paper, Small Heart Punch, Scallop Trim Border Punch, White Taffeta ribbon, Distressing tool

Thanks for visiting my blog. Do come back again!

Blessings,

Sue

Stamping 411 challenge #2

Yesterday I shared with you my version of this week's Stamping 411 challenge that I created with the My Digital Studio. Today I finished a stamped card for this challenge. I tried mixing gold Shimmer paint with alcohol to spray on the pink butterflies but the scan doesn't show the shimmer very well. Thanks for visiting my site and come back soon!

411 challenge #2 1-4-10 Stamp set: Teeny Tiny Wishes

Card stock: Pretty in Pink, Certainly Celery

Ink: Old Olive

Other: Shades of Spring Designer Series Paper, Sweet Pea Stitched Felt, Gold Shimmer paint, rubbing alcohol, Stampin' Up! Beautiful Wings Embosslits die

My Digital Studio card for Stamping 411

I accepted the challenge this weekend on Stamping 411 to make a card according to the following sketch.  

Ssc132  411 Challenge 1-1-10-001 copy 

This is the card I created using My Digital Studio. This program is great because you have the use of a great variety of stamp sets that you may not have in your stamp room. I do have Cheep Talk but I don't have Greatest Moments nor do I have dotted Certainly Celery designer paper. For $79.95, you can't beat the value! Order your My Digital Studio by going to my online store. You can even choose to only buy the files you want to use if you already have a favorite image processing program.

Stamps: Cheep Talk, Greatest Moments

Colors: Bashful Blue and Always Artichoke

Other: Whisper white grograin ribbon, Certainly Celery dotted designer paper

Happy 2010!

Welcome to the new year! I created this card for you using the My Digital Studio program Stampin' Up! sells. With this program you have access to many of the same images, embellishments, punches, and papers Stampin' Up! carries in the big Idea Book and Catalog at a fraction of the cost. Once you have created your project you have the option of either printing it out yourself, sending it electronically to the Stampin' Up! partnered professional printer, or sharing it on the web as I am doing with you. Click here to access my online store to order your own copy of My Digital Studio. You can even just order individual files to download if you already have a favorite image processing program. Here is the card

New Year 2010-001  

Finally, a Christmas card for you all!

I have been working on a variety of Christmas cards in my mind but have had to wait until I finished jammies for my grandkids…all 10 of them…..to put stamp to ink and then to paper. Maybe I am just extending the season…LOL! Anyway, here is my card. I hope you like it.Scenic Season Christmas 2009

When I mounted my stamp, I separated the greeting from the rest of the stamp. Now that Stampin' Up! is going to sell clear mount stamps, I added static cling to the back of the greeting and am using it with an acrylic block. I inked up the main image with Always Artichoke, then wiped the ink off the bird and colored it with my Real Red marker. I added red Stickles glue on the bird and Stardust Stickles on the snowdrifts. The background cardstock is Stampin' Up!'s shimmery paper.

Have a very Merry Christmas!

Blessings,

Sue

Stamp set: Scenic Season

Inks: Real Red, Always Artichoke

Cardstock: Shimmery white

Other: Stickles glue, Real Red dotted 5/8" grosgrain ribbon