Category Archives: Techniques

Happy Mistake – Festive Flurry

Sometimes a mistake can turn out to be even better than what a stamper had planned. In this case, it is not better than the original plan but definitely a good discovery. I was working on my Christmas cards. One step in the process was to stamp the Festive Flurry images on the Silver Foil sheets and emboss with Heat & Stick Powder, then sprinkle silver glitter over the images. All was going well until I took a break for the day. The next time I worked on them I grabbed the little jar that was at hand and sprinkled the powder over the images. I was mystified for a moment or two that the glitter wasn’t sparkling like usual. Hmmm….THEN I looked at the jar! I had picked up the silver embossing powder instead of the glitter. Oops! I decided to go ahead and heat emboss the images and was pleased with the end result.

Festive Flurry Christmas card
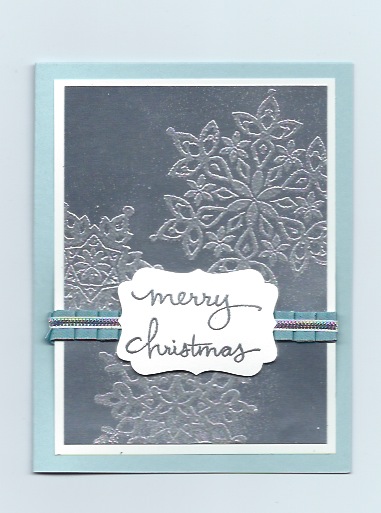
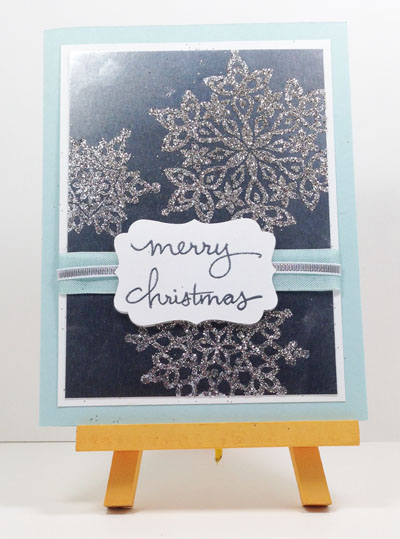
What do you think? Don’t the snowflakes look like they have been crocheted with silver thread? The lumpiness of the Heat & Stick Powder created a different texture to the heated silver embossing powder. Fortunately, I only had done 6 of these before I discovered my mistake. Here is the original card. Oh yeah…I also forgot to check if I had enough of the Pool Party Seam Binding ribbon and ran out of it. Fortunately, the retired Baja Breeze pleated ribbon I had left over works well too.

Festive Flurry Christmas card

Supplies:

Stamp Sets – Festive Flurry (131788-wood, 131781-clear), Endless Wishes (133455 – sold out)

Ink – Versamark (102283)

Pper – Soft Sky (131203) and Whisper White (100730) card stock, Silver Foil Sheets (132178)

Other – Decorative Label Punch (120907), Heat & Stick Powder (100625), Silver Glitter (132205), Silver Stampin’ Emboss Powder (109131), Embossing Buddy (103083), Heat Tool (129053), Soft Sky 1/2″ Seam Binding (131210)


Different Watercoloring Technique

This card uses a new-to-me watercoloring technique. I love the way the ink flows on the paper. Choose a line image where the lines are solid. Stamp this image using versamark ink on Stampin' Up! shimmery white card stock and heat emboss using clear or black embossing powder. Choose a couple coordinating colors of refill ink and put a couple drops each on a nonporous surface making sure not to mix the colors. Generously spritz the image with water. Pick up some of one color of ink with an aqua painter and gently touch one area of the image. The ink will flow across the area. Repeat using the colors as desired. Allow the image to dry and use as a focal point for your card or an accent on a scrapbook page. Below is a card I made using the Embrace Life stamp set. Email me or visit my online Stampin' Up! store to purchase the supplies to make this card. Thanks for visiting. Come back again soon.

Watercolor onshimmer paper card Stamp Set: Embrace Life

Cardstock: Sage Shadow, Pirouette Pink, Shimmery White

Ink: Sage Shadow, Pretty in Pink, Regal Rose, Stazon Black, Versamark

Other: White tafetta ribbon, Scallop Circle punch, clear embossing powder

Comments about using PPA

In my post of the picture frame, I mentioned that I had used PPA (Perfect Paper Adhesive) to glue the designer paper to the frame but that the paper came unglued and wrinkled when I painted Varathane on the frame. Susan Pickering Rothamel, president of USArtquest and developer of PPA emailed me the following comments:

"If you use PPA as the 'decoupage' or 'collage' medium, then you do not need to use Varathane.  In fact, the PPA is a stronger and more water resistant, UV resistant medium, even producing less tack, then the Varathane itself.  If you want a shiny finish, use PPA gloss.  If you want a satin finish – mix PPA 1/2 matte and 1/2 gloss.  However, if you do want to use the Varathane anyway, understand that it will yellow over time.  PPA will not. Also, if you choose the Varathane, even a PVA/Elmers/Mod Podge, etc. glue will lift, if it isn't REALLY nailed down. 
 
PPA is used often under Varathane by wood artisans and experimental artists. It is necessary to make sure the paper is glued under every teensy area, and even on top.  The paper should be fully encapsulated in PPA.  Then you must wait for it to dry thoroughly before adding any type or urethane product. However, using the PPA as the finishing varnish needs no extra drying time.  Drying happens by 'curing' rather then evaporation.  Therefore, the longer you wait, the more successful the piece will be.  Easily a day or two in between coats." She further gave these directions for adhering paper to a wood frame or plaque: "You apply PPA to the frame, then continue to use the PPA'ed brush as you apply the paper, brushing even more adhesive over the top of the paper, smoothing it as you go.  For the absolute BEST success, spritz or dunk each piece of paper thoroughly in water before applying it to a frame (or any other surface.  This assures that every fiber is fully wetted, preventing unsightly buckling or bumps.  Make sure that every area though has adhesive under it, or you'll have bumps when the paper dries.  It is quite a simple process, and works everytime with the few tips I've mentioned." Susan graciously permitted me to post this information on my blog. I hope it will help someone else with their creative projects.