Category Archives: Uncategorized

Let It Snow

Let It Snow 
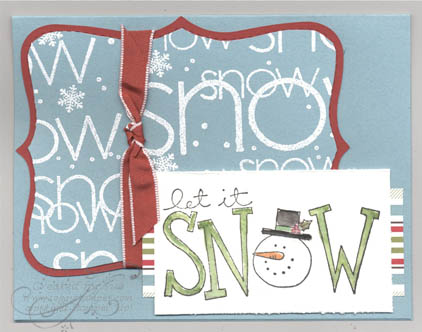
Today it was actually snowing here in SE Alaska! Of course, the snow didn't stay around for long. This card is appropriate for today. I wheeled the jumbo 'Snow' wheel repeatedly on Baja Breeze cardstock with Versamark ink. (To get a jumbo cartridge of Versamark ink, buy an uninked cartridge and ink it with Versamark refill ink.) Then I embossed the images with a mixture of Winter White and Iridescent Ice embossing powder. I cut this cardstock out using the Sizzix Bigz Top Note die and trimmed it along the perforations. I also cut the Top Note die out of Riding Hood Red cardstock and layered the two together. The recipe for this card is below. Order the materials for this card  online or email me.

Materials:
Stamp Set: Big on Christmas
                 Snow wheel
Card Stock: Baja Breeze
                  Riding Hood Red
                  Whisper White
Ink: Versamark, Craft Black
Other: Watercolor crayons
            Ski Slope Designer Paper
            Riding Hood Red Taffeta Ribbon
            Winter White embossing powder
            Iridescent Ice embossing powder

Snowflake Frame

Snoflake frame with Roscoe copy Have you used designer paper to cover an inexpensive picture frame? When you send your pictures at Christmas, consider framing them with beautiful seasonal frames. I bought some this summer at one of the craft stores for $1 each. I have finally used one of them to make this frame for a Stamping Sister. First I painted the frame with an acrylic paint. Then I traced the frame on a piece of the wonderful Ski Slope Designer Paper from Stampin' Up!, cut it out, and glued it to the front of the frame. I used Perfect Paper Adhesive as the glue. I won't be doing that again. When I sealed the frame with Varathane that cleans up with soap and water, the paper started to come unglued and wrinkle. I think I should have used decoupage medium or run the designer paper through my Xyron for the adhesive. I finished off the frame with iridescent snowflake embellishments and a picture of our cocker spaniel, Roscoe. Roscoe loves to roll in the snow and his fur quickly becomes full of little snowballs. They are visible on his ears if you look very closely. Click here or email me to order your package of Stampin' Up!'s Ski Slope Designer paper.

Life is Good when you use Decor Elements from Stampin’ Up!

I love this saying and jumped at the chance to buy it when Stampin' Up! first brought it out in their new Decor Elements Wall Decor line. However, my walls need painting and I didn't want to put up the design until after they were painted. Instead, I applied the decor to the front of a picture frame's glass. Then I put Autumn Vine Designer paper inside the frame. I can change out this paper with the seasons. This is just one of many ways you can use the Decor Elements. Check out this pageLife is Good picture frame for more ideas and the rest of the designs. Application of the Decor Elements is easy and they can be removed when you want to change them out.

Decorate for the Holidays with Country Living/Stampin’ Up! Kit

This convenient ornament kit comes to you from the joint efforts of Country Living and Stampin’ Up! Everything you need to create these country-inspired ornaments is included in the kit. Click hereCountry Living photo to order this wonderful kit. Supply is limited so don’t wait!

  • Holiday Collection stamp set (six stamps)
  • Four 12″ x 12″ sheets of die-cut chipboard
  • Eight 12″ x 12″ sheets of die-cut Designer Series paper (2 ea. of 4 double-sided designs
  • Four 12″ x 12″ sheets of Designer Series paper (2 ea. of 2 double-sided designs)
  • Two 12″ x 12″ sheets of Whisper White card stock
  • 25 yds. Silver Metallic cord
  • 10 yds. 3/8″ Whisper White taffeta ribbon
  • Pretties Kit brads (20)
  • Stampin’ Dimensionals
  • Dazzling Diamonds Stampin’ Glitter (1/2 oz.)
  • Tombow Multi Purpose Adhesive
  • Riding Hood Red Classic Stampin’ Spot
  • Old Olive Craft Stampin’ Spot
  • Uninked Stampin’ Spot
  • Whisper White Craft Ink refill

Tumbled Tile Trivit

    Have you tried stamping on tumbled tile flooring tiles? It is easy and they make wonderful gifts for Christmas, house-warmings, birthdays….you name it. I made this one using the Happy Blessings stamp set from Stampin' Up! I stamped the images with brown Staz-On ink which dries quickly and works on almost all surfaces. I thought it would be permanent but found that my blender pen was dissolving the stamped image. I stopped working on the tile and baked it in the oven at 150 degrees for 20 minutes. Then I let it cool and the brown Staz-On ink became permanent. Here is a picture of the trivit and directions follow.Happy_ Blessings_Trivit To order this stamp set and the craft inks, click here.
Supplies:
Stamp Set: Happy Blessings
Inks: Timber Brown Staz-On,
        Craft inks-Garden Green
            Pumpkin Pie
            Real Red
            Ruby Red   
            Creamy Caramel
            Summer Sun
            Chocolate Chip
            Really Rust
Other: Blender Pen
           Tumbled Tile 6"x6"
           Four half marbles (found in the floral
                arranging area of a craft store)

Directions:

1. Clean surface of tile well and let dry.
2. Stamp images with Timber Brown Staz-On ink.
3.  Bake tile in 150 degree oven for 20 minutes. Let cool.
4.  Using the blender pen, pick up ink from Craft pads to color in the images.
5.  Bake tile again in 150 degree oven for 20 minutes. Let cool.
6.  When cool, glue a half marble in each of the four corners on the bottom side. These little 'feet' lift the trivit up off the surface of the table or counter and make it easier to pick up the trivit. As an alternate idea, glue a hanger on the back of the trivit instead of the feet and hang it on the wall.

Fall Votive Card

Happy_Blessings_Votive_Card

I love the way this votive card turned out! The tutorial for making a card like this is the online bonus technique of the August/September Technique Junkies Newsletter. To order the supplies to make this card, click here.

Stamp Set: Happy Blessings
Cardstock: Pumpkin Pie, Shimmery White, vellum paper
Ink: Basic Brown
Other: Only Orange and Garden Green markers
           Watercolor crayons
           Aqua Painter

First post

This is my first post on my blog. I am developing this blog as a supplement to my Stampin’ Up! demonstrator business web site, www.creationsbysue.stampinup.net. Please bear with me as develop the blog and my blogging skills. I chose the title”The Soggy Stamper” because I live in SE Alaska where we get about 130 inches of mostly rain a year. We are living in a temperate rain forest. I can think of nothing more pleasurable than sitting in my stamp room creating cards and gifts while outside the wind is blowing the rain sideways. Thanks for looking and please come back to visit again.
Sue