** The only card you will not be able to print from home are the 6×6 unless you have a printer that can handle paper larger than 8 ½ x 11**
Printing Landscape Cards (5”x7” or 4 ¼”x5 ½”)
1. Designing your card:Design four pages – and put them in the following order:
Back, Front, Inside Top, Inside Bottom
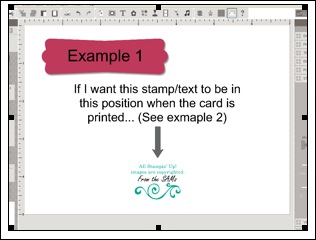
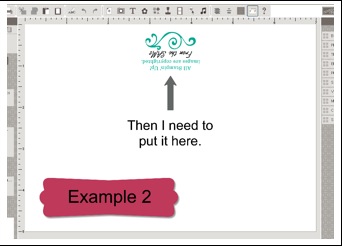
PLEASE NOTE: For the Back of your card – You’ll need to use the Flip and Mirror functions on ALL images on the back for them to print correctly. For a Text box you will need to rotate it 180˚ (Meaning when you look at them in MDS they will be upside down and backwards. The other thing to keep in mind is that what you want to print on the bottom needs to be on the top and vice versa – see pictures for example).

 2. Setting up your Print Options:
a. Select Print from Share Project.
b. Select only your Front & Back cover designs.
c. Click on Print Setup:
i. Choose a Portrait Orientation
ii. Type 0 in each of the margins. Your computer will automatically change them from 0 to the lowest setting your printer will allow – this is okay!
iii. Click OK
d. Click on Advanced:
i. Under Number of Images per Sheet change it to say 2.
ii. Click OK
3. Printing the Front & Back:
a. Select your Print Quality (there is no reason not to select 100%)
b. Click OK
c. Make sure the correct printer is selected and hit OK.
4. Setting up your Print Options again for the inside:
a. Select Print from Share Project.
b. Select only your Inside Top & Inside Bottom designs.
c. You don’t have to do the Print Setup again, as the margin changes will remain as you previously selected.
d. Click on Advanced:
i. Under Number of Images per Sheet change it to say 2.
ii. To align your card correctly with the Front & Back, enlarge the Vertical Space Between Images to 0.125” (if you click the Up button next to this option once it will choose that size for you)
iii. Click OK
5. Printing the Inside Left & Inside Right:
a. Figure out how to insert the paper you just printed on, back into your printer so it prints on the right side of the paper. There really is no way for us to tell you how to do this part, as every printer is different. The easiest way is to make a test card. Put some kind of image or wording on each page, and then just start experimenting. Once you’ve figured it out, insert your printed front & back cover and continue with the instructions.
b. Select your Print Quality (there is no reason not to select 100%)
c. Click OK
d. Make sure the correct printer is selected and hit OK.
6. Finishing your card
a. Trim the edges off your card
b. Fold as desired (There will be a white
c. Add any embellishments to create a Hybrid card
d. Give to a loved one!
Printing Portrait Cards (5”x7” or 4 ¼”x5 ½”)
1. Designing your card:Design four pages – and put them in the following order: Back, Front, Inside Left, Inside Right.
2. Setting up your Print Options:
a. Select Print from Share Project.
b. Select only your Front & Back cover designs.
c. Click on Print Setup
i. Choose a Landscape Orientation
ii. Type 0 in each of the margins. Your computer will automatically change them from 0 to the lowest setting your printer will allow – this is okay!
iii. Click OK
d. Click on Advanced:
i. Under Number of Images per Sheet change it to say 2.
ii. Click OK
3. Printing the Front & Back:
a. Select your Print Quality (there is no reason not to select 100%)
b. Click OK
c. Make sure the correct printer is selected and hit OK.
4. Setting up your Print Options again for the inside:
a. Select Print from Share Project.
b. Select only your Inside Left & Inside Right designs.
c. You don’t have to do the Print Setup again, as the margin changes will remain as you previously selected.
d. Click on Advanced:
i. Under Number of Images per Sheet change it to say 2.
ii. To align your card correctly with the Front & Back, enlarge the Horizontal Space Between Images to 0.125” (if you click the Up button next to this option once it will choose that size for you)
iii. Click OK
5. Printing the Inside Left & Inside Right:
a. Figure out how to insert the paper you just printed on, back into your printer so it prints on the right side of the paper. There really is no way for us to tell you how to do this part, as every printer is different. The easiest way is to make a test card. Put some kind of image or wording on each page, and then just start experimenting. Once you’ve figured it out, insert your printed front & back cover and continue with the instructions.
b. Select your Print Quality (there is no reason not to select 100%)
c. Click OK
d. Make sure the correct printer is selected and hit OK.
6. Finishing your card
a. Trim the edges off your card
b. Fold as desired
c. Add any embellishments to create a Hybrid card
d. Give to a loved one!
