Ornamental Pine Meets Northern Flurry


Handmade Christmas card using Ornamental Pine stamp set and Northern Flurry Tea Light Holder
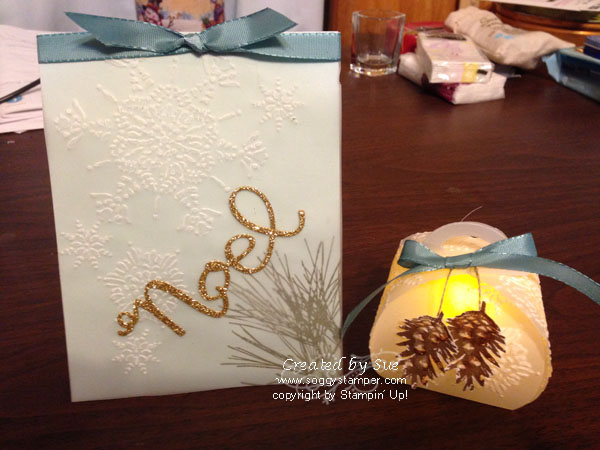
If you had come to my class last Tuesday, you would have learned how to make this beautiful vellum tea light holder and matching Christmas card.

We cut card stock vellum with the Curvy Keepsake Box Thinlits Dies (135853). Then we dry embossed the pieces with the Northern Flurry Textured Impressions Embossing Folder (120902) and the Big Shot. We curled the pieces slightly with bone folders.

Next we stamped the pine cone from the Ornamental Pine stamp set (wood – 135104, clear – 135107) twice on Whisper White card stock with Soft Suede Suede ink and cut them out. Dazzling Details (124117) was applied to the white areas of the pine cones and then they were cut out. A little Multipurpose Liquid Glue (110755) was used to attach them to a short piece of Linen Thread (104199) and attached to just one side of the overlapping flaps of the box.

A bow of Lost Lagoon 3/8″ Silky Taffeta Ribbon (135841) was attached on top with a glue dot. We placed a flameless tea light inside. I love the soft glow of the tea light through the vellum and the embossed area gives a lacy look to the box. See other Curvy Keepsake Boxes I have created here and here.

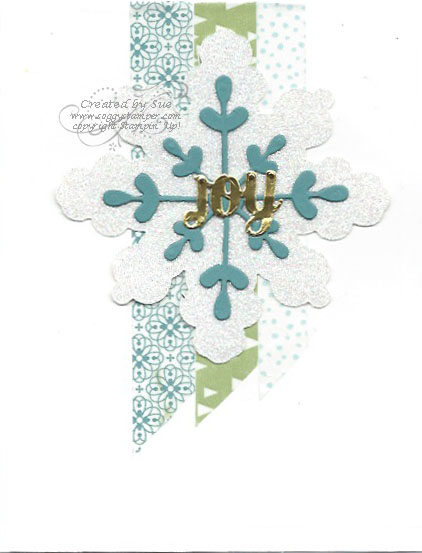
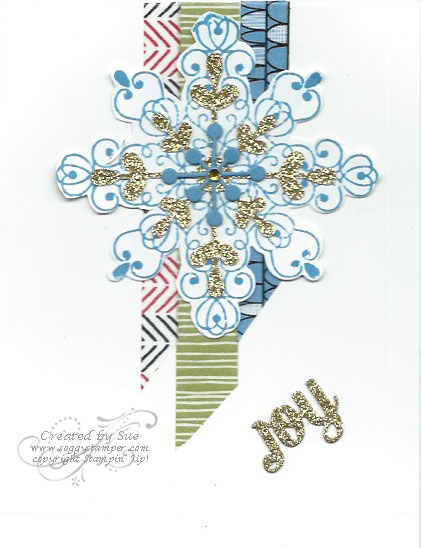
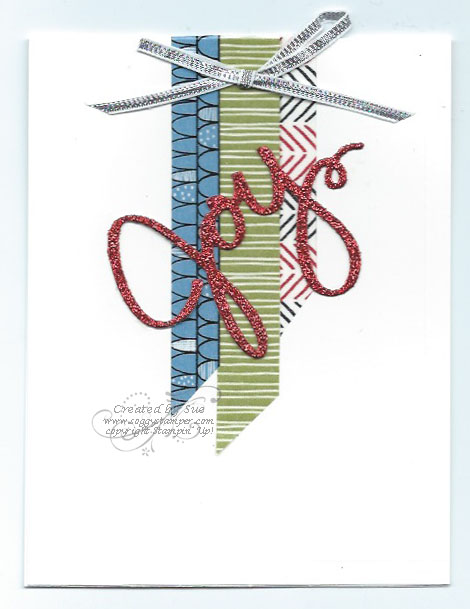
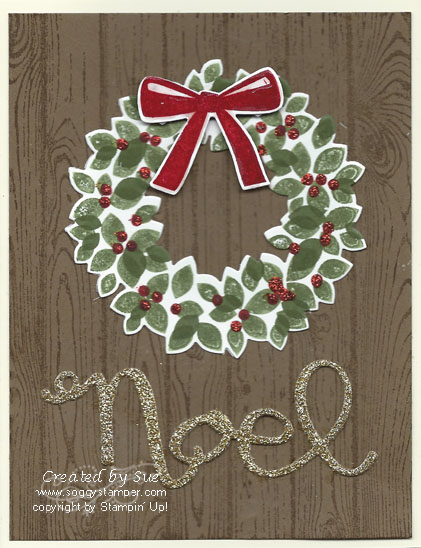
To go along with the tea light holder we created a Christmas card with a vellum overlay. The overlay was embossed with the Northern Flurry embossing folder and applied to the Soft Sky card base with SNAIL adhesive along the top edge. A length of the Lost Lagoon ribbon was tied around the card front to cover where the vellum was attached. The pine bough was stamped on the Soft Sky card base in the lower right corner. We used the Noel framelit from the Wondrous Wreath Framelits Dies (135851) to cut out the word from Gold Glimmer paper (133719) and glued it to the vellum layer with Multipurpose Liquid Glue.

Do you need the supplies for these projects or are you running out of some of your other supplies? Just click on the links above or on the pictures below to go to my online store to order them. I appreciate your business! :o)

Thanks Veterans!


Veteran's day photo Today our nation stops to remember, honor, and thank our veterans. Words can hardly be enough to repay their sacrifice of time, comfort, often horrible injuries, and often death to protect our freedom. There is more you can do. Here is an article listing ways you can get involved in supporting the members of our military in a variety of ways. http://www.military.com/spouse/military-life/military-resources/how-to-support-our-troops.html

If you are like me, you probably have a stash of cards you have made but never mailed out. What better way to use them than to send them to our troops overseas and in hospitals to encourage them while they are on active duty.

One group I particularly like is From Our Hearts, http://www.fromourhearts.info/. This wonderful group of stampers recognizes the need for military personnel oversea to have access to greeting cards to send back home to their family and friends. There are no Hallmark stores or any of the big box stores that also carry greeting cards. Typically these cards are sent to the chaplain who puts them out in the chapel for anyone to take for free. Sometimes a box of hundreds of cards is gone within two hours so you know the demand is high. Box up those cards and even make a bunch just for this purpose and send them to From Our Hearts. All the information you need is on their website.

Other groups of stampers who send cards that you might consider are:

Now go gather up your stash of cards and share them with those who are sacrificing for our freedom!


MDS Monday – Downtown Grunge

digital scrapbook page using photo frames from the Downtown Grunge Photobook Templates downloadWelcome to MDS Monday. As the November guest designer on the MDS Monday blog, I bring you this great birthday scrapbook page. The sketch is by Beth and I particularly love the frames around her photo places.

sketch for digital scrapbook page for MDS Monday challenge 90So I went on a search and found them in one of my favorite downloads, Downtown Grunge Photobook Templates (126056). I have used the wrinkled pattern of its designer series papers frequently for a distressed background on cards and scrapbook pages but had never paid any attention to the frames that come with the download. I really like the way the corners of the frames make the photos look a little distressed.

The greeting is from the Little Milestones Birthdays Greeting Card Template Set (129890). It originally said ‘Have a Monstrous 3rd Birthday.’ Thanks to the stamp cropping tool, I was able to crop off the ‘Have a Monstrous’ part.

Of course, I had to add an overlay to create interest in the background without distracting from the rest of the page so I added the swirl stripe pattern of the Decorative Overlays stamp set (129880) and changed the color to Pink Pirouette .

Now it’s your turn. Create a scrapbook page or card from this template and then go to the MDS Monday blog to link back to your blog. Click here. While you are there, check out the other samples.

MDS Monday Challenge 89

Digital Scrapbook Page for MDS Monday Challenge 89I am so honored to be a guest designer on the MDS Monday blog design team for November! This is my first post in that capacity.

I love these pictures of our great-granddaughters. I used the Daffodil Delight Pom-pom trim as it resembles the dandelions the one child is holding. I also colored the splatters with Daffodil Delight for the same reason.

Here is the sketch:

Sketch for the MDSM89 digital scrapbook challengeI challenge you to create a card or scrapbook page based on this sketch. These are the specifics of the challenge:

Challenge Guidelines:
Please create a new MDS project for the current challenge.
Provide a link back to MDS Monday or use the Challenge Graphic above within your post.
Link directly to your Post for this challenge, not your entire blog. (So we can find your project)
You can create a Card, Scrap Page or 3-D Object with the Sketch.

Then go post it on the MDS Monday blog here. You will also be able to see what the other design team members have done with the sketch.


Tag You’re Tagged!

handmade Christmas TagsDid you know that handmade Christmas tags are quick and easy to make? I have made Christmas cards galore but have not stopped to make tags until this weekend. I whipped these out in less the 30 min. These would make a great hostess gift when you go to holiday parties because people are always doing last minute gift wrapping. They would welcome some cute or elegant gift tags.

I used the For the Birds stamp set (wood – 132001, clear – 126407) for the first tag. This little bird ice-skating makes me smile. I stamped the image with Tuxedo Black Memento Ink (132708) and colored it in with various Blendabilities. I cut it out with one of the Apothecary Accents Framelits (127003). The end of the tag is punched with the Tag Topper Scalloped Punch (133324). Notice the Cherry Cobbler rhinestones on the tag? The regular self-adhesive rhinestones were colored with the darkest shade of Cherry Cobbler Blendabilities.

The second tag also uses a Cherry Cobbler cardstock base. If you cut a strip just slightly narrower than 2″, it will fit perfectly in the Tag Topper Scalloped Punch. You can make the tag any length you want. I cut another strip just under 2″ wide from a Gold Foil Sheet (132622), punched it with the tag topper then punched the bottom with the Confetti Star Punch (135861). Next I put it into the Lucky Stars embossing folder (135817) so the punched end was outside the folder and ran it through the Big Shot. I trimmed the Gold Foil layer so it was shorter than the Cherry Cobbler and adhered the two together with SNAIL adhesive. I stamped Peace & Joy from the Good Greetings October hostess special set on Whisper White cardstock, cut it out with a Bitty Banners Framelits die (129267), curled the ends and mounted it with glue dots.

Order any of the supplies I used for these tags by clicking on the links above or on the images below. Now I’m off to make more tags!


Happy Halloween!

Halloween trict or treats with Curvy Keepsake Box Thinlits dieHappy Halloween everyone! Our great-granddaughters are coming to trick or treat at our house tonight so I made up these treat holders with their treats inside. The Curvy Keepsake Box Thinlits Dies (135853) is what I used to cut out these jack-0-lanterns. I stamped the straight stamp from the Work of Art stamp set (wood – 134111, clear – 134114) with Tangelo Twist ink on Pumpkin Pie cardstock. I used my Basic Black marker for the faces. These little boxes are just big enough to fit a Snicker’s Fun Size bar, snack size Reese’s Peanut Butter Cup, and packet of Welches Fruit Snacks. You can order the supplies to make these darling little pumpkins by clicking on the images below.

MDS Monday – Digital Project Life

I am so excited and honored! I have been chosen to be the November guest designer on the MDS Monday blog. Be sure to come back next week to see my first design in my official position. This week though, I am playing along. Here is the sketch for this week.

Sketch for MDS Monday Challenge 88And here is my page.

Christmas Digital Scrapbook Page in a Project Life StyleI love these photos of our family at Christmas. Notice how the baby in the first photo is now a pre-teen in the third photo. The baby in the third photo is our older daughter’s baby.

Did you know that Stampin’ Up! and Becky Higgins have joined forces to create Project Life by Stampin’ Up!? Project Life by Stampin’ Up! combines the Project Life memory keeping system of pages with pockets to slip your photos in and preprinted cards by Stampin’ Up! in Stampin’ Up! colors and designs to also slip in the  pockets. This sketch is similar to Project Life layouts. While I used that layout, I created my own cards to use where I didn’t place photos. I added some fun embellishments like the star punches filled with Gold Glimmer paper and the strings of gold sequins. You can see the details of and order the downloads I used by clicking on the images below.

Washi Wednesday – Washi Christmas Cards

Handmade Christmas card using All Is Calm Designer Washi Tape and Snowflake Card Thinlits DiesYep…here is another Washi Wednesday with three more cards using washi tape. This first one uses the All Is Calm Designer Washi Tape (135844) to create a series of banners behind the snowflake. I had cut out the Dazzling Diamonds Glimmer paper (135315) with the Snowflake Card Thinlits die and found it lying on my stamping table. I cut the blue snowflake from Lost Lagoon cardstock and the Joy from a Gold Foil Sheet (132622) using other dies from the Snowflake Card Thinlits Dies (135855).

In this post, I described how I cut out the large snowflake from glimmer paper. Since then I actually took the time to watch Stampin’ Up’s video on how to use the die and learned a much easier way to cut out the snowflake:

  1. Place a 3 3/4″ square of cardstock/glimmer paper under the snowflake part of the card base die and run it through the Big Shot.
  2. Remove the cardstock , turn it 90 degrees, and replace it under the die lining up the cut parts with the corresponding parts of the snowflake.
  3. Run it through the Big Shot again. Voila! You now have a perfectly cut snowflake. This is also the way to cut out the large snowflake from the Letterpress Winter stamp set (photopolymer 135145). However, lining up the die to the stamped image is very difficult. I found it much easier to first cut the snowflake shape out and then stamp the image on it. The photopolymer stamp make placement of the image on the die cut much, much easier.

Handmade Christmas card using the Santa and Company Designer Washi tape and Letterpress Winter stamp set Handmade Christmas card using the Santa & Co Designer Washi Tape and Wondrous Wreat Thinlit DiesThese are two more versions of this washi tape Christmas card. The top card shows the result of following the directions above using the large snowflake die from the Letterpress Winter stamp set (135143). I used the Santa and Co. Designer Washi Tape (135843) on this card and the next one. The Joy and the larger snowflake were cut from Gold Glimmer paper (133719) using one of the dies from the Snowflake Card Thinlits Dies as was the Marina Mist smallest snowflake. I love how the various stamp sets and dies work so well together!

The third card is a little less detailed. I used the Santa and Co. Designer Washi tape and added the word ‘joy’ cut from Red Glimmer paper (121790). I added a bow from Silver 1/8″ Ribbon (132137). I don’t know which one I like best. How about you? Leave your choice in a comment below. To order the supplies to make these cards, click on the images below.

MDS Monday – Be Yourself Designer Series Paper

Digital Scrapbook Page using the Be Yourself Designer Series Paper and meeting MDSM87 challengeI absolutely love the colors in the Be Yourself designer series papers found in the Be Yourself May Digital Kit (133426)! I have used it often and have in this scrapbook page. This picture of our great-granddaughter jumping in the mud puddle in the alley behind her grandma’s house is so cute I just HAD to use it in a scrapbook page.

The MDS Monday Challenge 87 is to play with changing the size of the patterns of the designer series papers and to insert one photo over several photo boxes.  I often shrink a dsp pattern so more of the pattern shows in a punch but this time the pattern didn’t need to be shrunk because all I was going for was the splashes of color. To put a picture over several photo boxes, select the boxes you want by holding down the shift key and clicking on the boxes. Then group them. Finally drag your picture to the grouping and like magic, each box gets a piece of the photo!

Here is the challenge sketch:

MDSM87 Challenge SketchIf you don’t have this wonderful Be Yourself May Kit, you really need it! Click on the image below for more details about it and to order it.

Happy Bosses Day!

Happy-Boss-Day-11-334x480This is National Boss Day and I am happy to report that I am one too. Yes…I am my own boss and boy do I have struggles with myself! These are the top three reasons I love being my own boss as an owner of a paper crafting company:

  • I directly reap the rewards of the effort I put into my company. These rewards are not only monetary rewards but creative and relationships rewards.
  • I get to set my own schedule and work it around my family’s schedule.
  • This is one of the few jobs where you can have such fun and creative outlet while working!

For further information on how to be your own boss and enjoy these benefits of owning your own paper-crafting business as a member of my team of Stampin’ Up! demonstrators, give me a call or email me. You can also click on this link to get additional information: http://www.stampinup.net/esuite/home/creationsbysue/jointhefun.


Terrific Tuesday – Gold Glimmer Paper

Stampin’ Up! reconfigured the Gold Glimmer paper (133719) at the start of the 2014 – 2015 annual catalog. I was curious as to what the difference was between the old Gold Glimmer paper and the new one so I ordered a package of the new paper even though I still had a supply of the old. I discovered that the color has changed to a brighter gold color. The top Joy was cut from the new paper with the ‘joy’ die of the Wondrous Wreath thinlits (135851). I like both colors equally well. How about you? Leave a comment below.

photo of comparison between new and old Gold Glimmer paper using a die from the Wondrous Wreath Thinlits

This is Terrific Tuesday beccause each Tuesday we get terrific Weekly Deals. Check them out below and click on the links for more details and to order them.

MDS Monday – Herringbone Technique

Digital birthday card with a herringbone background using Be Yourself designer series papers

Welcome to MDS Monday. This week our challenge is to make a herringbone background using narrow rectangles. Here is the challenge sketch:

MDSM86 challenge sketch using a herringbone backgroundI filled rectangles with various patterns of designer series paper from Be Yourself May Digital Download and solid colors chosen by the color picker to match the designer series paper. The grosgrain ribbon started out as Regal Rose and I recolored it with Rich Razzleberry color. The starburst came with the Game Daby Photobook template.

The technique is shared in this video by Juanita Golson

T

To order the downloads I used, click on the links below.

Halloween Wondrous Wreath

Handmade Halloween card created with the Woundrous Wreath stamp set and diesHere is another great idea I had for the Wondrous Wreath bundle. I am having so much fun with this stamp set and corresponding dies. I love how Stampin’ Up! attached little handles to the wreath stamps and to their corresponding dies so we have a reference point for lining them up correctly. I used the little bats stamp and the greeting from the Holiday Home stamp set. I wish the bats were a little larger though. I guess the wreath is just full of baby bats….LOL!

If you missed the other cards I created with this Wondrous Wreath bundle check this post. Have I convinced you yet that you need this stamp set? Go order it and the supplies needed to make this card now by clicking on the images below.

MDS Monday – Reason to Preserve Memories

I came across this quote some time back and have wanted to do a piece of wall art to remind me of the necessity of scrapbooking. Since my parents are deceased, I have all the memorabilia from my side of the Julier family. If I don’t pass on to my children and grandchildren the memories I have, the names of the people in my stash of photos, the events the photos are taken of, and the feelings that were part of those events will die when I die.

I did the first created this lovely background for the quote using a piece of Summertime Splendor designer series paper and filled a punch with a piece of Be Yourself designer series paper.

Digital wall art using Summertime Splendor designer series paper and a quote about preserving memories

Then I got to thinking of all the vintage photos I have in my possession and thought maybe the background to the quote should be vintage-like pictures of faces that are a part of my life. So I created this as well.

Digital wall art in a vintage style

Now my quandary is which page should I send off to print. I really want only one on my stamping room wall but I like them both. So I need your help. Which one do you like best? Leave your answer in a comment below.

If you don’t have the MDS program or the digital downloads I used, click on the links below for more information and to place your order.

World Card Making Day – Wondrous Wreath

I told you yesterday to come back later in the day to see what I had created for World Card Making Day but there was no later post for you to see. That’s because I was having such fun creating cards that I ran out of time to post them. Here they are in all their glory.

I really, really am glad I bought this Wondrous Wreath bundle. It was one of the sets I thought I could do without until I saw all the great cards others were creating with the set. None of these ideas are original with me but…hey…in the stamping world CASEing (copy and sharing everything) is a great type of flattery! These cards show off how versatile this set is.

handmade Christmas card using the Wondrous Wreat stamp set Wondrous Wreath Thanksgiving Wondrous Wreath Noelhandmade Christmas card using the Wondrous Wreath stamp set with a garlandWhich of these cards is your favorite? Leave your answer in a comment below.

Did you create a card for World Card Making Day yesterday but didn’t get a chance to email me a photo? You can still do that through today. I will share your card on this blog and my husband will choose his favorite from the cards that are submitted. The winner will receive these cards I made for their prize. Email me your card!

To order any of the supplies I used for these cards, just click on the images below.