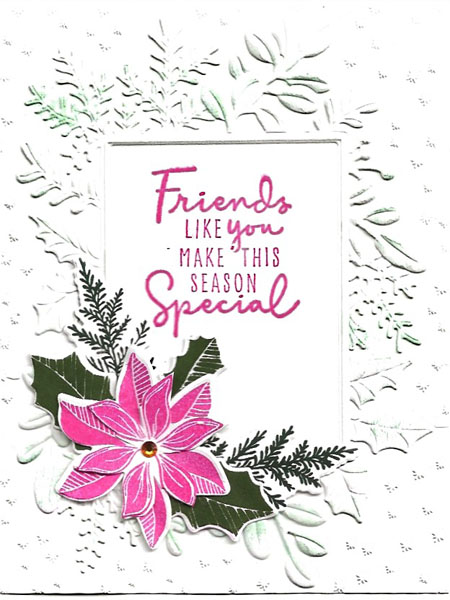
This Soft Pastel Merriest Moment
Card is not my usual type of Christmas card. I generally go for the traditional red/green or Night of Navy/Gold color combinations. But the current trend is to go with softer pastel colors and I love the results in this card.
What is so very special in this Merriest Moments bundle is that there is an embossing folder designed to emboss the cut image of the frame. I did not use the frame die on this card. I just used the embossing folder. To highlight the embossing a bit, I used a Blending Brush to apply Mint Macaron ink on the raised surfaces. The greeting is from the Christmas to Remember stamp set and it is so true!
Supplies Used for Soft Pastel Merriest Moments Card
- Basic White Cardstock 11″ x 4 1/4″ scored at 5 1/2″ and folded for card base, scraps
- Polished Pink, Mint Macaron, and Evening Evergreen ink pads
- Merriest Moments Bundle
- Blending Brush
- Holiday Rhinestone Basic Jewels
- Stampin’ Seal
- Multipurpose Liquid Glue
- Stampin’ Cut & Emboss Machine
Instructions
- Place the front of the card base into the embossing folder so that the raised design of the frame fits in the card front and run through the Stampin’ Cut & Emboss Machine. A bit of the embossed dots will be on the back of the card base at the fold.
- Use a Blending Brush of lightly brush Mint Macaron ink on the raised portions of the embossed image.
- Use Polished Pink ink to stamp greeting near the top of the frame .
- Stamp two evergreen branches, two large holly leaves and one small holly leaf on scrap Basic White cardstock with Evening Evergreen ink.
- Stamp the two layers of poinsettia petals on scrap Basic White cardstock with Polished Pink ink.
- Cut out all the pieces with the matching dies.
- Layer the pieces as shown using either Stampin’ Seal or Multipurpose Liquid Glue.
- Apply a yellow Holiday Rhinestone Basic Jewel in the center of the poinsettia.
- Stamp the inside and envelope as desired.
I hope you love this card as much as I do and give it a try. Order the supplies I used by clicking on this link https://s.tamp.in/rLGmd7 to see the shopping cart. You can remove any products you already have. When you order, use this host code A7EE4XH6 and receive a small thank you gift from me.
