Monthly Archives: September 2012

Wicked Cool Halloween Card

Bows-001
Supplies: MDS2+ (130646), MDS2 (130644), MDS2 upgrade (130650), or 30-day FREE trial of MDS2 (130910); Wicked Cool Stamp Brush Set from Wicked Fun Digital Kit (127609); Cast a Spell Designer Series Paper (118114)

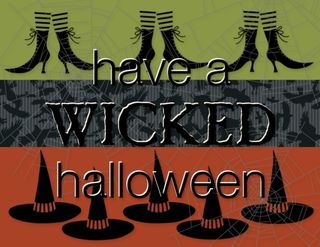
I've been busily creating cards and scrapbook pages for you in My Digital Craft Corner today. I ceated this card using the Wicked Cool stamp brush set for you who love, love, love Halloween. I got the white shadow effect on the greeting by adding the stamp twice to my project. One I left black and changed the color of the other to Whisper White. I then offset the two. This card sort of evolved from my original idea. I was going to put the witch's hat on the feet like a little kid was wearing a too big hat. I have still used the feet and the hat but in a much different way. The middle stripe on the card is a punch filled with one of the Cast a Spell Designer Series Papers. If you need any of the supplies I used to create this card, just click on the links or visit my online store.

Until next time…blessings,
Sue Erickson
sue@soggystamper.com

Time is Running Out!

B1_BacktoSpool_Sept0112_USCA

Tomorrow is the last day to take advantage of this Back to Spool promotion. What is it all about you ask? Well..for every $40 of product you purchase, you can choose a FREE spool of the 2012-2014 In Color 3/8" Stitched Satin Ribbon. That is a $8.95 value for FREE! If you would like to get all 5 colors, then order $200 worth of fun stamping stuff. Not only would you get 5 free rolls of ribbon but your order would also qualify for $30 of Hostess benefits to spend on anything in the big catalog or in the Holiday catalog. One thing though…you must place your online order through my demonstrator online store to get the hostess benefits. Just click here to start shopping.

Until next time…blessings,
Sue Erickson
sue@soggystamper.com

For the Birds #3

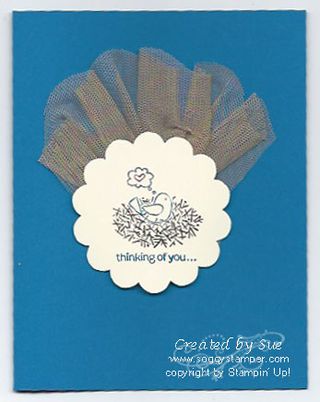
Nest cardToday's card features the bird in the nest from the For the Birds stamp set (c-126407, w-126405). I used the beautiful Pacific Point card stock for the base of my card. I colored the stamp with Pacific Point, Early Espresso, Basic Gray, and Real Red markers and stamped it on Whisper White card stock. Then I punched it out with the 2 3/8" Scallop Circle Punch (118874). I put about 3 strips of Snail on the back of the circle and pleated up about 6" length of the Crumb Cake 3 1/2" Scalloped Tulle Ribbon (127840), sticking it to the Snail as I went. Over the top of the tulle, I put two strips of Sticky Tape. I added several Stampin' Dimensionals on the back as well to give some room for the pleated tulle. Then I mounted the whole thing onto the card base.

One thing that is nice about this set is that the sentiment and the image are on the same stamp. This makes quick business of creating a card. It is particularly great for beginner stampers. To see the index showing all the stamps in this set click here.

Thanks for coming by to visit today. I have one more sample which I will share with you on Sunday. Be sure to come back then.

Until next time…blessings,
Sue Erickson
sue@soggystamper.com

Why Use Stampin’ Up!’s Professional Printer

Mdsnetbanner_print

Did you know that you can electronically send your MDS2 projects in to a professionals printer whose inks are adjusted to the very same RGB formulas as Stampin' Up!'s inks?

The process is fairly easy. Once you have all the elements exactly as you want them, you go to the Project pulldown menu and then click on 'order'. It will give you the options available to you. If you have created a card, then only the card option comes up. If it is a scrapbook page, you can choose between photobook and single page. With the single page option, you can order in increments of 1 but must have a minimum of 5 pages. Standard single pages are printed on glossy paper that is slightly lighter weight than Whisper White card stock so it can slip into page protectors easily. You can also choose heavy paper for single pages. This paper is a little heavier than Stampin' Up! card stock.

By sending your projects off to Stampin' Up!'s professional printer, you are guaranteed that the colors are true colors. This is a benefit because you can then add ribbons, additional punched elements, and embellishments to your printed project and they will matche what is on the page. Do you like 12 x 12" scrapbook pages but don't have a printer that can print that size paper? Then using the professional printer is your answer. Do you find that your printer can only handle Whisper White paper and sometimes not even that? Then using the professional printer is your answer. Have you taken your projects on a flash drive to one of the quick print places and the color was too greenish or too blue? Then using the professional printer is your answer. So you have created a card for someone and your printer is just not doing the job. For less than the cost of a cheap card in a Hallmark Store, you can get that card printed at Stampin' Up!'s professional printer.

I think you get the picture. For professional results, send in your projects to Stampin' Up!'s professional printer. It takes 2-3 days for the project to be printed and then Stampin' Up!'s normal shipping times. No you can't get instant printing like you can at home but the results are well worth the wait. So give it a try.

Until next time…blessings,
Sue
For the Birds #2

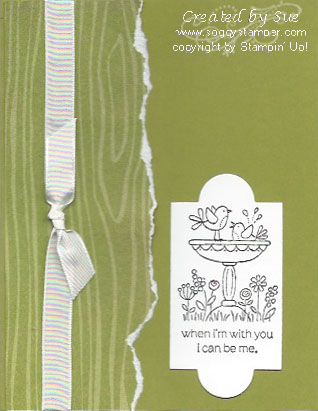
Bird BathThe next few days I am sharing cards I created with the For the Birds stamp set (c-126407, w-126405). This is such a versatile set and money well spent!

Today's card showcases the birdbath. I tore a piece of designer series paper from the Orchard Harvest Designer Series Paper (126895), tied a length of Very Vanilla 1/2" seam binding ribbon (120999), and adhered it to the base Lucky Limeade card stock. I stamped the image on Whisper White card stock with Basic Black ink and cut it out using one of the Apothecary Accents Framelits (127003).

This is a very quick card to make and is wonderful to send to a dear friend or a loved one.

Thanks for coming to visit today. I hope you will enjoy a cup of virtual coffee or tea with me as you browse my blog. If you like what you see, go to my Facebook page and click on the 'like' button.

Until next time…blessings,
Sue Erickson
sue@soggystamper.com

It’s Only a Week Away!

My free gift to you starts in just one week. Each Wednesday for the next 12 weeks, I will send you an email with an exclusive Christmas project during my 12 Weeks of Christmas campaign. However…in order to receive this gift, you must be on my News From My Digital Craft Corner newsletter mailing list by 1 p.m. local time next Wednesday. Subscribing is easy, just fill in the box to the right and be sure to respond to the email you will get from me confirming your subscription. If you are already a subscriber to my newsletter, great! Would you tell your friends about it and have them come subscribe too.

Until next time…blessings,
Sue Erickson
sue@soggystamper.com

It’s Only a Week Away!

My free gift to you starts in just one week. Each Wednesday for the next 12 weeks, I will send you an email with an exclusive Christmas project during my 12 Weeks of Christmas campaign. However…in order to receive this gift, you must be on my The Soggy Stamper Newsletter mailing list by 1 p.m. local time next Wednesday. Subscribing is easy, just fill in the box to the right and be sure to respond to the email you will get from me confirming your subscription. If you are already a subscriber to my newsletter, great! Would you tell your friends about it and have them come subscribe too.

Until next time…blessings,
Sue Erickson
sue@soggystamper.com

Merry Christmas For the Birds

Welcome to The Soggy Stamper on a very soggy evening here in SE Alaska. We are having one of our typical winter rain storms. The card I am sharing with you tonight is the first one I have made with the For the Birds stamp set (c-126407, w-126405). I used the Utah Divas International Saturday challenge for the sketch:

UDI sketch 9-22-12and here is my card:

Merry Christmas bird

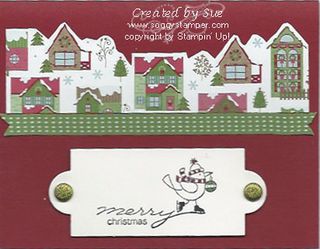
The houses are from one of the designs of the Snow Festival Designer Series Paper (126908). I trimmed along the top of a row of the houses and mounted it on a Cherry Cobbler card base. I used Jet Black Stazon ink (101406) to stamp the image on Watercolor paper (122959), then colored it in with Cherry Cobbler, Gumball Green, and Basic Black markers. I cut it out with one of the Apothecary Accents Framelits (127003) and inserted two Old Olive Brights Glimmer brads (121006). A strip of Gumball Green 2012-2014 In Color 3/8" Stitched Satin Ribbon (126848) finishes the card. To order the supplies I used to create this card, either click on the names of the items or visit my online store here. Remember that you can receive that roll of 3/8" Stitched Satin Ribbon for FREE when you order $40 product. This promotion ends Sept 30 so order right away.

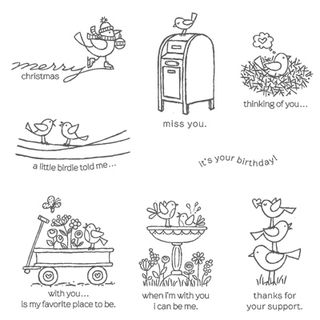
Here is a photo of all the stamps in this For the Birds stamp set. It is a great set as it has stamps for a variety of occasions. I'll be sharing several ideas using this set over the next few days.

For the Birds indexThanks for coming by to visit. Come back again soon.

Until next time…blessings,
Sue Erickson
sue@soggystamper.com

Terrific Tuesday – Designer Rosettes Birthday Card

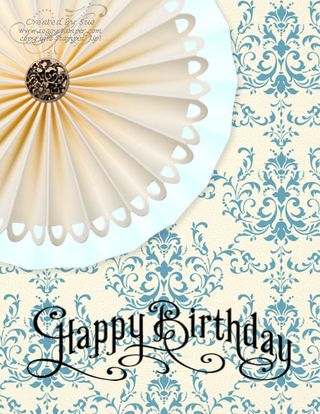
Terrific Tues 9-25-12-001 copySupplies: MDS2+ (130646), MDS2 (130644), MDS2 upgrade (130650), or 30-day FREE trial of MDS2 (130910); Designer Rosettes (131525); Antique Brads (122164); Perfectly Penned Stamp Brush Set (130167); Beau Chateau Designer Series Paper (124222)

Welcome to Terrific Tuesday here in My Digital Craft Corner. Stampin' Up! did well with the new downloads they have offered us today. Click here to see them and order the ones you know you will want. They are shown on the right-hand side of the page.

I haven't really been fond of rosettes as I have had a terrible time learning how to make them. Hot glue and I don't get along that well. However, I decided to order the Designer Rosettes digital download. While the color choices are limited, I suspected that the white one would be great for recoloring. I was right! I recolored it with Baja Breeze and was really excited with the resulting color. Then I added the Very Vanilla scalloped edge rosette. It almost looks like it is illuminated. Man…I love, love the combination of the two rosettes! I finished them off with a gold antique brad. The background is Beau Chateau Designer Series Paper pattern 4. The flourishy Perfectly Penned stamp set is the perfect one to use for the greeting.

Bootiful Occasions #4 – Elegant Snow Boot

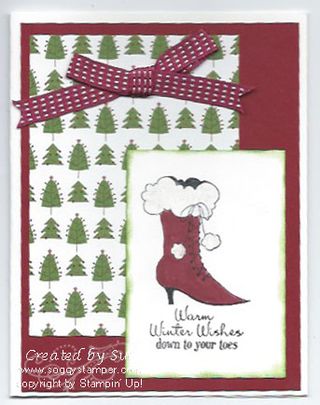
Snow boot cardThis is the last stamp in the Bootiful Occasions stamp set (c-126597, w-126395). I would love to be the lady who could wear this boot with style! Unfortunately, I would struggle to not wobble on the heels and my toes would be screaming out in pain…LOL!  A girl can dream, right?! This is a great card to send someone who doesn't celebrate Christmas or when you want to send 'condolences' to a friend who is struggling with too much snow. I stamped the image with Black Stazon Ink (101406) on Whisper White card stock. I then colored it with a Cherry Cobbler marker and painted Frost White Shimmer paint (116854) on the fluffy cuff and pompons. I added a small layer of Snow Festival Designer Series paper (129831) under the focal point. Now that you have seen the great cards you can quickly create with this Bootiful Occasions stamp set, place your order by clicking on the link above or visiting my demonstrator online store here. When you place an order onliine for this stamp set by Sunday night, I'll mail you a card created by this set as a thank you. Don't forget that for every $40 you spend in product, you get a FREE roll of the 2012-2013 In Colors 3/8" stitched satin ribbon.

Until next time…blessings,
Sue Erickson
sue@soggystamper.com

Playing with Photo Frames


Playing with Photo Frames-001Supplies: MDS2+ (130646), MDS2 (130644), MDS2 upgrade (130650), or 30-day FREE trial of MDS2 (130910); Vintage Overlay Stamp Brush Set (121061), Fabulous Phrases stamp brush set (124586)

Over on www.mydigitalstudio.net, Cindy Shuster posted a scrapbook page where she took the 10+ challenge theme and grouped the 10 frames to add one photo over all the frames. What a cool technique! For this page, I started with a photo only template. I wanted my granddaughter's face to be in one photo frame so I moved the pre-designed frames around, resized one and added two more so I had a center frame. Then I selected all the frames and grouped them. Finally I dragged her photo onto the group. I added a black background to simulate looking through a wrought iron window. I then added the Vintage Overlay – 1 with the color changed to Very Vanilla to simulate frost on the window. I used the color picker to get the color of the title. That is all the embelishment I added as I don't want to take away from the beautiful girl's picture. This was on her 17th birthday. I challenge you to use this feature of MDS2 to add a photo to your page, then share your page with me by email. I'll post it here with you as a guest artist.

Here are the directions again:

  1. Place as many photo frames on your page as desired. Position and size them to their final position, then select all of them and group them.
  2. Find your photo and drag it onto the grouped photo frames. Like magic, the photo will fill the frames.

Yes, it is that easy! Unfortunately you can't resize the photo so if you find you need to resize anything, you will need to ungroup the photo frames.

Until tomorrow…blessings,
Sue
sue@soggystamper.com

Bootiful Occasions #3 – Halloween Boot

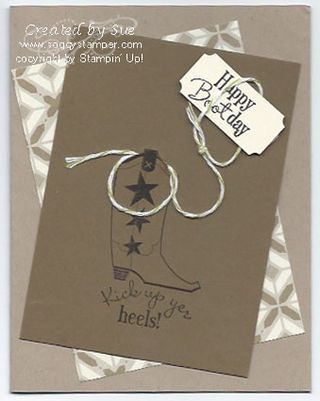
  Cowboy boot cardOn this post, I shared the index for this Bootiful Occasions stamp set (c-126597, w-126395) and have been sharing cards created with each of the stamps in the set. This one is the Cowboy boot. I love the saying "Kick Up Yer Heels"! It works perfectly for a birthday card like this one but I can see it as a Get Well card with a computer generated greeting that says something like "Hope it won't be long until you can…" and then the "Kick Up Yer Heels." I used Crumb Cake for the base of this card and layered a pattern from Comfort Cafe Designer Series Paper (126898). The image is stamped on Soft Suede card stock with Early Espresso ink. I cut along the top of the boot to hang a loop of Early Espresso Baker's Twine (123124). The other end is tied around the greeting that has been stamped on Very Vanilla card stock and punched out with the Ticket Duo Builder Punch (126883). I got the punch so I could finish the Make & Takes from convention but am finding it the perfect size to punch out some of our greetings. I'm so glad it can be used for more than tickets.

Thanks for coming to visit today. If you want to get the supplies to make this card, just click on the links or visit my demonstrator online store. Tomorrow I will have the fourth card of this series so be sure to come back to see it.

Until next time…blessings,
Sue
sue@soggystamper.com

Using Photo Only Templates in MDS2

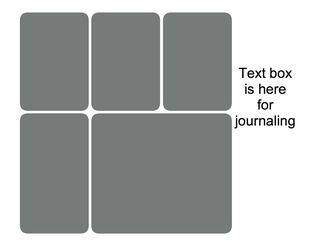
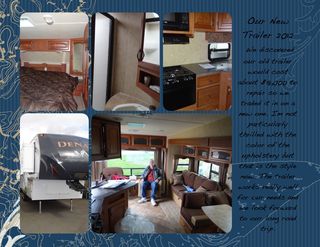
Welcome to My Digital Craft Corner tonight. I want to share with you a part of the MDS2 program I rarely use. That is the Photo Only Templates. For a beginner scrapbooker, this is a great option. All you have to do is drag in your photos into the photo boxes and add your text. In the sample I created, I added a designer series paper background. This is the template:
Photo only rounded corners-001
Here is the scrapbook page after I added my photos and journaling:

Our New Trailer-001
Supplies: MDS2+ (130646), MDS2 (130644), MDS2 upgrade (130650), or 30-day FREE trial of MDS2 (130910); Travel Journal Designer Kit (121071) Designer series paper pattern 9

When you have a number of photos to fit on one page, this is a great way to go.This is just one template out a whole series of templates that can be combined into a quick photobook.

Thanks for coming to visit. If you like my blog and the information you get here, you will love my News from My Digital Craft Corner. Each month I send out this newsletter to my subscribers with a variety of projects and tips. Subscribe by filling in the box on the right. I'll be starting a 12 Weeks of Christmas mailing on Wednesdays to my subscribers so subscribe now.

Until next time…blessings,
Sue
sue@soggystamper.com

Bootiful Occasions #2

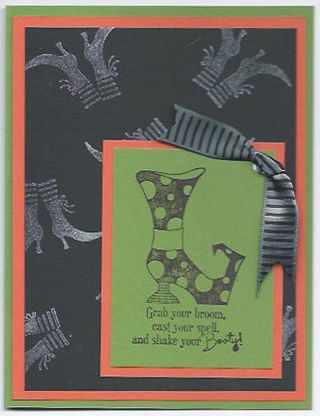
Shake Your Booty CardThis is the card we will be making at our stamping club in Craig on Sunday. So come on and join us if you are local. (Let me know if you are coming so I'll have supplies for you.) We will be using the Illuminate Glimmer Watermark Stampin' Pad (126857)for the "spooky" background and the witch boot from the Bootiful Occasions stamp set (c-126597, w-126595). The ribbon is 1/2" Striped Satin Ribbon (127837). It adds a touch of class to this card.

Beginning Oct 3, I will be offering my 12 Weeks of Christmas promotion to my subscribers on The Soggy Stamper Newsletter. If you haven't subscribed yet do so in the box on the right. You won't want to miss receiving an exclusive project by email every Wednesday during the 12 weeks before Christmas.


Until next time…blessings,
Sue
sue@soggystamper.com