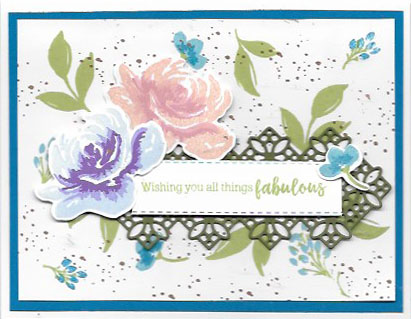
The stunning All Things Fabulous Bundle (154112) enables you to make beautiful floral cards and decorate 3D items. This bundle includes a set of 26 photopolymer stamps and is a 3-step stamp set. This gives you the ability to create a wonderful sense of depth to the flowers. With so many stamps, it is easy to get confused as to how to use them all. Let me share some things I have discovered to make it easier for you.
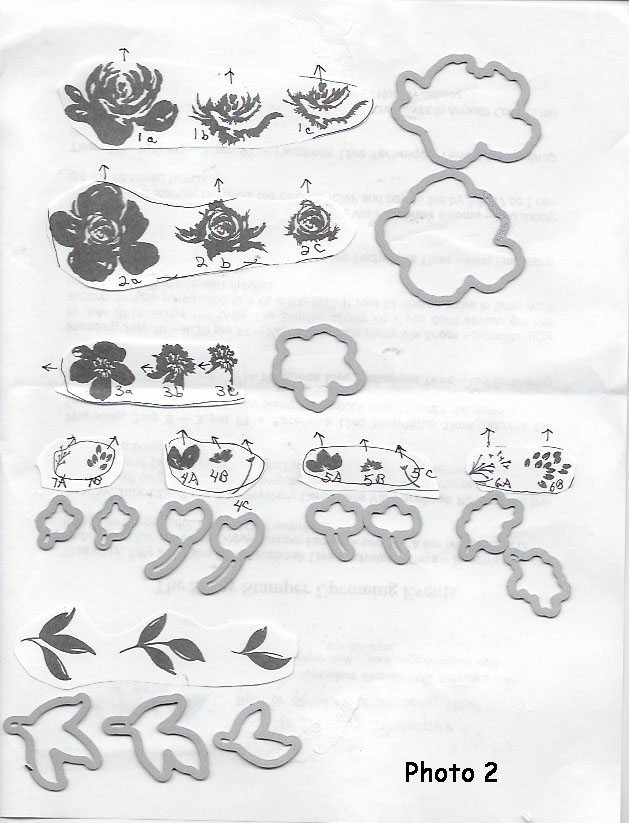
The stamp case insert has the three stamps for each flower grouped together in a line. That is helpful. The clear plastic sheet the stamps stick to not only has the stamped image of the stamp but also has the three stamps to use labelled in very tiny, almost microscopic print along with an arrow showing the direction the stamp faces to line up with each stamp of the series. Honestly, I did not see the tiny print even after someone said it was there. I thought the labelling was missing on my set. Finally, I was able to see it when I got the light to reflect just right off the plastic sheet. I have created a cheat sheet for you with the labeling and direction arrows hand-written so even aging eyes like mine can see them. I also found positioning the dies a little challenging at first so I have included the die to use next to each set of stamps. I hope this cheat sheet will help you as much as it has helped me. I keep it close by so I can see the positioning of each stamp. See photo 2.

On a side note, I though 4a and 5a were leaves with 4b and 5b being flowers to nest with the leaves. After several tries, it dawned on me that 4a and 4b were a two-step flower with 4c being the stem. The same is true for 5a, 5b, and 5c.
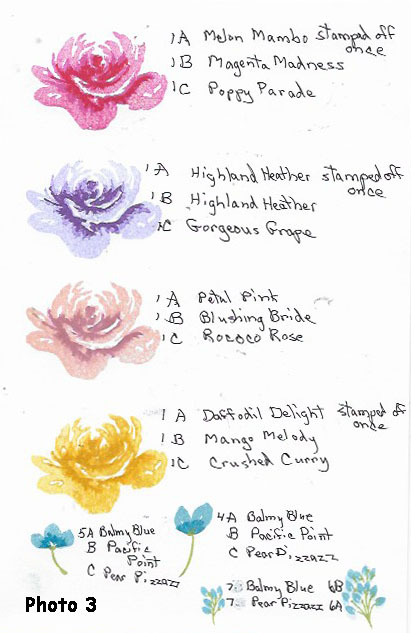
In 3-step stamping, ink the stamp with the least detail with the lightest color stamp, the next greater detail with the next darker ink, and the stamp with the greatest detail with the darkest ink. Sometimes it helps to stamp off once one of the colors to create a nice gradation of depth of color. Use the lines and spaces on each successive stamp in a series to guide in placement of each stamp. Have fun experimenting with different color combinations while practicing placement of the stamps. See photo 3 with some of the combinations I really like.

TO MAKE THE STUNNING ALL THINGS FABULOUS BUNDLE CARD
Supplies:
Stamp sets – All Things Fabulous, Forever Fern (speckles stamp)
Inks –
Combo 1 for rose – Petal Pink, Blushing Bride, Rococo Rose
Combo 2 for rose – Purple Posy (retired), Highland Heather*, Gorgeous Grape
Combo for flower 5 – Balmy Blue, Pacific Point
Pear Pizzazz, Cinnamon Cider
*since Purple Posy ink is retired, use Highland Heather ink stamped off once for first layer
Cardstock – Whisper White 8 ½” x 5 ½” scored and folded for card base, 5” x 3 ¾”, scraps for large flowers and label; Pacific Point 5 ¼” x 4”, Mossy Meadow 5” x 2”
Accessories – Fabulous Florals Dies, Stampin’ Cut & Emboss Machine, Rectangle Stitched Frames, Stampin’ Seal, Stampin’ Dimensionals, Mini Stampin Dimensionals
Instructions:
1. Adhere Pacific Point CS to card base with Stampin’ Seal
2. Randomly stamp small flowers and leaves on 5” x 3 ¾” Whisper White piece. Hint – Place all three leaf stamps on D acrylic block and only have to stamp it twice on this layer.
3. Fill in blank spaces with the speckles stamp using Cinnamon Cider ink. Then adhere this layer to card front.
4. Cut the Mossy Meadow CS out with the beautiful lattice die. Adhere it to the card front with a bit of Stampin’ Seal.
5. Stamp the greeting on Whisper White CS with Pear Pizzazz ink.
6.Use the next to smallest skinny rectangle to cut out the greeting. However, the label will be too wide and cover too much of the Mossy Meadow diecut. Make the label thinner by placing the die on the CS so that one edge of the die is close to the stamped image and run through the die-cutting machine. Place the resulting label back in the die matching the stitching on the ends and cutting off part of the width of the label.
7. Adhere the label to card front with Stampin’ Dimensionals.
8. Stamp the rose series of stamps that are open at the top on scraps of Whisper White CS once with the Combo 1 of inks and once with the Combo 2. Cut out with the matching die. Add to the card front with Stampin’ Dimensionals.
9. Stamp the flower 5 series with Balmy Blue and Pacific Point inks and cut out with die. Add to card front by corner of label with Stampin’ Mini Dimensional.
Order this stunning All Things Fabulous Bundle and follow along as I share different samples using this bundle in the next few blog posts. I will also be featuring it on this coming Friday’s FaceBook Live at 3 pm on my Soggy Stamper Facebook page.
