Tag Archives: Christmas Card Tutorial

Easy Merriest Trees Christmas Card

Easy Merriest Trees Christmas Card

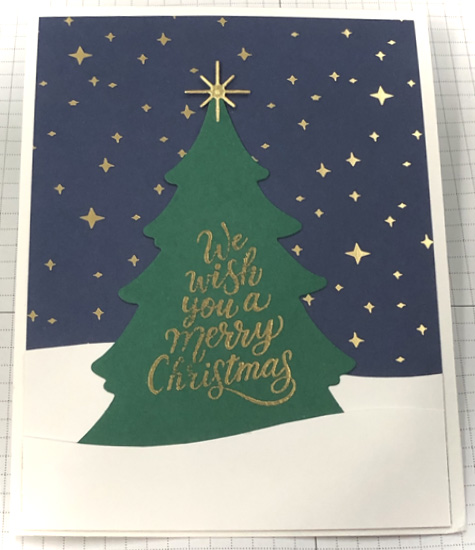
It’s a snap to make this easy Merriest Trees Christmas card! A total beginner stamper had no trouble making this card in class last week. We used the Merriest Trees bundle (162048) and a piece of beautiful Shining Brightly Specialty Designer Series Paper (162378). The greeting was heat embossed with gold embossing powder. Heat embossing is such a magical technique that still enchants me after at least 45 years.

Supplies Used for Easy Merriest Trees Christmas Card

  • Stamp Set – Merriest Trees
  • Paper including cutting measurements – Basic White Cardstock 11″ x 4 1/4″ scored and folded at 5 1/2″, 4″ x 2 1/2″; Shaded Spruce Cardstock 5″ x 3 3/4″; Shining Brightly Specialty Designer Series Paper – Night of Navy with stars 5 1/4″ x 4″; Gold Foil Sheet scrap
  • Ink – Versamark
  • Accessories – Merriest Trees Dies, Adhesive Sheets, Paper Trimmer, Paper Snips, Stampin’ Seal, Stampin’ Cut & Emboss Machine
  • Click here to be taken to a shopping cart in my online store with all these supplies already pulled for you. You can delete any you might already have.

Directions

  1. Use Stampin’ Seal to apply the designer series paper to the folded Basic White card base.
  2. Rub the Shaded Spruce cardstock with the embossing buddy and stamp the greeting with versamark. Apply gold embossing powder, tap off excess and heat emboss.
  3. Cut the greeting out with the largest tree die.
  4. Use the paper snips to cut the 2 1/2″ x 4″ Basic White cardstock approximately in half with a snowdrift type curve. Turn one piece around so they overlap.
  5. Use seal to stick the back layer to the card front.
  6. Adhere the front layer with seal only on the sides and bottom of the piece. The top should be not sticky.
  7. Apply a little seal on the back of the tree and then slip it between the Basic White layers.
  8. Cover the back of the gold foil sheet scrap with adhesive sheet and cut one of the stars from it. Put it on the top of the tree.

Watch my Facebook Live video here

.

Simple Floating Strips Technique

Cute handmade card using the Floating Strips Technique and Penguin Friends designer series paper

This technique uses acetate to create the appearance of strips of cardstock or DSP floating above your card front.

Supplies

Acetate

Cardstock or DSP cut into strips

Foam Adhesive Strips or SU Dimensionals

•Multi-purpose Liquid Glue

Cardstock Base

•Cardstock for card layers

•Paper Snips

•Silicon Mat

•Dies (optional), sentiment stamp and any other supplies required depending on desired design

Instructions

1. Cut and score card base. Cut another piece of Basic White to layer acetate on, plus any other layers required for your chosen design.

2. Cut a piece of acetate to desired size. If you will be using a die, ensure the acetate piece is larger than the size of the die you’re intending to use.

3. Cut a variety of cardstock/DSP strips, ensuring they are at least as long as the width of the acetate (or as long as the diagonal if going with a diagonal design. I used 1 cm and 1.5 cm wide strips.

photo shows an example of strips of designer series paper

4. Starting at one end of the piece of acetate, adhere the strips of cardstock/DSP to the acetate with liquid glue, leaving a gap between each strip. Continue until you reach the top of the acetate. Be careful not to use too much glue, particularly near the edges.

Photo shows the strips of dsp adhered to acetate sheet

5. Leave until the glue has dried, then turn over and use paper snips to trim the overhanging cardstock/DSP.

Photo shows the strips trimmed off

6. If using a die, run the acetate piece through the Cut & Emboss Machine.

7. Place foam adhesive strips or SU Dimensionals on the back of the acetate, using the cardstock/DSP strips to hide the adhesive.

photo shows the application of adhesive foam strips to the back of the acetate sheet

8. Remove backing from the foam strips SU Dimensionals and place on the first card layer.

9. Adhere this layer to the front of your card base and decorate as desired.

I used the above technique to make this Christmas Card

Handmade Christmas card created with the Floating Strips technique, Cork Specialty Paper, Christmas Season and Christmas to Remember stamp sets

Supplies Used in this Simple Floating Strips Technique

  • Christmas Season Bundle
  • Shaded Spruce Cardstock 5 1/4″ x 4″, scrap
  • Cork Specialty Paper 5 1/4″ x 4″ cut into strips
  • Basic White 11″ x 4 1/4″ scored at 5 1/2″ and folded for card base, scraps
  • Real Red, Soft Suede, Early Espresso, Crumb Cake and Shaded Spruce ink pads
  • Window sheet 5 1/4″ x 4″
  • Stitched Rectangles Dies
  • Adhesive Sheets
  • Gold 3/8″ Shimmer Ribbon
  • Mini Glue Dots
  • Stampin’ Seal
  • Foam Adhesive Strips
  • Use this link https://s.tamp.in/ot0BOF to access the shopping cart with these supplies. You can uncheck what you already have

If you give this Simple Floating Strips Technique a try, I’d love to see what you make. Take a picture of it and email it to me sue@soggystamper.com.