Terrific Tuesday – Sketched Birthday

Sketched Birthday digital card
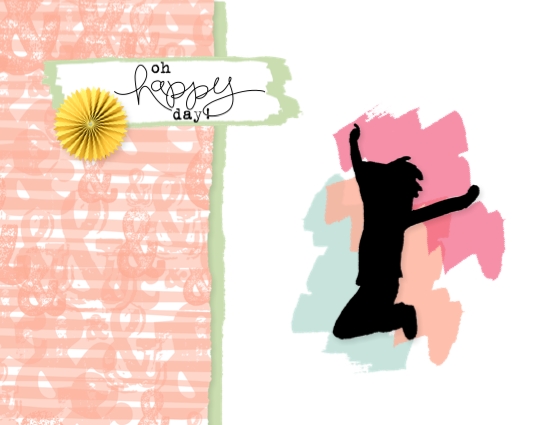
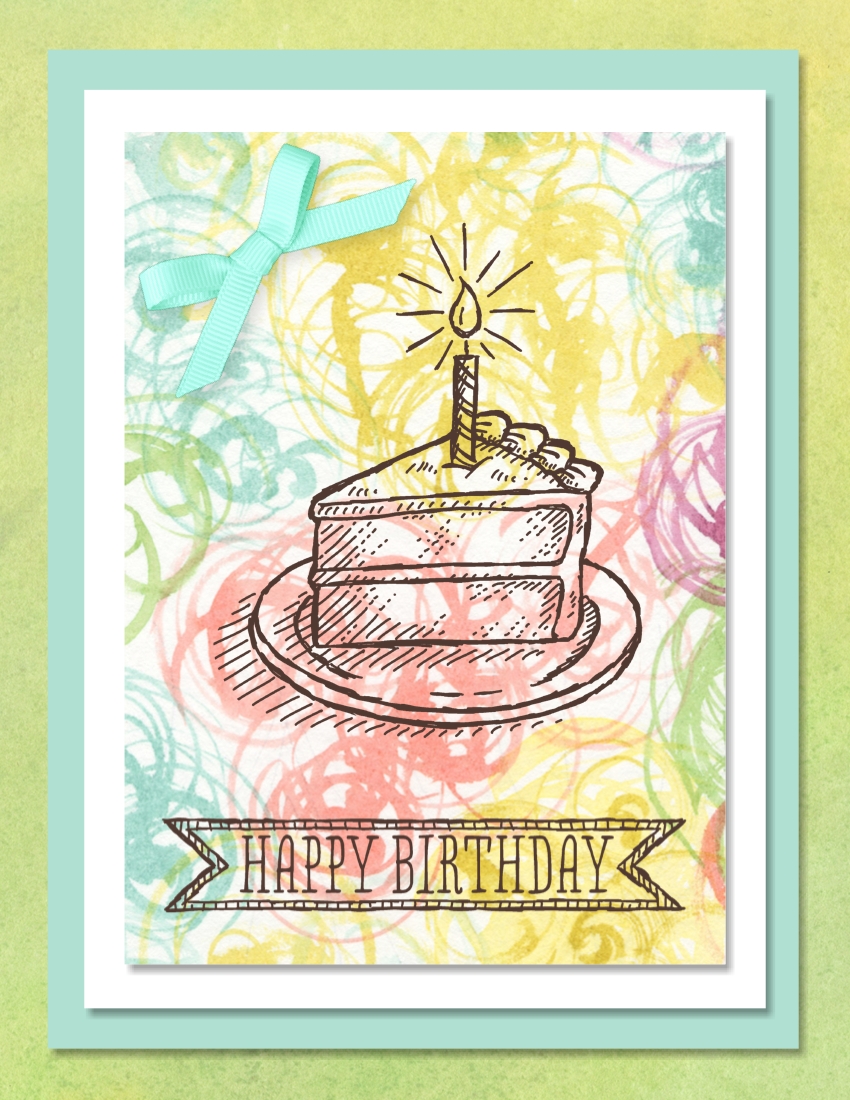
Whoohoo! I have seen so many sweet birthday cards created traditionally with the hands-on Sketched Birthday stamp set that I almost added it to my collection. But…now I don’t have to because Sketched Birthday is one of the wonderful digital downloads today. You can check out the rest of them and order here.

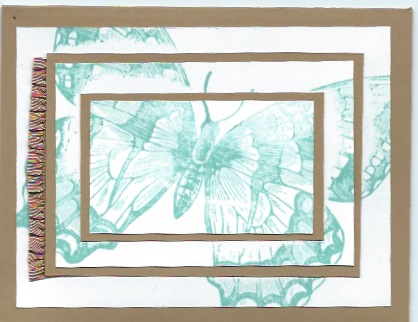
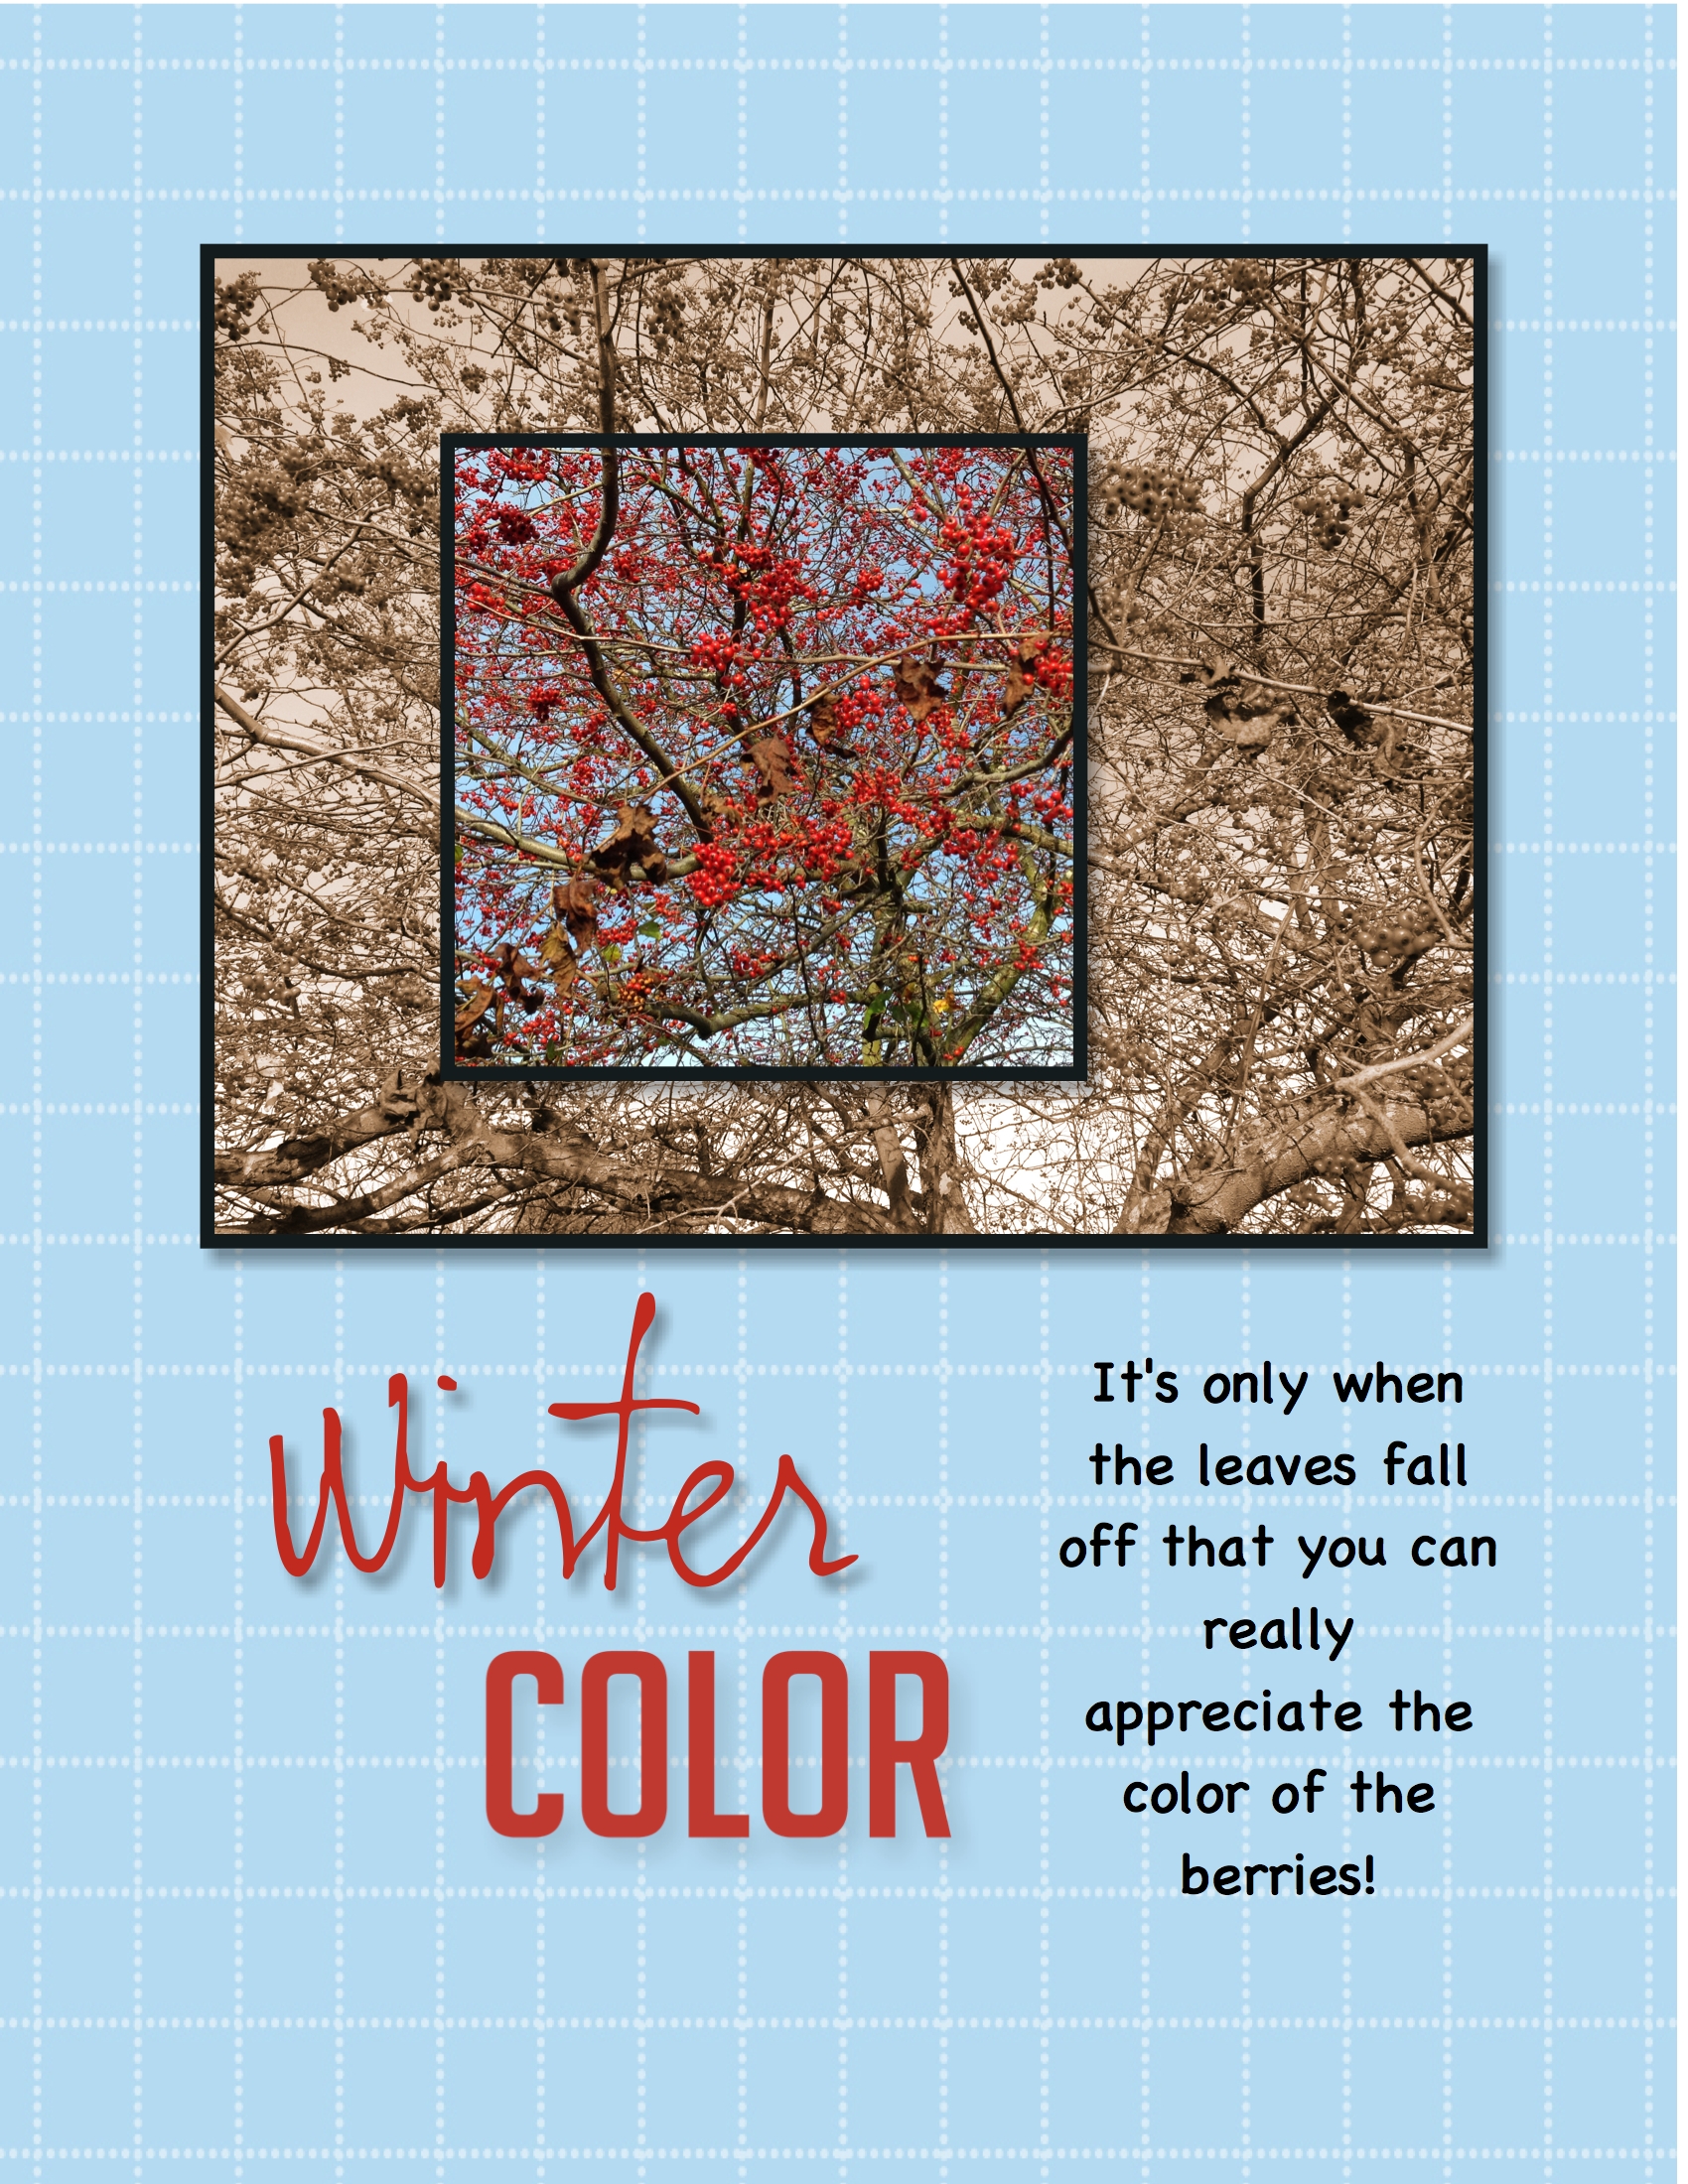
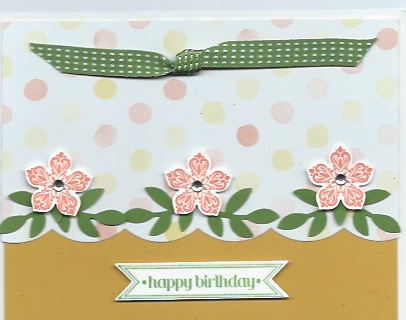
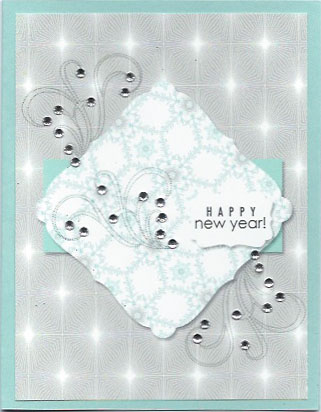
I really love the soft spring-like colors in the Be Yourself May Digital Kit and used two of the beautiful designer series paper patterns from that kit on this card. The background is one pattern and the layer that is stamped on is another.

I added the little grosgrain bow in the upper left corner for an accent. The download does not have any of the colors in the designer series paper so I recolored it. I started with a white bow but could not come up with a color that coordinated well with the paper. When I used Pool Party or Soft Sky to recolor, you could barely see any color. So I chose a River Rock bow because I knew my desired color would have a green tint to it and River Rock has a hint of green. I used Coastal Cabana to recolor and am delighted with the result. So…when recoloring an embellishment, choose a darker colored embellishment and then recolor it.

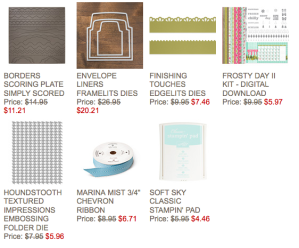
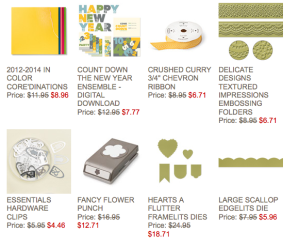
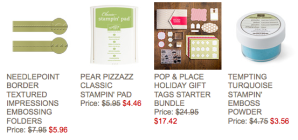
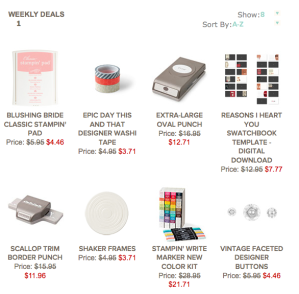
Now, Tuesday is also when Stampin’ Up! announces the new Weekly Deals. Check them out! For more information about them and to order them, click on the photo.

Weekly Deals for 1-21-14

Have you seen the new Occasions catalog? There are so many great items in there that I can’t say for sure what is my favorite. I think it is the Watercolor Wonder Designer Series Paper but then it might be the Petite Petals Punch and stamp set or….? I’d love to send you a catalog so you can pour over it and choose your favorite things. Send me an email with your phone number and best time to call you so I can tell you how to get the catalog for free. Or you can just give me a call.

Don’t forget that Sale-a-bration starts January 28 and runs through March 31. This is a perfect time to host a workshop, stock up on supplies, or start your own paper crafting business as a member of my team and get free product. Contact me to schedule a workshop or for more information about owning your own business. Furthermore, if you become a demonstrator before July 1, your registration fee for convention will be waived. That is right, you won’t have to pay a registration fee!

MDS Monday – Watercolor Washes with the Be Yourself May Kit

Be Yourself May KitThe sketch for MDS Monday this week is a challenge to use watercolor washes in the background. Three of the stamp sets that have watercolor washes are the Be Yourself May Kit (133246), Watercolored Winter Kit (136678), and the My Digital Class Beautiful Today Kit (135913). I chose to use the Be Yourself May Kit watercolor washes for this card. I love the exuberance of the image, greeting, and watercolor washes on this card.

Did you know you can achieve torn edges on layers digitally? Create a photo box and drag your choice of designer series paper or a photo into the box. Then right click on the photo box and the option for ripped photo will be in the list of options. Click on that option. The photo box will be outlined in red and a small square appears on each side of the box. Click on the squares to rip that side of the photo.  Each time you click on the square you will get a different tear. You can also adjust the width of the tear in this screen. I wanted to have two layers torn so I layered two photo boxes filling one with the Amped Up Ampersands – 4 designer series paper and one with Pistachio Pudding color. I encourage you to check out this feature of the photo box options. Email me a copy of your creation and I will share it on my blog.

As you can see, there is unlimited creativity available using MDS and I have such fun challenging myself to reproduce digitally techniques that are done with traditional inks, stamps, and paper. But…you can quickly create simple cards and scrapbook pages using MDS as well. Have you given it a try? You can purchase the software program for only $19.95, download it to your computer and be creating in less than an hour. If you are not quite sure but want to try it out with no commitment, you can download the free 30-day trial. Then before the 30 days are up and you find how much fun it is, you can order the permanent copy of the program and all the projects you have created are seamlessly folded into your continuing library. Click on any of the links below to order.

Supplies:
MDS software digital download (130646), MDS software disc (130647), or 30-day Free Trial of MDS (130910)
Embellishments
Designer Rosettes (131525) – small pointed crumb cake (re-colored) Color = SUMMER SUN 255,196,56
Stamps
Be Yourself May Kit (133246) – wash 2, Color = SOFT SKY 199,227,220; Color = CRISP CANTALOUPE 253,173,150; Color = STRAWBERRY SLUSH 239,79,117
Be Yourself May Kit – silhouette 2, Color = 0,0,0
Be Yourself May  Kit – wash 1, Color = PISTACHIO PUDDING 201,221,176; Color = WHISPER WHITE
Bloomin Marvelous (from a SAB disc) – oh happy day, Color = 0,0,0
Photos
Card Stock/Pistachio Pudding
Amped Up Ampersands Kit (134844) – Amped Up Ampersands Designer Series Paper – 4

How do I cut layers?

Triple Time Card

Supplies:
Stamp set – Swallowtail (129216-c, 131943-w)Card stock – Whisper White and Baked Brown Sugar
Ink – Coastal Cabana
Other – Baked Brown Sugar 3/8″ Ruffle Stretch Trim (130022)

Q:  I love the layered look like the card above but don’t know how to cut the different layers. Can you help me?

A:  I am happy to help you. When I cut my layers, I generally cut each layer either 1/4″ or 1/2″ smaller. For an example if the card base is 5 1/2″ x 4 1/4″ when folded, the next layer I cut would be at 5 1/4″ x 4″. If I wanted another layer on top of that, I would cut it at 5″ x 3 3/4″. So…whatever size the layer, if you want a mat behind it that is 1/8″ wider and longer, cut it 1/4″ wider and longer. For a 1/4″ border around a layer, cut the mat 1/2″ wider and longer. If you have more questions, don’t hesitate to contact me at sue@soggystamper.com or give me a call.

Love You to the Moon

There is a children’s Alaskan book by Barbara Lavalle titled Mama Do You Love Me? In the book mama says “I will love you to the moon and back.” I love that book and when I saw the name of this stamp set, I had to have it! The stamp set is perfect for Valentine’s Day as well. This is one of the cards I created using this set.

Love you to the Moon stamp setIt is really hard to get a good photo with that highly reflective Gold Foil Sheets. I would have liked for all of the gold to be shiny but had to settle for this photo. Imagine the color of a big harvest moon as it rises over the horizon. That is the color I was going for with the gold foil sheet. I used black Stazon ink to stamp the image on the gold. Then I cut out the moon with my Paper Snips.

Check out these great images in this Love You to the Moon stamp set! I will be sharing more cards using this stamp set over the next few weeks so keep coming back for new ideas.

Love You to the Moon stamp setClick on the links below or visit my online store to order the supplies to make this card yourself.

Supplies:
Stamp Set – Love You to the Moon (133140-w, 133143-c)
Paper – Gold Foil Sheet (132622) Real Red and Whisper White card stock
Ink – Real Red Classic Ink pad, Jet Black Stazon ink (101406)
Other – Arrows Textured Impressions Embossing Folder (132187)

Spotlight Stamping Technique with MDS

scrapbook page using digital spotlight techniqueYesterday I shared this digital scrapbook page with you and promised to share the technique with you today. As I said yesterday, I started out playing with the photo spread across 5 smaller squares. The photo was all in color. Then I decided to see what it would look like if I ungrouped the squares and made all but one of them sepia toned. That was sort of cool and that brought to mind the spotlight technique in traditional stamping. So I started over with a blank page.

I added the large photo box and then added the smaller one. I added a drop shadow and black mat to both photo boxes. I positioned the smaller box over the larger one and then grouped them. You have to have the positioning the way you want it because once you add the photo, the content of each box stays the same no matter where you move the photo box.

Next I dragged the photo onto the grouped photo boxes. Then I ungrouped them, selected the larger box and clicked on the photo effect button in the DESIGN CENTER under photos. This opens a variety of things you can do with your photo. I chose ‘sepia’.

And there you have it…a perfect spotlight done digitally!

I didn’t have the word ‘color’ by itself in my MDS library so I used the ‘color me creative’ stamp from the Color Me Creative Kit we received at convention the year MDS 2 was released. I used the crop tool to crop out all but the word ‘color’. I used the color picker feature to color both words of the title with one of the colors in the berries in the photo.

So my challenge to you now is…go forth and try creating a spotlight on your card or scrapbook page. Again…send me a photo of your creation. I just might share it on my blog!

Supplies:
MDS software digital download (130646), MDS software disc (130647), or 30-day Free Trial of MDS (130910)
Stamps
  Color Me Creative Designer Kit– color me creative (cropped)
Punches
Holiday Celebration Punches (131309) – winter
Photos
Designer Series Paper/Grid/Bashful Blue Grid (118858) also comes with MDS software

Isn’t it still Tuesday?

Sorry I didn’t get a blog post done yesterday. I really have no excuse other than I am a professional procrastinator! I sure wish I could get paid for all my experience in that professions…LOL!

On Monday, I shared this blog post and told you all that I would share your scrapbook pages using the technique on my blog if you emailed me a photo of the page. The offer still stands. Dorothy Cordes shared this one with me. I love the view of her backyard covered with a glistening blanket of snow.

Split photo scrapbooking techniqueI had planned to also share a scrapbook page with a photo spread over an arrangement of squares. As often happens, the creative process takes over and the end result is nothing like my beginning idea. Here is what I ended up with. Tomorrow’s post will tell you how to do this.

scrapbook page using digital spotlight technique

Although I am a day late, I still want to share the new Weekly Deals that came out yesterday. Here they are. Click on the photo to go to my online store to order them.

Weekly Stampin' Up! Deals for 1-14-14

Tuesdays are still terrific due to our new digital downloads for MDS. Here are this week’s downloads. Again, click on the image to go to my online store.

New MDS downloads for 1-14-14

MDS Monday – Festive Flurry Digital Kit

Festive Flurry Digital KitOnce in a while you take a special photo that demands special treatment. I created this scrapbook page for the MDS Monday Challenge 49. The sketch has five elongated photo boxes on the page and this photo of frost crystals on the edges of my rosebush leaves is the perfect photo to add across all the photo boxes. I wanted the frost to be the highlight of the page so kept the rest very simple by just adding three lacy white snowflakes from the Festive Flurry Kit.

It is a snap to add one photo across several photo boxes using MDS. Add a photo box, size it and adjust the shape as desired. Then copy and paste to get the desired number of boxes. Arrange them as desired, then select all of them by holding down the shift key while clicking on each box and group them. While the group is selected, drag your photo into the photo box group. Voila! The photo is divided into all the boxes. Experiment with the sizes of the boxes and the alignment of them.

I am going to play with this technique a bit more today and will post a couple of different versions tomorrow. Email me your creations using this technique and I will share them here.

Supplies:MDS software digital download (130646), MDS software disc (130647), or 30-day Free Trial of MDS (130910)
Stamps: Festive Flurry Kit (135250)

How do I fix it?

Oh no! My image didn’t get completely stamped on my card! How can I fix it?

When that happens to me, I get out my trusty Stamp-a-ma-jig! It is not only useful for placing an image exactly where you want it but it is also for fixing incomplete images.

The Stamp-a-ma-jig comes with a plastic square. Position one corner of the square in the angle of the Stamp-a-ma-jig so the edges of the plastic are up tight against the Stamp-a-ma-jig. Ink up your stamp…I use a contrasting color of ink so it is easy to see if it lines up with the original image. Then place the stamp up tight inside the Stamp-a-ma-jig and stamp on the plastic sheet. See photo 1.

Using the Stamp-a-ma-jig to fix an image

Remove the stamp and the Stamp-a-ma-jig. This is what you will see.

Using the Stamp-a-ma-jig to fix an imagePlace the plastic on top of your card stock so the images line up perfectly. Without moving the plastic or the card stock, put the Stamp-a-ma-jig back around the corner of the plastic making sure it is tight around the plastic.

Using the Stamp-a-ma-jig to fix an image

Carefully remove the plastic without disturbing the Stamp-a-ma-jig. Ink up your stamp again with the original color of ink and place it in the corner of the Stamp-a-ma-jig exactly the same way you had it when you stamped on the plastic and stamp on your card stock.

Using the Stamp-a-ma-jig to fix an imageRemove the stamp and the Stamp-a-ma-jig and….voila! You have a perfect image!

Love You to the Moon stamp set

So there you have it! The Stamp-a-ma-jig (101049) to the rescue! Order yours here. The image is from the wonderful new Love You to the Moon (133140-w, 133140-c) stamp set which is in the new catalog. If you would like a catalog, send me an email with your phone number and best time to reach you or just give me a call. I’d love to discuss with you how you can get one totally free.

Petite Flowers Birthday Card

Petite Petals handmade birthday card

The new Celebrate the Everyday Stampin’ Up! catalog is here and I will be sharing some of my favorite items from this catalog with you over the next few days. One of the things that especially excites me is when Stampin’ Up! creates a stamp set and matching punch. The Petite Petals stamp set is one example. These flowers measure just under 1″ across and are perfect for adding little touches as on the card above or on a tag. You can see the different designs on the petals in the photo below.

Petite Petals stamp setThis stamp set gives you unlimited possibilities as you change out the colors and patterns of the flowers and the punch eliminates tedious cutting out the flowers by hand.

Did you notice the designer series paper in the background? It is from another favorite of mine in the new catalog. The Watercolor Wonder Designer Series Paper has beautiful, soft yet cheerful colors in delightful designs. Look for more samples of it as I share projects over the next few weeks.

I have to apologize to you. Tuesday I forgot to include a link to the new Weekly Deals. I wasn’t sure Stampin’ Up! would continue offering these deals in the new year but they are. Yay for Stampin’ Up! This is an awesome company! I have pictured the deals below. Just click on the image to be taken to the place in my online store to order them. As always, the deals are as long as product lasts so jump on the ones you want right away.

Weekly Deals for week of 1-7-14

Supply List:
Stamps: (133155-c, 133152-w) Petite Petals, (126257-c, 132022-w) Bitty Banners

Paper:  Summer Starfruit, Gumball Green, and Whisper White card stock, (132994) Watercolor Wonder Designer Series Paper

Ink: Gumball Green

Other: (129269) Bitty Banners Framelits, (117191) Bird Punch, (127019) Large Scallops Edgelit Die, (126848) Gumball Green 3/8″ Stitched Satin Ribbon, (119246) Basic Rhinestones Jewel Accents

Terrific Tuesday – Terrific MDS Tip

Snow Day digital cardSupplies: MDS software digital download (130646), MDS software disc (130647), or 30-day Free Trial of MDS (130910), Background – Card Stock/Soft Sky, Embellishments – (134509) See Ya Next Year Photobook Template– embellishments washi tape 1, Stamps – (135251) Snow Day, Punches – (130924) Hexagon PunchPaper – (135265) Winter Frost Designer Series Paper patterns 3,4,6,8; (132917) Glimmer Designer Series Paper – Silver

Have you ever titled a project but completely changed what you had planned to make during the creative process? As an example, this card originally was named Wreath Base and was a 12 x 12 page. I didn’t need the wreath base after all so converted the file to this hexagon card for the FILE pull-down menu and choose ‘rename project’. I changed the name from Wreath Base to MDS Monday Hexagon card. I also changed the project size by choosing ‘Change Project Size/Type’ from the EDIT pull-down menu. It is so easy to do this and by accurately naming your project you will easily find it again.

Since this is Terrific Tuesday, we have new digital downloads. Check them out below and then click on the image to go order them.

New digital downloard for 1-7-14

Today is Trivia Day… Here’s Your Question!

Question Marks-001

Today, January 4, is Trivia Day. Are you ready for your trivia question? Here it is:

How many stamp sets are introduced in the new Occasions catalog?

Email me your answer and then post a comment below telling me you have sent your email. I will send you a little prize if your answer is correct. Then stay tuned for the answer in the next couple of days.

Did you know that the new Occasions catalog ordering period began yesterday? There are a lot of new and exciting tools, stamps, and papers to feed your crafting habit. Hehehe! I looove enabling stampers’ addictions. If you would like a free copy of this catalog, send me an email with your phone number, time zone, and best time to call you. I’ll give you a call and let you know how to receive the catalog totally free.

Happy New Year! – Hybrid Winter Frost card

Winter Frost DSP hybjrid card

Happy New Year! I wish each of you a year filled with too many joyous moments to count, lots of love, and as much good health as possible. Life is good no matter what the circumstances when you walk with God so I wish you to walk with God every day and find the good in each day. May 2014 be a great year for you and your family.!

Did you know that you can turn a digital card into a traditional card by printing out just the card front, mounting it on a card stock base, and then adding embellishments? A couple of weeks ago I designed this digital card for a MDS Monday challenge. You can see it here. Today I am sharing the hybrid version of the card. Unfortunately, the scanner doesn’t pick up all the sparkle of the little rhinestones very well. It is so sparkly in real life.

Supplies:
MDS software digital download (130646), MDS software disc (130647), or 30-day Free Trial of MDS (130910)
Background
Winter Frost Designer Series Paper ( 135265) pattern 11, Pool Party card stock (122924)
Embellishments
Basic Rhinestones Jewel Accents (119246) – rhinestone small
Stamps
Autumn Elements (127172) – flourish 4
When The Clock Strikes Twelve Ensemble (136679) – happy new year
Punches
Convention 2012 Photobook Template (130971) – curvy square frame 2 punch,  Filled with:  Winter Frost Designer Series Paper – 12
1.25 Square Punch (comes with program), Fill Color = Pool Party
Decorative Label Punch (123951), Fill Color = Whisper White

Terrific Tuesday – Love You to the Moon

Love You to the Moon

The new Occasions catalog begins January 3rd and I am excited to share this card featuring the beautiful Watercolor Wonder Designer Series Paper, Love You to the Moon stamp set, Banners Framelits, and Arrows Textured Impressions Embossing Folder. These are just a few of the exciting new items available to feed your stamping addiction. I’ll bet you were getting really hungry for some new goodies.

You don’t have the new catalog yet? Would you like one? There is no finer bedtime reading than drooling over all the new goodies in the new catalog. Just email me at sue@soggystamper.com with your phone number, time zone…so I don’t call you after you have gone to bed :o)…and the best time to call. I’ll give you a call letting you know how you can get this great catalog for free!

Be sure to check out the new digital downloads for today. It must be because of the holidays and the creative staff has been taking some well deserved time off as there are only two downloads today. Click on the photo to see the description of the downloads and order them.

Baking Up Love digital download

Year of Infancy digital download

There are only three days to order from the Holiday catalog. Are there some things you have been debating about ordering? Get on the stick! You know you want them. Hurry and order them while you can. It is much easier to order while they are current than after they have retired. Wondering what, if any, will be carried over to the new catalog? Give me a call or email me about the ones you question.


Why I consider my business to be a great gift

Stampin' Up! fun IMG_1245 workshop

My paper crafting business as an independent Stampin’ Up! demonstrator is a great gift for myself and can be for you as well. These photos demonstrate why I feel this way. In each photo, people are gathered together to enjoy each other while creating projects that will bring joy to themselves and others. This gives me such pleasure as I bring them together through my business and teach them how to make cards and home decor items to bring smiles to their faces and to the faces of those who receive the gifts and cards. I also love teaching how to preserve memories through scrapbooking. Creating relationships with my customers and teaching them new ideas energizes me and makes my job so much fun.

Owning your own paper crafting business as a Stampin’ Up! demonstrator is also a great gift for you. Your pleasure may be in the relationships you create, but it could be in other things. It might be in the extra income you earn to pay for ballet lessons for your child or to pay off school loans or to ease the budget crunch.Since you own your own business, you can determine the amount of money you earn based on your business strategies.

Maybe you get pleasure in being able to travel. Not only can you earn extra money to use for travel, but Stampin’ Up! offers expense paid trips as incentives to earn as you build your business.

Or maybe you stay home with your children but crave adult contact. Owning your own business allows you to get out of the house, earn extra money, and have fun with other adults. Since you own your own business, you can adjust your work schedule to fit in with the family’s needs.

There are many benefits to running your own business. Drop me an email at sue@soggystamper.com with your telephone number, your time zone and the best time for me to call you so we can discuss which benefits meet your needs.

Terrific Tuesday – Punch Art digital Christmas Card

Digital punch art Christmas card

Today is an extra special Terrific Tuesday because it is Christmas Eve! Christmas Eve day can be quite hectic with all the last minute shopping, gift wrapping, and baking. My wish for you today is that you will stop all the busy-ness this evening to spend some time reflecting on Christ’s birth and how it changes the way we relate with God and each other. Wherever you are tonight, may you be filled with peace and wonder at the miracle given to the world.

I created the artwork above a year or two ago as a challenge to myself to use MDS punches to CASE a traditional punch art card. My original post is here and the CASEd card here.

Oh, yes, the other two reasons for Tuesdays being special. First, we get new downloads for MDS. View and order them here.

The other reason is that we get a new group of Weekly Deals. Stampin’ Up! hasn’t said if this program will continue into the new year so we may have only one more chance after this to take advantage on great savings. Check out what is on sale this week then click on the images to choose and order the ones you want.

Weekly Deals for 12-24-13