Category Archives: Fancy Fold Cards

November Bundle of the Month

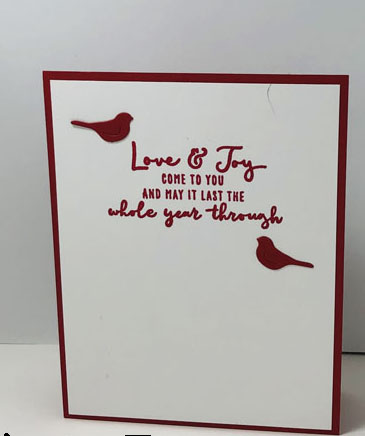
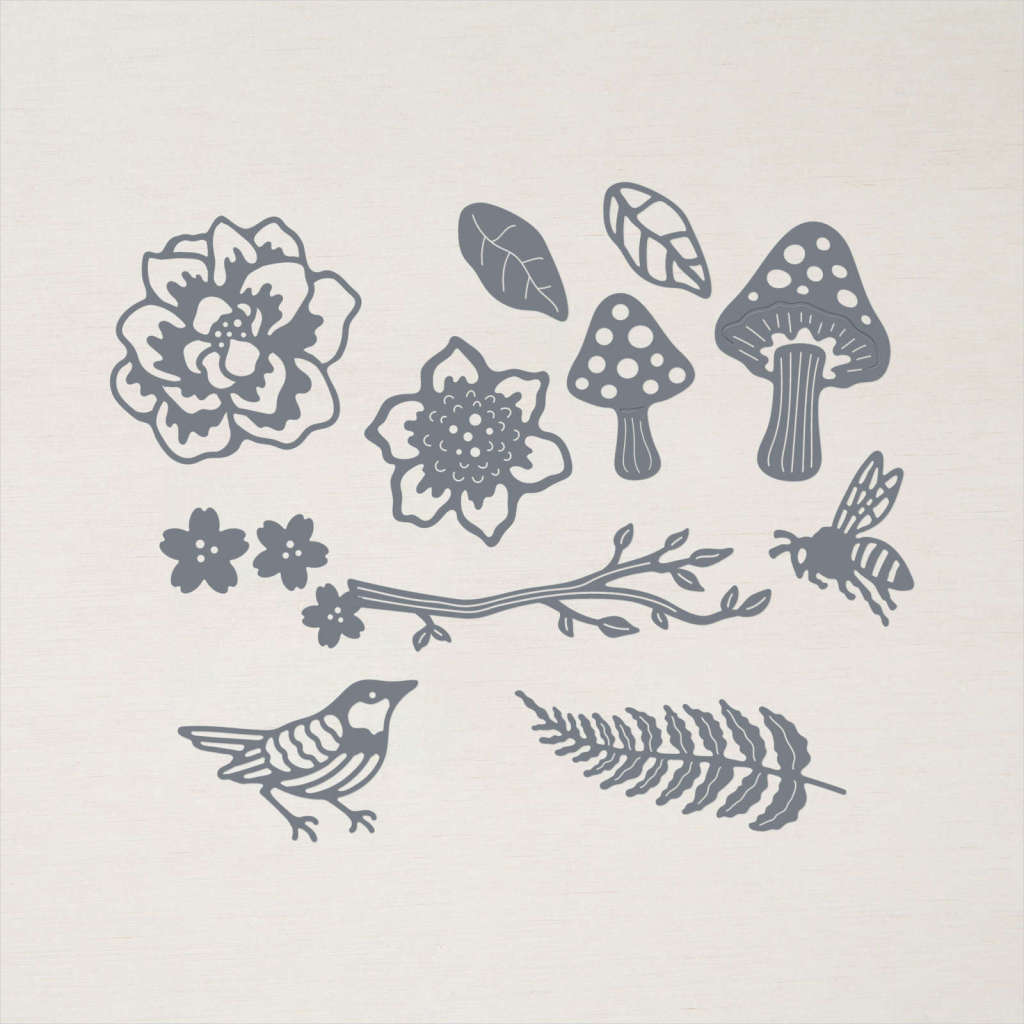
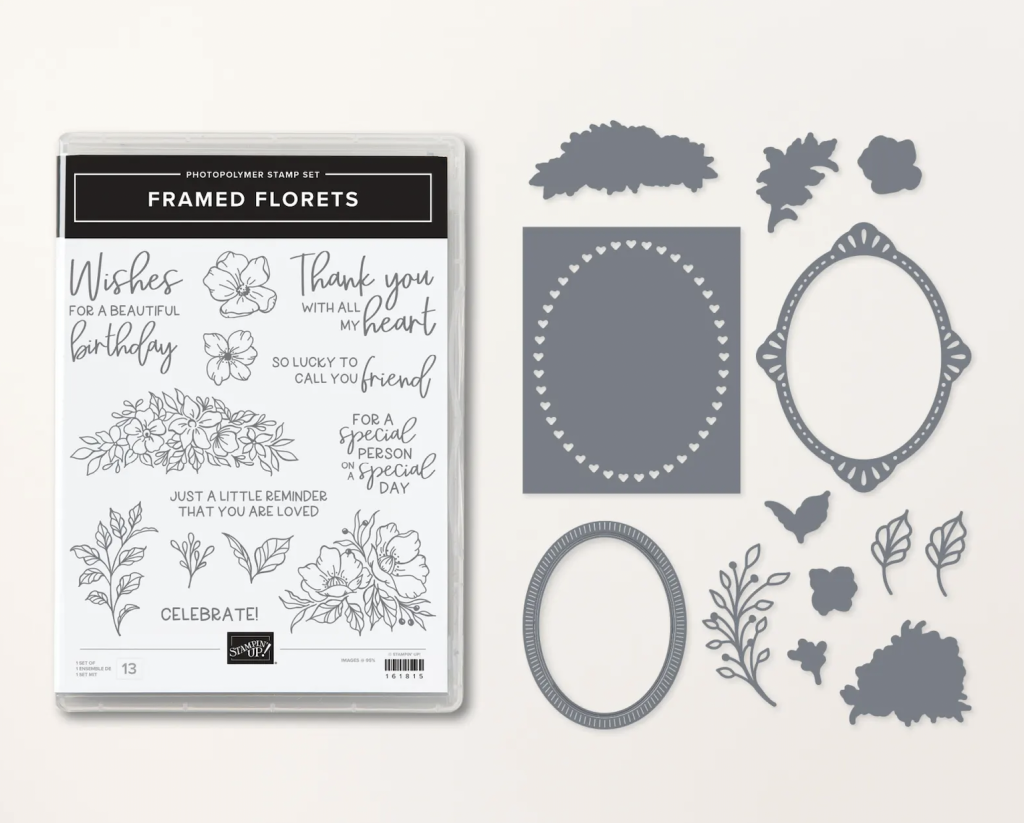
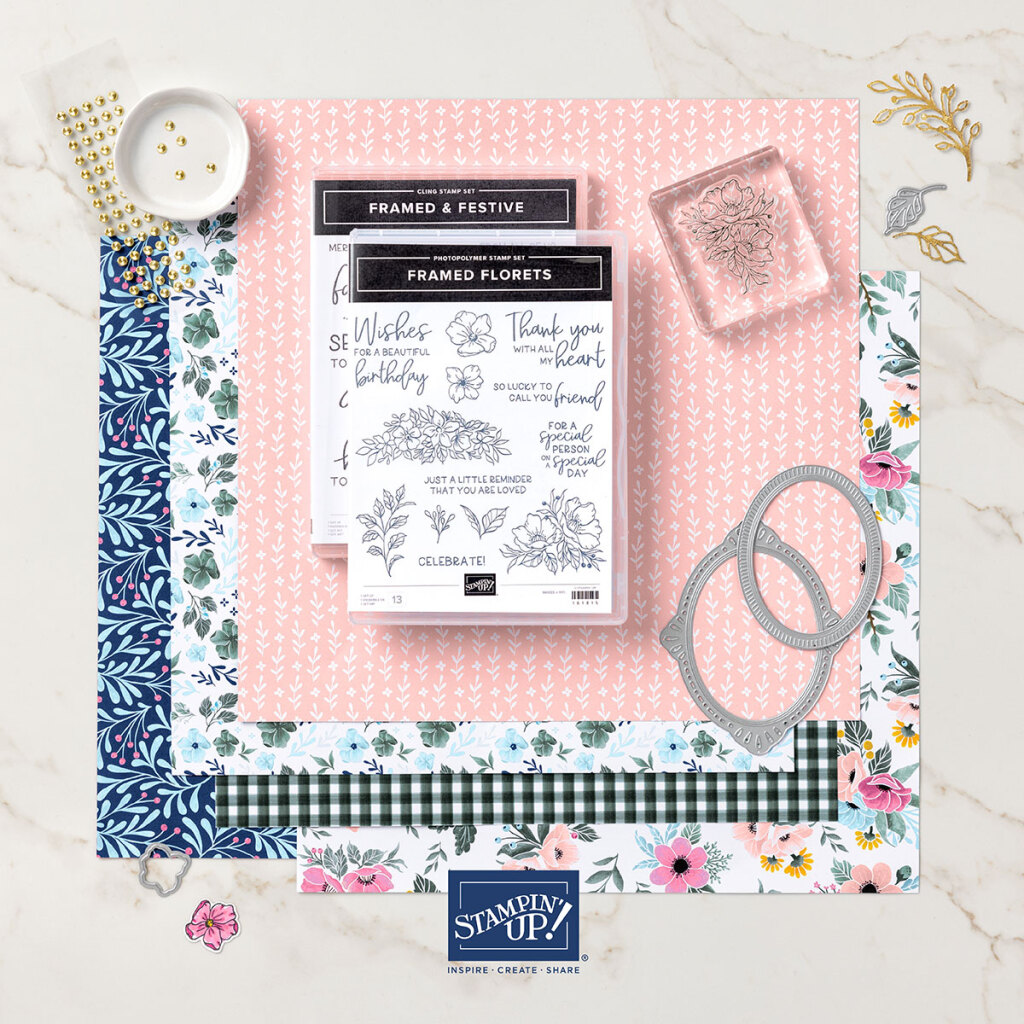
The November Bundle of the Month is the Framed Florets Bundle (162407). I love this beautiful floral bundle for it’s versatility and the beautiful oval frames. Check it out.

This image is of the November Bundle of the Month, the Framed Florets Bundle

If you order this November Bundle of the Month from me, during November, I will email you five free tutorials using this bundle.

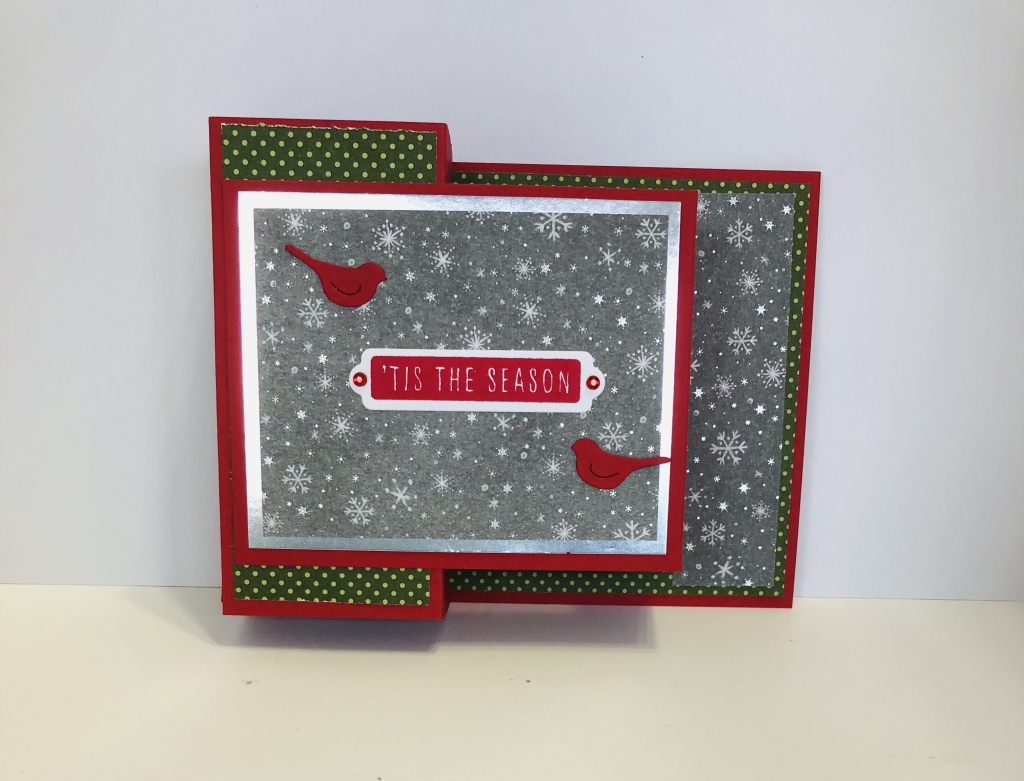
Now, this bundle is part of a November – January 4 promotion by Stampin’ Up!, the Fitting Florets Collection. In addition to this bundle; the collection includes a Christmas greeting stamp set, Framed & Festive (160888); The gorgeous all-year themed Fitting Florets 12 x 12 Designer Series Paper (161814) and the Gold Adhesive-Backed Swirls (161822).

Fitting Florets Collection of which the November Bundle of the Month is a part

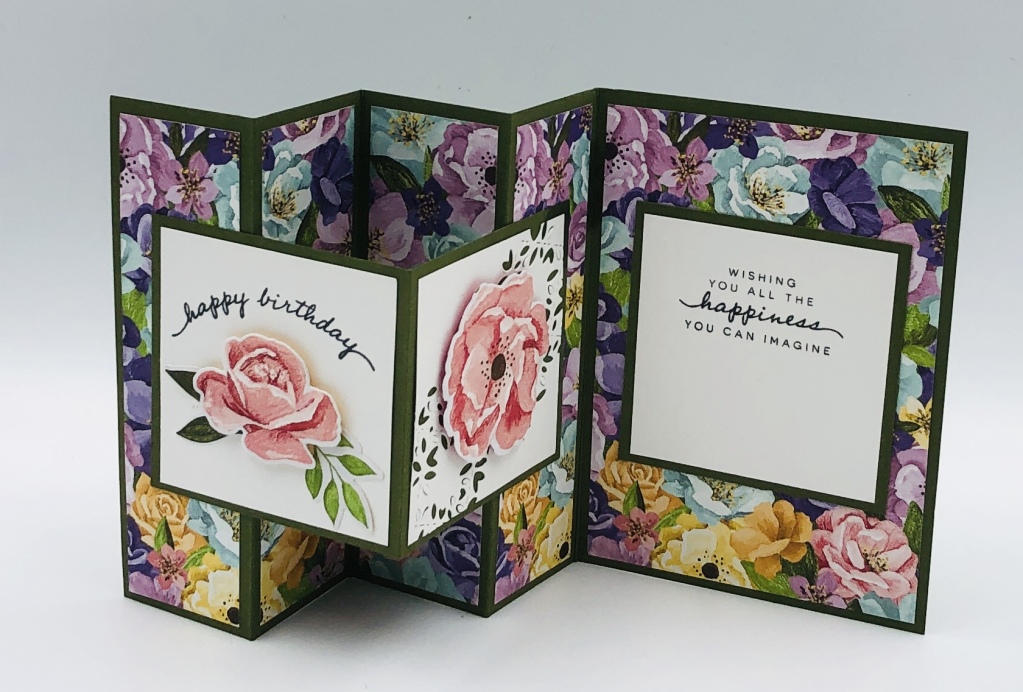
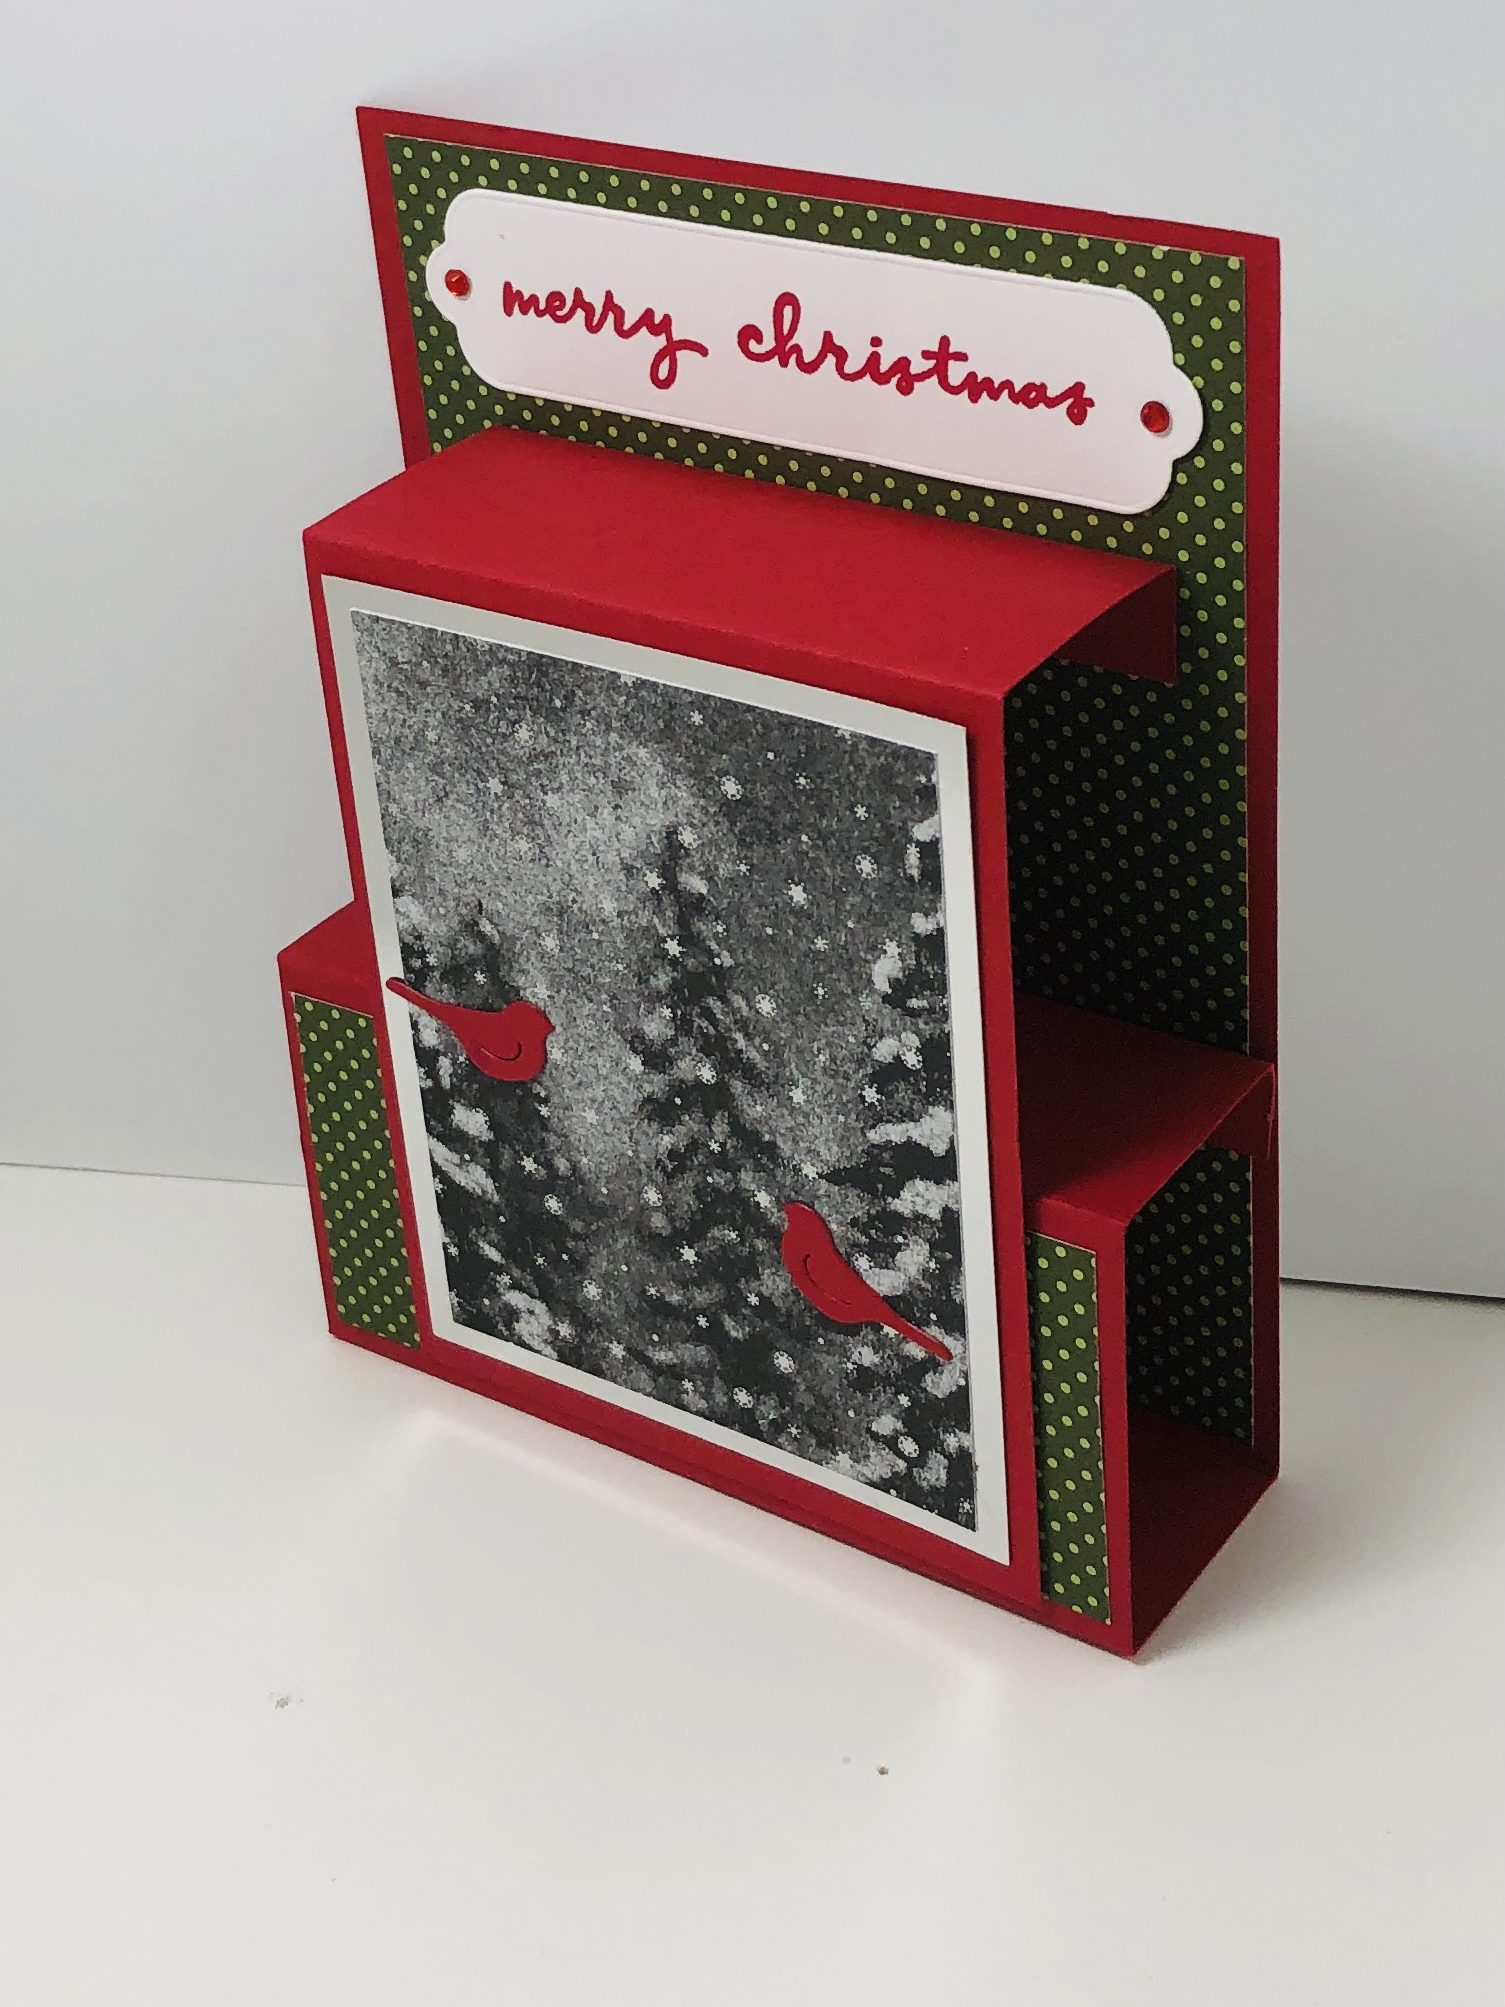
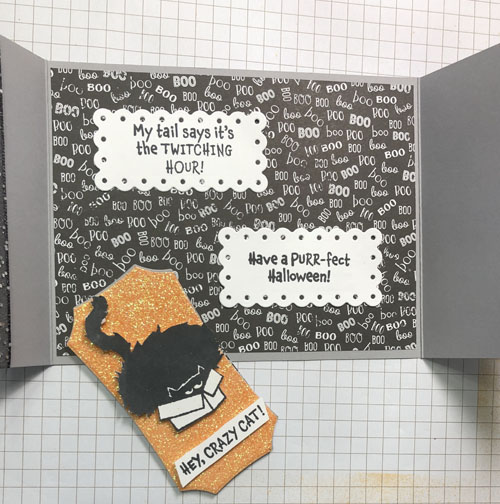
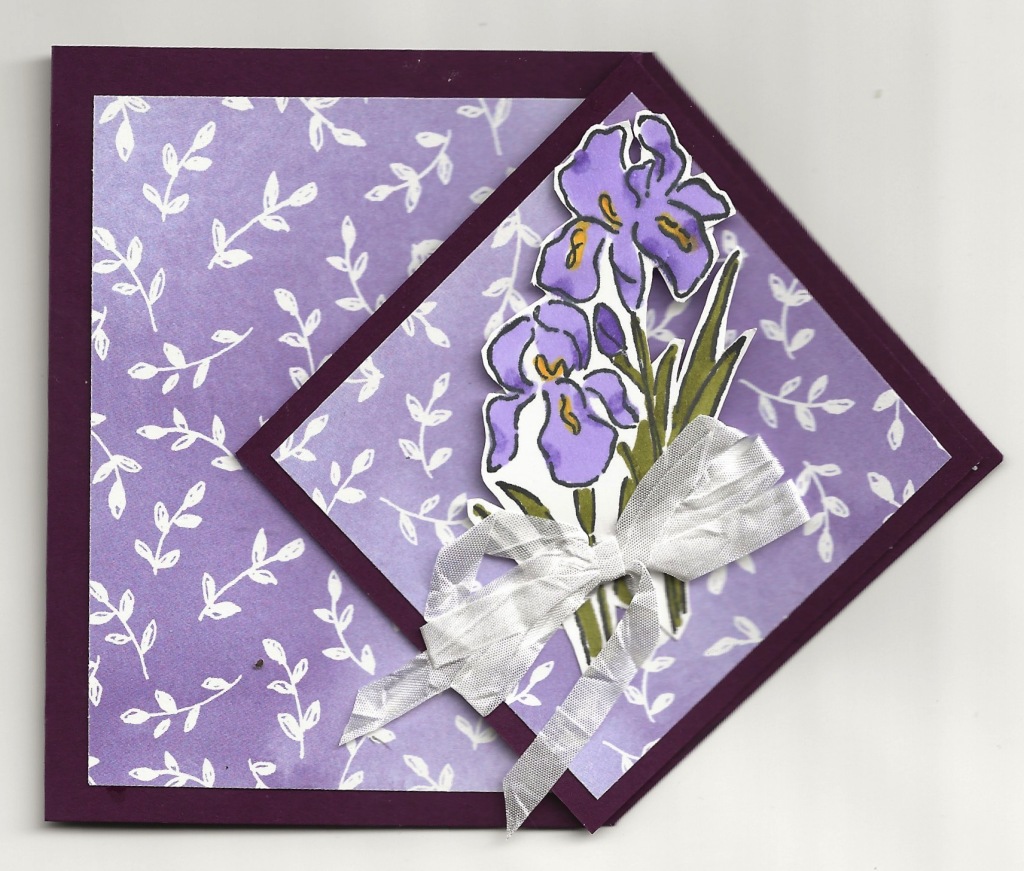
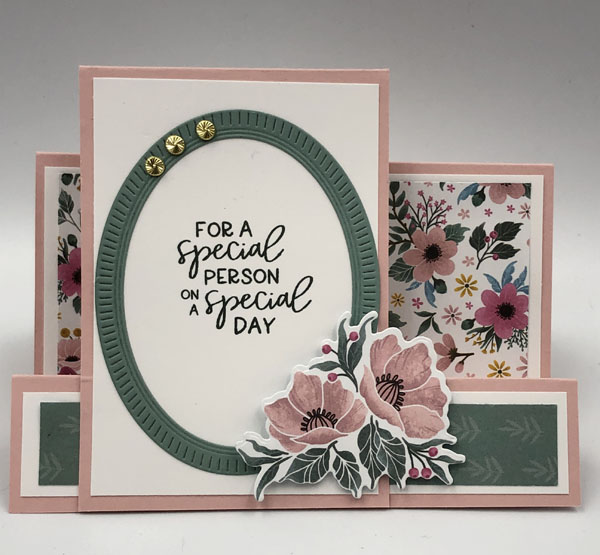
When you purchase the complete Fitting Florets Collection from me in November, I will send you not 5 but 10 tutorials using all the products. What a deal! I love creating tutorials and sharing them with you! I created this Faux Side-step card using all the products in the Collection.

November Bundle of the Month used to create a spring-themed birthday card using all of the Fitting Florets Collection

SUPPLIES USED

  • Blushing Bride Cardstock – 8 1/2″ x 5 1/2″ scored at 3″, 6″, and 7 1/4″; 8 1/2″ x 3″ scored at 4 1/4″
  • Basic White Cardstock – 2 pieces 4″ x 2 3/4″, 5 1/4″ x 1″, 5 1/4″ x 2 3/4″
  • Soft Succulent Cardstock – scrap big enough for oval die
  • Fitting Florets 12 x 12 Designer Series Paper 5″ x 3/4″, 5″ x 2 1/2″ plus scrap with flower design
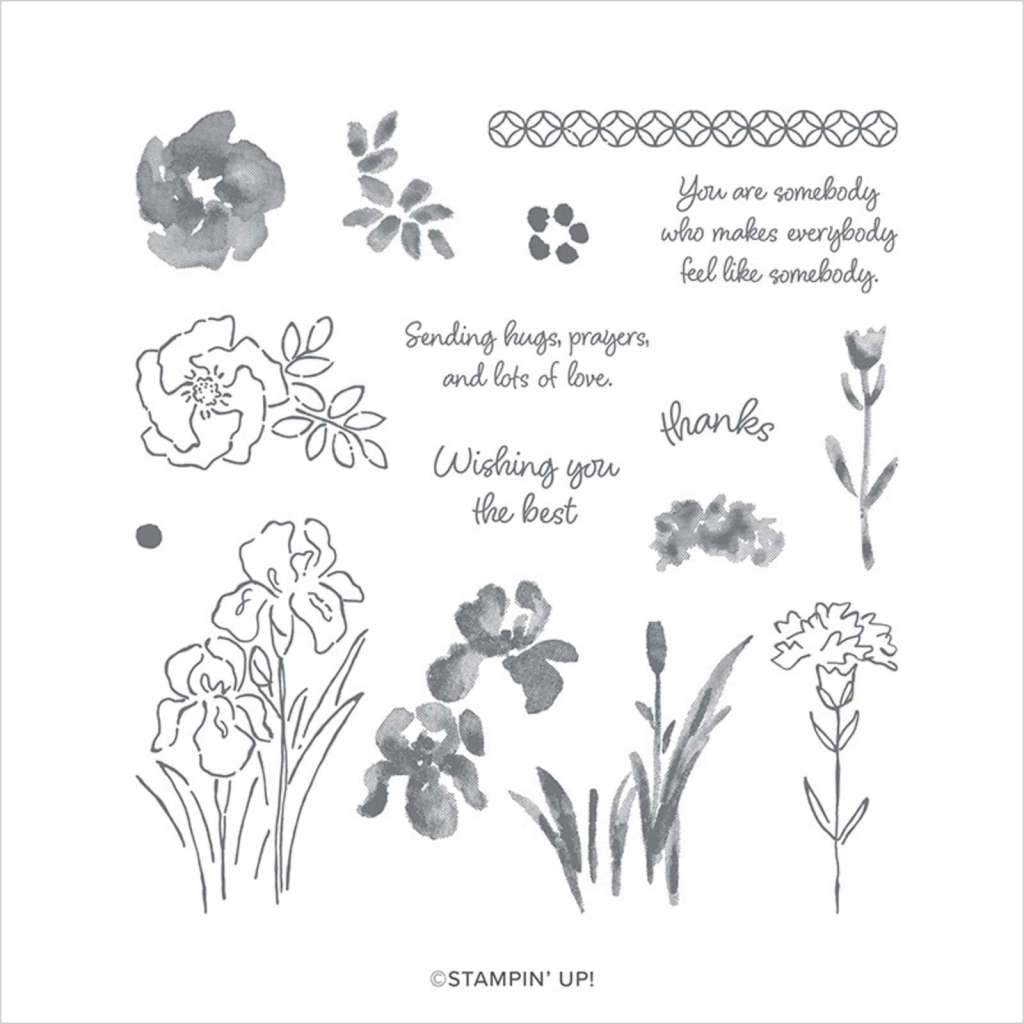
  • Framed Floral Bundle
  • Evening Evergreen Ink
  • For your convenience, here is a shopping cart in my online store with all the needed product for this project. You can delete any supplies you already have.

The Fitting Florets Designer Series Paper, Frames & Festive stamp set, and the Gold Adhesive-backed Swirls are available only as long as supplies last. I believe they will sell out quickly so I advise you to place your order now! You will be able to create a large variety of cards with just this one collection.

Scary Cute Pop-upCard

photo is of a Halloween Scary Cute Pop-up Card

This scary cute pop-up card is such fun to play with. What you are seeing is the card in the closed. The magic happens when you open the card. The photo shows the card flattened open but it is 3 dimensional otherwise. I love how the black cat pops up! I can play with it for minutes at a time. 🙂

Halloween Scary Cute Pop-up card opened

The images of the children do not have a corresponding die so I fussy cut them out. The tricky part of the card is getting the pop-up feature to work properly without any of the cat showing out the bottom of the card when it is closed. The fence is cut out with part of a Split Card Textures die

Supplies Used for Scary Cute Pop-up Card

  • Scary Cute Bundle (159852)
  • Starry Sky Cardstock (159263) 8 1/2″ x 4 1/4″ scored at 5 1/2″ and 7″, 1 1/2″ x 1 1/4″ for pop-up
  • Evening Evergreen Cardstock (155574) 8 1/2″ x 2″ scored at 5 1/2″ and 7″, 3 7/8″ x 2″
  • Basic Black Cardstock (121045) scraps for cat, haunted houses and bats
  • Gray Granite Cardstock (146983) 4 3/4″ x 1″ for fence
  • Basic White Cardstock (159276) scrap for tag, scrap to stamp children on
  • Mango Melody Cardstock (146989) scrap for moon
  • Tuxedo Black Memento Ink (132708) and Dark Mango Melody Stampin’ Blend (retired) use marker instead
  • Split Card Textures Dies (159162)
  • 1″ Circle Punch – retired
  • Paper Snips (103579)
  • Paper Trimmer (152392)
  • Stampin’ Cut & Emboss Machine (149653)
  • adhesives of choice
  • you can find these supplies in a shopping cart in my online store for your convenience. Click here.

Once you have gathered your supplies, watch this FaceBook Live I did to see how to put the card together.

For other samples of cards using this Scary Cute bundle, click here and here.

Scary Cute W-Fold Card

photo shows the front of a Scary Cute W-fold Card

I am delighted to share this Scary Cute W Fold card with you. My Bundle of the Month is the Scary Cute Bundle (159852). When you purchase this bundle from me during September, I will send you a free bundle of 5 tutorials to make cards and a treat holder using this bundle. I shared another card using this Scary Cute bundle in this post.

While the card front is cute, look at the inside! This is where the cuteness explodes.

image is of the Scary Cute W Fold card opened

Imagine the kids out Trick-0r-Treating on a dark night with the light of street lights lighting their way. Here are the supplies I used to make this darling card.

Supplies Used

  • Scary Cute Bundle (159852)
  • Beauty of Friendship stamp set (154983)
  • Deckled Rectangle Dies (159173)
  • Cajun Craze Cardstock (119684) 11″ x 4 1/4″ scored and folded at 5 1/2″
  • Basic Gray Cardstock (121044) 2 – 5 1/4″ x 4″
  • Mango Melody Cardstock (146989) 8 1/2″ x 5 1/2″, 5″ x 4″
  • Basic Black Cardstock (121045) 8 1/2″ x 5 1/2″; 11″ x 1 3/4″ scored at 2 3/4″, 5 1/2″ and 8 1/4″; scraps
  • Basic White Cardstock (159276) Scrap
  • Tuxedo Black Memento Stamp Pad (132708)
  • Multipurpose Liquid Glue (110755)
  • Stampin’ Seal (152813)
  • Stampin’ Cut & Emboss Machine (149653)
  • These items are in a shopping cart for your convenience. You can delete items you already have from the cart.

Once you have the supplies ready, watch this video of my Friday Facebook Live and stamp long with me to make this Scary Cute W Fold Halloween Card.

Don’t Miss This Sale!

image is a banner about Stampin' Up's 24 Hour Stamp Sale - Don't Miss This Sale!

Don’t miss this sale! This coming Thursday, September 15 for just 24 hours almost all stamps in the 2022-2023 Annual Catalog will be 15% off. This sale occurs just once a year and I don’t want you to miss it. I’m sure you have stamps you would like to buy but just haven’t ordered yet. Thursday is THE day to get them at a discount. Get out your wish list and have it ready. Then on Thursday place your order in my online store or email it to me and I’ll place it for you.

While you are at it, check out the new Weekly Deals that will be posted on Thursday and add some of them to your order. You can easily find them here.

Scary Cute Parade Twisted Easel Card

photo shows a Scary Cute Parade Fancy Fold card

I’m delighted to share this Scary Cute Parade Twisted Easel Card with you. I am using the Scary Cute Bundle (159852) found on page 56 of the July – December mini catalog. This is an easy fancy fold to make and folds flat to mail.

image is of the Scary Cute Parade Fancy Fold Card flattened for mailing

Supplies for Scary Cute Parade Fancy Fold Card

  • Scary Cute Bundle (159852)
  • Basic Gray Cardstock (121044) 8 1/2″ x 4 1/4″, 3 7/8″ x 3 7/8″
  • Basic Black Cardstock (121045) 5 1/2″ x 4″
  • Crushed Curry Cardstock (131199) 4″ x 4″
  • Memento Ink Pad (132708)
  • Stampin’ Seal (152813)
  • Multipurpose Liquid Glue (110755)
  • Paper Trimmer (152392)
  • Mini Stampin’ Cut & Emboss Machine (150673) or Stampin’ Cut & Emboss Machine (149653)
  • Click here to be taken to a shopping cart in my online store with these supplies in the cart. You can remove any of the things you already have.

Scoring Template

image is a scoring template for the Twisted Easel fancy fold

I hope you will order the supplies to make this card from me and stamp along with the video.

Thanks for visiting my blog. Please leave me a comment so I know you have been here.

Rings of Love Fancy Fold Card

photo shows Rings of Love Fancy Fold Card using Sweet Songbirds stamp set and punch

Making this Rings of Love Fancy Fold card is really quite easy! Start with a Crumb Cake cardstock base. Then add a layer of Soft Sea Foam cardstock and the beautiful Rings of Love designer series paper that will be free during Sale-a-bration for a $50 purchase.

I stamped the branch, leaves, and nest on crumb cake cardstock with Soft Suede and Parakeet Party ink and fussy cut them out. The bird was stamped on a scrap of Basic White cardstock using Starry Night ink stamped off once and the wing with full strength Starry Night ink. I stamped the belly with Daffodil Delight ink and colored the beak with Pumpkin Pie Stampin’ Blend. When I finished coloring the bird, I punched it out with the Songbird Builder Punch. Next I adhered the branch with the nest and the bird to the front of the narrow upright strip of cardstock. The finishing step was to stamp the greeting and then adhere this piece to the cardbase.

Supplies Used for Rings of Love Fancy Fold Card

  • Sweet Songbirds Bundle
  • Crumb Cake Cardstock – 8 1/2″ x 5 1/2″ scored at 1 1/4″ mountain fold), 2 1/2″ (valley fold), 5 1/2″ (mountain fold); 8 1/2″ x 2 3/4″ scored at 4 1/4″ (mountain fold); scrap fro nest and branch
  • Soft Sea Foam Cardstock 5 1/4″ x 2 3/4″, 5 1/4″ x 1″, 2 of 4″ x 2 1/2″
  • Basic White Cardstock scrap for bird
  • Rings of Love Designer Series Paper (free with $50 purchase during Sale-a-bration) 5″ x 2 1/2″, 5″ x 3/4″, 3 3/4″ x 2 1/4″
  • Soft Suede, Parakeet Party, Starry Sky, Daffodil Delight ink
  • Dark Pumpkin Pie Stampin’ Blend
  • You can order these supplies here. What you don’t need can be removed from the shopping cart. The Rings of Love Designer Series Paper will be available July 1.

Check out this video of the Facebook Live I did demonstrating how I made this card.

Beautiful WV Fold Card

photo of a WV fold greeting card created with product from the Hues of Happiness Suite

I am excited to share with you this beautiful WV fold card! WV you ask? The left side of the card forms a W while the two white panels with the roses on them forms a V. This is a very easy card to create and when you use one of Stampin’ Up!’s beautiful designer series papers such as this Hues of Happiness Designer Series Paper (158822), you end up with a gorgeous card!

Supplies Used for Beautiful WV Fold Card

  • Happiness Abounds Bundle
  • Mossy Meadow Cardstock – 11″ x 5 1/2″ scored at 1 3/4″, 3 1/2″, 5 1/4″, 7″; 6″ x 3″ scored at 3″, 3″ x 3″
  • Basic White Cardstock – 3 pieces 2 3/4″ xz 2 3/4″
  • Hues of Happiness Designer Series Paper – 4 pieces 5 1/4″ x 1 1/2″,5 1/4″ x 3, scraps of the design with the largest roses

Most of the dies in this Happiness Abounds Bundle will cut out the flowers and leaves in the design with the large individual flowers. I the first card, I cut out pink flowers. In the card below I cut out purple flowers. Same designer series paper but different looking cards.

Beautiful WV Fold card with images cut from the purple flowers in the Hues of Happiness Designer Series Paper

On the second card I added some bling from the Glossy Dots Assortment which is included in the Hues of Happiness Suite. You can order the supplies needed for this project beginning May 3 when the new 2022-2023 Annual Catalog goes live. I have created a shopping cart for you, just click here. You can easily deselect any product you already have. Watch the video of my FaceBook Live where I demonstrated making this card.

Waves of the Ocean Tower Card

Tower card created with product from the Waves of the Ocean Collection

I created this Waves of the Ocean Tower Card to feature some of the beautiful products in the Waves of the Ocean Collection (161797). This collection is available now through May 2nd as long as product lasts. It includes a stamp and die bundle, beautiful designer series papers, Blue foil sheets, and some wonderful rhinestone Waves Basic Jewels. The Waves of Inspiration Bundle ()158841) does carry forward into the new 2022-2023 Annual catalog. The rest of the collection will retire May 2 if supplies last that long.

Supplies Used to Make the Waves of the Ocean Tower Card

  • Waves of Inspiration Stamp Set (158833)
  • Night of Navy Cardstock (100867) 8 1/4″ x 5 1/2″
  • Basic White Cardstock (159276) 2 pieces 5 1/4″ x 2″, scrap for greeting
  • Waves of the Ocean Designer Series Paper (159982) dark blue/blue-green design 4 pieces 5 1/4″ x 3/4″, one piece 4″ x 1 1/4″, 2 pieces 4″ x 3/4″
  • Blue Foils Specialty Paper (159983) – Coastal Cabana color 4 pieces 5 3/8″ x 7/8″, 1 piece 4 1/8″ x 1 3/8″, 2 pieces 4 1/8″ x 7/8″, 2 pieces 5 3/8″ x 2 1/8″ for the center sections, 1 1/4″ x 1 1/4″ for greeting mat
  • Gray Granite Classic Stampin’ Pad (147118)
  • Night of Navy Classic Stampin’ Pad (147110)
  • Pebbles Enamel Shapes (158141)
  • Click here to go to a shopping cart in my online store that has all these products already selected for you. If there are items in the cart you already have, you can uncheck them.

Thank you, Debbie Henderson and Mary Deatherage, for sharing this template. Now I’m passing it on to you. After cutting and scoring your card base, watch my video to see how to put it together.

Thanks for visiting my blog. I urge you to order these products soon as they are quite popular and may run out before May.

Fancy Fold Happy New Year Card

Fancy Fold Happy New Year card created with Simply Elegant Specialty Designer Series Paper

You know I love fancy fold cards and this fancy fold Happy New Year card is my favorite so far. It is a stage pop-up card I learned how to make from Heejung Hunsberger. Now the front of this card is lovely with the gorgeous Simply Elegant Specialty Designer Series Paper. But look at the inside! I love, love, love it!

Fancy Fold Happy New Year card open

I shared how to make this on last Saturday’s Facebook Live presentation and told the viewers that I would post the materials and cutting measurements on my blog so here goes.

Supplies Used for Fancy Fold Happy New Year Card

  • Stamp sets – Peaceful Deer, Way to Goat
  • Ink – Tuxedo Black Memento
  • Paper – Basic White Cardstock 4 1/4″ x 4″ and a scrap for goat, Basic Black Cardstock 11″ x 4 1/4″ scored at 5 1/2″; 12″ x 4 1/4″ scored at 4 1/2″, 6″, 7 1/2″; 5″ x 3 1/4″ scored at 1/2″ on short end
    Simply Elegant Specialty Designer Series Paper for pop-up panel 4 1/4″ x 3 1/8″; 4″ x 1 1/4″, 4 1/4″ x 4″ for inside of card front, 5 1/4″ x 4″ for card front
    Soft Suede Cardstock scraps for the dancing goats
    Accessories – Soft Pastels for eyeshadow on goats, Paper Snips, Paper Trimmer, Multipurpose Liquid Glue
  • To order these supplies click here to be taken to the shopping cart. You can delete any supplies you already have from the cart before checking out. Thanks for ordering from me.

    Enjoy this video.

Double Box Fancy Fold Card

Handmade Christmas Card using the Double Box fancy fold and Peaceful Place Designer Series Paper

I love fancy folds and this double box fancy fold card is easy and fun to make. The October Paper Pumpkin’ kit had pre-printed cards with this image on both the front and the back of the card. It is such a beautiful image with the snowy evergreen trees and the silver snowflakes that I couldn’t see using the patterned paper for the back of the card. So I cut the cards in half, added card bases from cardstock I had, and made twice the number of cards. That is what is on the front of this card.

However, you can still make this card even if you didn’t get the October Paper Pumpkin’ kit because the Peaceful Place Specialty Designer Series Paper found in the July – December mini catalog has a design just like the card in the kit. The kit was designed to coordinate with the Peaceful Place Suite of products. I love it when Stampin’ Up! designs products this way!

The back of this Double Box fancy fold card is where you can write your message and sign the card.

Photo shows the back of the double box fancy fold card

Supplies Used

  • Christmas to Remember stamp set
  • Real Red Classic Stampin’ Pad
  • Real Red Cardstock 10 1/2″ x 4 1/4″ scored at 1/2″, 1 3/4″, 3 3/4″ and 5″ (bottom box/card base); 5 3/4″ x 3 1/4″ scored at 1/2″, 1 3/4″; scraps for cutting the birds
  • Basic White Cardstock 5 1/4″ x 4″ for back of card, scrap for greeting
  • Silver Foil Sheet 3 3/4″ x 3″
  • Heartwarming Hugs Designer Series Paper, green dotted design – 5 1/4″ x 4″, 1 3/4″ x 4″, 1″ x 4″
  • Peaceful Place Specialty Designer Series Paper, tree pattern or back of tree patterned card from October Paper Pumpkin kit – 3 1/2″ x 2 3/4″
  • Seasonal Labels Dies – long thin label
  • Beautiful Trees Dies – bird die
  • Red Rhinestone Basic Jewels
  • Tear & Tape, Stampin’ Seal, Mini Glue Dots
  • Bone Folder
  • Paper Trimmer
  • Stampin” Cut & Emboss Machine or Mini one
  • Use this link to order these supplies. If you already have some of the supplies, you can delete them from the shopping cart.

This card can also be made in the landscape orientation as in this card using the same supplies.

Handmade Christmas card using the double box fancy fold in the landscape orientation.

Thanks for dropping by today. Grab a cup of coffee or tea and relax while browsing for other projects I have shared on my blog. And…leave a comment so I know you have been here. Thanks!

Clever Cats Slide & Lock Card

handmade Clever Cats Slide & Lock Halloween card created with the Clever Cats stamp set

If you have been following me, you know that I love fancy fold cards and this Clever Cats Slide & Lock card is one of my favorites. I love the Clever Cats stamp set (156490) found in the July – December mini catalog. The fancy fold part of this card is that the label slides out to allow the recipient to open the gatefold card.

Clever Cats Slide & Lock card showing the slide part of the card being removed

And then when the slide is removed, this is what the Slide & Lock Clever Cats card looks like.

This photo shows the Slide & Lock Clever Cats card fully opened.

SUPPLIES USED

  • Stamp set – Clever Cats
  • Inks – Pumpkin Pie Refill, Memento Ink
  • Paper including cutting measurements – Smoky Slate (11″ x 4 1/4″plus 2 scraps1 1/2″ square), Basic White (scraps), Cute Halloween 6″ x 6″ Designer Series Paper (5 1/4″ x 4″ plus 2 scraps 1 1/2″ square), Glimmer Paper – retired (scrap)
  • Scalloped Contours dies
  • Halloween Magic Dies – retired
  • Stampin’ Spritzers
  • Tear & Tape, Stampin’ Seal
  • Order these supplies here. You can delete from the shopping cart what you already have.

I encourage you to give this fancy fold a try. If you do, I’d love to see what you come up with. Please email me a photo of it and if you have any questions or need clarification of some of the steps, be sure to contact me at sue@soggystamper.com.

My Favorite DSP on Sale!

My favorite dsp is on sale and so is your’s! There are nine of the designer series papers in the 2021-2022 Annual catalog that are on sale for 15% off. Now is the time to stock up and realize these savings. Check them out:

Yes, my favorite dsp is is the beautiful Hand-Penned Designer Series Paper. I love the line drawings and the palette of colors. The reverse sides make great backgrounds with their subtle designs and soft colors. The coordinating colors are Basic Black, Blushing Bride, Cinnamon Cider, Daffodil Delight, Garden Green, Highland Heather, Mint Macaron, Misty Moonlight, Pale Papaya, and Pool Party.These papers make a beautiful card all by themselves. All you need to add is a greeting or small focal point and perhaps some ribbon or other embellishment. Here are a couple examples I have made with this dsp.

slimline card created with my favorite dsp Hand-Penned and Color & Contours stamp set

Diamond Flip Fold card created with my favorite dsp Hand-Penned designer series paper and Hand-Penned stamp set

Click here to order the supplies used in the slimline card and here for the diamond flip fold card.

A Second Favorite DSP on Sale

Another of my favorite designer series papers which are on sale is the You’re a Peach. I love their color palette of Balmy Blue, Bumblebee, Calypso Coral, Early Espresso, Mango Melody, Pale Papaya, Pear Pizzazz, and Petal Pink.

Photo is of the You're a Peach designs
Dutch door

I created this dutch door fancy fold card using the small blue pattern of this dsp.

Notice the Pale Papaya ribbon? You might wonder where you find it in the catalog. Well, you can’t. Did you know that you can color the White 1/4″ crinkled seam binding ribbon with any color you need using our wonderful Stampin’ Blends? Just lay the ribbon on a craft sheet to protect your work surface and color it with the brush end of the blend. Since the blends are alcohol based, the ribbon will dry quickly. Order the supplies for this card here.

Thanks for stopping by. Drop me a comment so I know you have been here and come back soon!

Iconic Dies Stand Out

Photo shows a handmade corner flap card where the Iconic dies stand out. The Daisy Lane and Encircled in Friendship stamp sets are also used.

I love the way the Iconic Dies stand out on this corner tuck card! I totally overlooked the iconic dies found on page 163 the first and even the second time I poured over the 2021-2022 Annual Catalog. It wasn’t until I saw a card similar to this on Facebook that I actually looked closely at the dies. Check out the wonderful variety of dies in this set.

Photo shows the dies in the Iconic die set that was used to make the corner flap card where the Iconic Dies stand out.

These dies do not correspond with a specific stamp set but you can see how nicely they work with the Daisy Lane stamp set in this Iconic corner tuck card. The iconic dies stand out on this is a fancy fold card where the corner of the front tucks into a triangle on the upper right corner.

I stamped the fern image from the Daisy Lane stamp set all over the flap, the inside of the card and on the triangle with Pear Pizzazz ink; a verse from the Encircled in Friendship stamp set on Basic White cardstock with Mossy Meadow ink; and the greeting ‘Smile’ on another scrap of Basic White with Mossy Meadow ink. I cut the greeting out with the smallest rectangle in the Stitched So Sweetly dies.

The Soft Suede piece of cardstock was run through the die-cutting machine with the Bark 3D embossing folder to give it a woodsy texture. I then adhered it to a piece of Mossy Meadow cardstock which was glued to the card front flap. The mushrooms were sponged with Real Red ink before being glued to the front. I cut the fern fronds from Pear Pizzazz cardstock.

Supplies Used in Making Iconic Dies Stand Out:

  • Daisy Lane and Encircled in Friendship stamp sets
  • Real Red, Pear Pizzazz, and Mossy Meadow ink
  • Basic White Cardstock – 8″ x 4 1/4″ scored at 2 1/2″, 2 1/4″ x 2 1/4″ cut diagonally in half, 3″ x 4″ for inside greeting, scraps for mushrooms and front label
  • Mossy Meadow Cardstock – 3 1/4″ x 4 1/4″
  • Soft Suede Cardstock – 3″ x 4″
  • Pear Pizzazz cardstock – scrap for fern fronds
  • Iconic dies
  • Bark 3D embossing folder
  • Sponge Dauber
  • Trimmer
  • Multipurpose Liquid Glue and Stampin’ Seal
  • Stampin’ Cut & Emboss Machine
  • To order these supplies click here to see my shopping cart

Thanks for stopping by my blog today. I’d love to have you leave a comment so I know you were by. Also remember that this month Stampin’ Up! is having a Designer Series Paper Sale. Hop on over to my online store and stock up on your favorites while they are on sale!

My Favorite Retiring Inspiring Iris!

Diamond Flip fancy fold card featuring my favorite retiring Inspiring Iris Stamp Set

I will miss my favorite retiring Inspiring Iris! I love its images and the wonderful sayings included in this set. Check them out:

Image shows index of my favorite retiring Inspiring Iris stamp set

I also love making fancy fold cards so chose this Diamond Flip card to feature this lovely stamp set. I found the instructions on France Martin’s blog. The card at the top of this post is the end result. The designer series paper I used is a sneak peek of the Hand-Penned Designer Series Paper that is in the new 2021-2022 Annual catalog.

Supplies Used to Make My Favorite Retiring Inspiring Iris card

  • Inspiring Iris stamp set (149268)
  • Blackberry Bliss Cardstock (133675) 11″ x 4 1/4″ scored at 2 1/8″ and 5 1/2″, 3″ x 3″
  • Basic White Cardstock (159276) 5 1/4″ x 4″, 4″ x 3″, scrap
  • Hand-Penned Designer Series Paper (155499) available May 4
  • Memento Ink (132708)
  • Old Olive Stampin Blends Combo Pack (154892)
  • Highland Heather Stampin’ Blends Combo Pack (154887)
  • Daffodil Delight Stampin’ Blends Combo Pack (154883)
  • White 1/4″ Crinkled Seam Binding (151326)
  • Paper Trimmer (152392)

To order these supplies, click on the icons below. Watch my video tutorial here.

I am excited about the new 2021-2022 Annual catalog which will be live on May 4. Meanwhile there are lots of great products that are retiring to make way for the new. Check them out here and check out the new things on the clearance sale here. Thanks for stopping by.. Come back soon!