
I’m excited to share with you this Hot Dog Floating Gatefold Card today! Our granddaughter was just given two long-haired mini dachshunds for her birthday and I knew this would be the perfect card for her. We also share our home with a couple of very spoiled mini dachshunds so when the Hot Dog stamp set became available in the Stampin’ Up! January to June mini catalog, I jumped on buying it.
I used the following materials to make this Hot Dog Floating Gatefold Card
- Stamp set – Hot Dog
- Inks – Memento, Real Red, Lt Cinnamon Cider Blend, Lt Basic Black Blend
- Basic White Cardstock – 8 1/5″ x 5 1/2″ scored at 2 1/8 ” on both ends for card base, scraps of Basic White, and two strips 3″ x 1/4″ scored at 1/4″, 1 7/8″ and 2 3/8″
- Real Red Cardstock – scrap
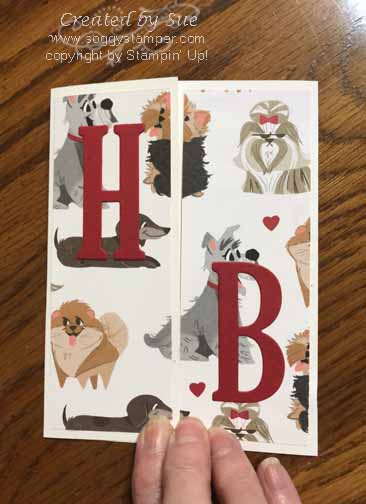
- Playful Pets Designer Series Paper – 5″ x 3 3/4″, 2 pieces 5 1/4″ x 17/8″
- Accessories – Stitched So Sweetly Dies, Retired Large Letters Framelits Dies, Stampin’ Cut & Emboss Machine, Multipurpose Liquid Glue, Stampin’ Seal
To Make Card
- fold card base on score lines. Then adhere dsp to card base.
- cut H and B from Real Red cardstock and adhere to front of card
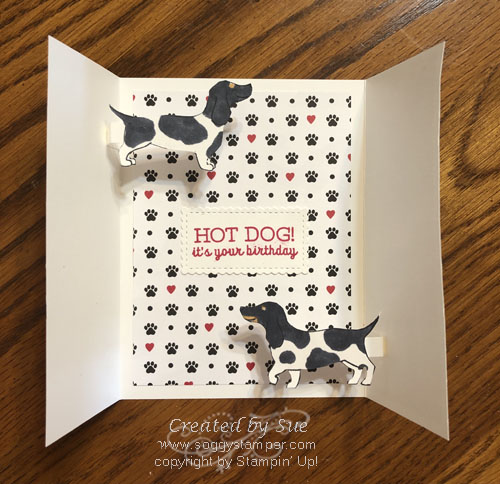
- stamp greeting with Real Red ink on white scrap. Cut out with a Stitched So Sweetly rectangle die. Adhere to inside center of card.
- stamp the dogs on Basic White cardstock scraps and color with Stampin’ Blends. Fussy-cut them out.
- Bend score lines on narrow strips of cardstock into a C shape. Adhere the 5/8″ end inside near bottom of right card front near the fold. Glue the dog to the strip being sure it doesn’t show below the closed card. Apply glue just to 1/4″ section and fold the strip back under the dog. Close card and press on the 1/4″ tab. Open card to be sure only the 1/4″ tab is glued down.
- Repeat this process in the upper left side of the card gluing the 5/8″ section to the inside of the left card front.
To order the supplies used in this card just click here. I appreciate your business.