Tag Archives: Timeless Tropical Stamp Set

Easy Faux Silk Technique

Handmade card using the Faux Silk Technique and Timeless Tropical Stamp Set

I made this beautiful card using the Faux Silk Technique. This technique is easy to do and gives a lovely texture to your background. You can stamp on the faux silk portion of the card or leave it a solid color.

How to do the Easy Faux Silk Technique –

Supplies:
Stamp set of your choice’
Ink colors of your choice
Piece of cardstock of desired size
Multipurpose Liquid Glue
tissue paper either white or colored about 1/2″ larger on all sides than cardstock

Instructions:
1. If you want a design on your faux silk, stamp it now on the piece of tissue paper. Then crumple the tissue paper into a tight ball.
2. Open the ball up and lightly smooth the tissue paper out leaving lots of wrinkles still in it.
3. Apply glue all over the cardstock using the broad end of the Multipurpose Liquid Glue.
4. Lay the tissue down on the glue pressing it down into the glue wrinkles and all. Allow to dry.
5. When dry, trim off the excess tissue paper and use this for a layer on your card. You could use a larger piece of cardstock and tissue paper and create a lovely paper for a small gift box.

To Make Card

Supplies:
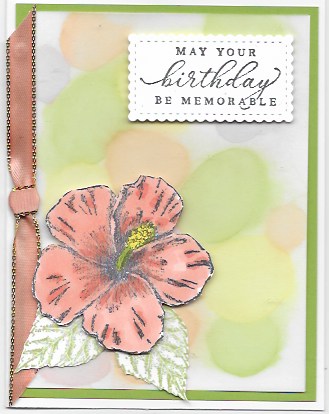
Stamp Set – Timeless Tropical (151497)
Inks – Old Olive and Soft Suede Stampin’ Write Markers, Memento Ink Pad, Combo Flirty Flamingo Stampin’ Blends
Cardstock – Crumb Cake 11″ x 4 1/4″ scored and folded at 5 1/2″ for card base, Old Olive 5 1/4″ x 4″, Whisper White 4 7/8″ x 3 7/8″ plus scrap for greeting, Soft Suede scrap
Accessories – Stitched So Sweetly Dies (151690), Multipurpose Liquid Glue, white tissue paper, paper snips, SNAIL adhesive, Stampin0 Dimensionals

Instructions:
1. Ink the palm tree stamp with the markers and randomly stamp all over the piece of tissue paper.
2. Follow the instructions for the Faux Silk technique as above.
3. Adhere the Old Olive CS to card front and the faux silk layer to the Old Olive layer.
4. Stamp the greeting and the plumeria flower on scraps of Whisper White CS with memento ink. Color the flower with the Stampin’ Blends and cut out with the paper snips.
5. Die-cut the greeting with the third from inside Stitched So Sweetly rectangle die and use the next size up to cut a layer from the Soft Suede CS. This leaves a fairly large border around the white label so I cut the Soft Suede layer down a bit. I show you how in the video.
6. Layer the labels together with SNAIL and then adhere them to the card front. Add the flower with a Stampin’ Dimensional.

Now it’s your turn to do the Faux Silk Technique. I’d love for you to share your end results with me. Email or text me a photo of it.

Easy Faux Bokeh Technique

handmade card created with the faux bokeh technique and Timeless Tropical stamp set

This Easy Faux Bokeh Technique is fun to do and makes a wonderful background! The bokeh effect comes from photography where the background is out of focus with pinpoints of light like this. The focus is distinctly on the main image.

sample of the bokeh effect

Easy Faux Bokeh Technique

Supplies:
Cardstock Vellum
At least three colors of Stampin’ Blends – darker colors show up better – I used dark Pumpkin Pie, dark Granny Apple Green, and dark Pineapple Punch
paper towel

Instructions:
1. Make a circle with one of the stampin’ blends and immediately burnish with the paper towel. Don’t even take time to recap the marker. Otherwise, the edge of the circle will dry and you won’t get the blurred effect.
2. Repeat this step several times with the first color randomly on the piece of cardstock vellum.
3. Change colors and repeat as desired.

To Make Sample Card

Supplies:
Stamp Set – Timeless Tropical
Inks – Memento and Pear Pizzazz ink pads
Stampin’ Blends – Dark Pumpkin Pie, Dark Pineapple Punch, Dark Granny Apple Green for bokeh background; Calypso Coral Combo, Dark Granny Apple Green, Dark Pineapple Punch
Cardstock – Whisper White 11 x 4 1/4″ scored and folded at 5 1/2″ for card base, 5″ x 3 3/4″, scraps for flower, leaves and greeting; Granny Apple Green 5 1/4″ x 4″; cardstock vellum 5″ x 3 3/4″
Accessories – In the Tropics Dies, Stitched So Sweetly Dies (next to the smallest rectangle), SNAIL adhesive, mini glue dots, Stampin’ Dimensionals, Gold Metallic Edged Ribbon colored with Light Calypso Coral Blend

Instructions:
1. Adhere Pear Pizzazz cardstock to Whisper White card base with the SNAIL
2. Do the technique on the Cardstock Vellum
3. Adhere the vellum to card front with SNAIL adhesive placing the adhesive in areas that will be covered up with the other elements.
4. Color length of gold metallic edge ribbon with the light Calypso Coral blend. Then tie an overhand know and adhere to left side of card with glue dot.
5. On Whisper White scraps stamp the leaves with Pear Pizzazz ink and the hibiscus flower with Memento ink. Color in the flower with the blends. Then cut out with the appropriate dies.
6. Stamp greeting on another scrap of Whisper White with Memento ink. Cut out with next to the smallest Stitched So Sweetly rectangle die.
7. Adhere the leaves to card front with SNAIL and the flower and greeting with Stampin’ Dimensionals.

If you need any of the supplies I used for this card, visit my online store. Use the host code when you order and I’ll send you a small thank you gift.

Another Ornate Floral Embossing Folder Idea

handmade card using Ornate Floral 3D Embossing Folder

Here is another Ornate Floral 3D Embossing Folder (152725) Idea. I shared my first card in this blog post. This time I also used one of the Ornate Border Dies (152724) along the right side of the card. This border die is so delicate that you really have to have it mounted on another piece of cardstock. In this case, I used Mossy Meadow cardstock for the card base. See the detail of the embossing folder in this close up photo.

To Make this Card:

  • Fold 8 1/2″ x 5 1/2″ piece of Mossy Meadow in half to form card base.
  • Die-cut right edge of 5 1/2″ x 4 1/4″ piece of Petal Pink cardstock with Ornate Border Die and die-cutting machine.
  • Use the Ornate Floral 3D Embossing Folder and the die-cutting/embossing machine to emboss the Petal Pink cardstock after the side is die-cut. To emboss first would cause the embossing to flatten when run through the machine to die-cut the edge.
  • Glue the Petal Pink layer to the card front with Multipurpose Liquid Glue or the Fine-Tip Glue Pen.
  • Stamp the greeting from Free as a Bird stamp set (149468) on Whisper White cardstock with memento ink and the plumeria flower from the Timeless Tropical stamp set (151497) on another scrap of Whisper White cardstock.
  • Die-cut the greeting with the next to the smallest Stitched So Sweetly Dies (151690) and the die-cutting machine.
  • Color the plumeria flower with the Calypso Coral Combo Stampin’ Blends (144045) and then either fussy-cut the flower out or use the corresponding die from the In the Tropics Dies (151495). Save 10% by purchasing the stamp set and dies together in the Timeless Tropical Bundle (153811). Then use a glue dot to attach it to the label.
  • Put some SNAIL adhesive on the back of the label and attach loops of gold and silver metallic thread to the SNAIL.
  • Use Stampin’ Dimensionals to adhere the label to the card front.

You can get the supplies needed to make this project by clicking on the items. They are linked to their location in my online store. When you place your order use the host code EQAYGMPG to receive a small thank you gift from me. Don’t use the host code if your order is $150 or more. With that amount you are your own host and will receive host benefits.