Category Archives: videos

Stunning Double Fan-Fold Card

This image is of a stunning Double Fan Fold Star Card

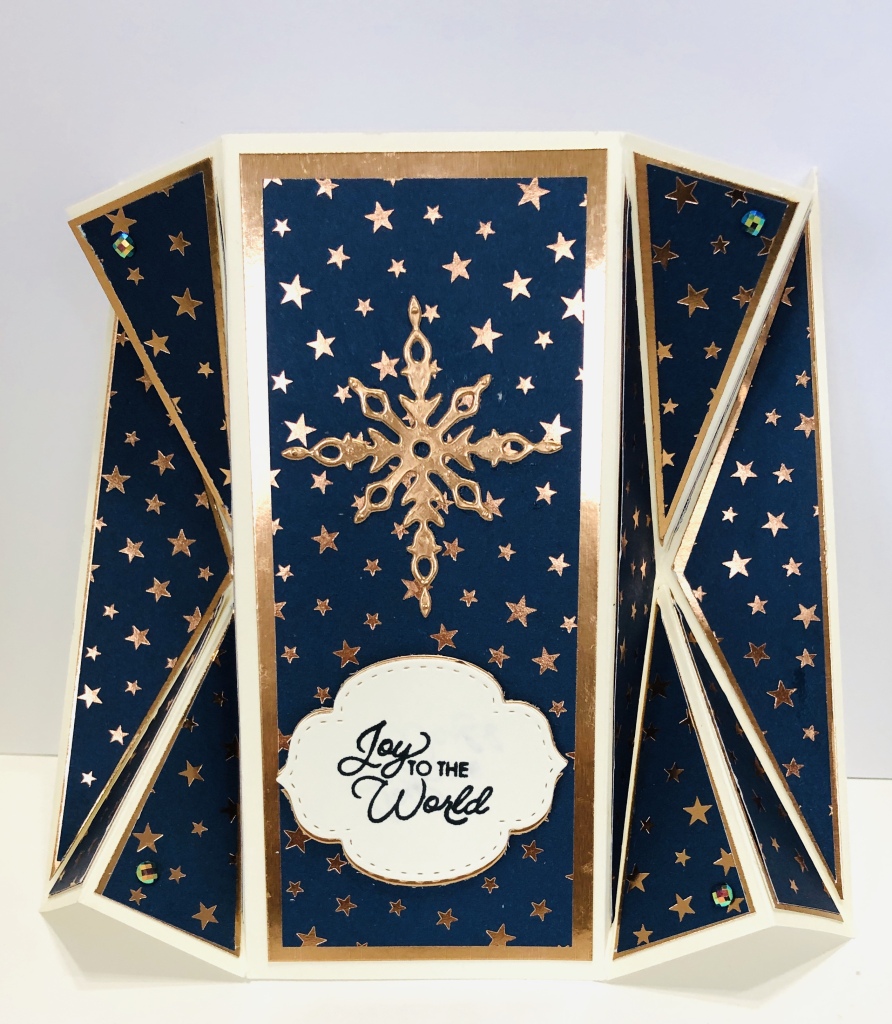
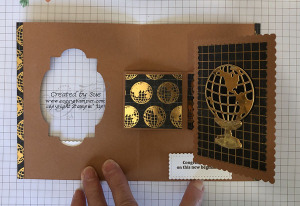
I love this stunning double fan-fold star card. If you have been following my posts you may have learned that I love fancy folds. Here and here are a couple other fancy fold cards I have shared. I thank Lavonne Schwendeman for sharing a template with the measurements and scoring directions on one of our facebook groups. This card can stand by itself and folds up to fit into a standard A2 envelope for mailing. I did a Facebook live demonstration of how to make this card yesterday and am sharing that video today with you. First, though, here are the supplies, cutting dimensions and scoring directions I used.

Supplies for the Double Fan Fold Star Card

  • Stamp set – Itty Bitty Christmas
  • Ink – Memento
  • Very Vanilla Cardstock 7 ½” x 5 ½” scored at 1¼”, 2½”, 5”, 6¼”. Then diagonally from top left corner to bottom of 2½” score and top of 2½” score to bottom left corner. Repeat with other end, scrap
  • Brightly Gleaming Specialty dsp – Night of Navy with copper stars 5” x 2”, 2 pieces 4¾” x 2”
  • Copper Foil Sheets – 5¼” x 2¼”, 2 pieces 5” x 2¼”, scrap
  • Accessories – Stitched So Sweetly dies, Starlight Thinlits Dies (retired), Blue Adhesive-backed Gems, Stampin’ Seal, Multipurpose Liquid Glue, Stampin’ Dimensionals

To get the supplies I used to make this stunning double fan-fold star card, click here.

Only Two More Days to Subscribe!

Flyer for July Paper Pumpkin shows that there are only two more days to subscribe.

There are only two more days to subscribe to the Paper Pumpkin in order to receive the July kit. This is one kit you don’t want to miss out on. Celebrate the magic of summer nights with the Summer Nights Paper Pumpkin Kit! In this exclusive fun-filled kit, you’ll unbox enough supplies to create nine postcard-style cards, coordinating envelopes, and die-cut tealight bags. What’s even more spectacular about July’s kit is the add-on you can purchase along with it! The Summer Nights Add-On includes 24 card bases and envelopes in coordinating Summer Nights designs. This add-on is perfect for helping you expand the Summer Nights creative experience beyond the Paper Pumpkin kit. Between the add-on and the leftover supplies from your Summer Nights kit, you will be crafting a summer night worth celebrating all month long! But you must be a subscriber by July 10 to receive this month’s kit. That means there are only two more days to subscribe. Check out this video then Subscribe now!

The Summer Nights Add-on (154973) can be added to your order of other products. This month is Bonus Days. For every $50 you spend in product during July, you get a coupon code by email worth $5 to be used in August. So…put together an order of $50 or more including the Summer Nights Add-on and start collecting coupons! Either email me your order or click on the ‘Shop Now’ button. Remember you also can collect Soggy Stamper rewards for shopping with me. Check out the details and download your tracking sheet here.

Stunning World of Good Grad Card

photo shows the front of the Stunning World of Good Grad Card
photo shows the Stunning World of Good Grad Card opened

This Stunning World of Good Grad Card is made with the wonderful World of Good Suite of products. This suite is shown on pgs 24 – 26 in the 2020-202 Annual Catalog and includes the Beautiful World stamp and dies bundle (154091), brass embossed World of Good Specialty Designer Series Paper (152491), Faux Suede Trim (152472), World of Good Memories & More Card Pack (153600), Old World Paper 3D Embossing Folder (153200), Antique Corners & Slides (152471) , and Brass Foil Sheets (153057). You can order all of this with just one number (154140).

I used the rectangle Rocker technique to make this card. When you open the card, the image behind the cut-out window on the card front rotates to the right. Interactive cards are such fun to make and receive. Watch the video below to learn how to do the technique.

The cutting measurements of the papers are:
Cinnamon Cider Cardstock (153078) 8 1/2″ x 5 1/2″ scored at 4 1/4″ for card base; 5 1/2″ x 2″ scored at 1/2″, 2 3/4″, and 4″, 3″ x 2″ scored on all sides at 1/2″ for mechanism: and 4 1/4″ x 3 1/4″ for moving panel
Basic Black Cardstock ( 121045) scrap
Whisper White Cardstock (100730) scrap
Brass Foil Sheets (153057) scrap
World of Good Specialty Designer Series Paper (152491)
Cinnamon Cider embossed map design 5 1/4″ x 4″
Checkered Black design 4″ x 3″
Black with globe design 2″ x 1-7/8″, 1-7/8″ x 1″

You can order the supplies I used to make this Stunning World of Good Grad card by visiting my online store or clicking on the links to be taken to each item’s location in my store.

Easy Faux Silk Technique

Handmade card using the Faux Silk Technique and Timeless Tropical Stamp Set

I made this beautiful card using the Faux Silk Technique. This technique is easy to do and gives a lovely texture to your background. You can stamp on the faux silk portion of the card or leave it a solid color.

How to do the Easy Faux Silk Technique –

Supplies:
Stamp set of your choice’
Ink colors of your choice
Piece of cardstock of desired size
Multipurpose Liquid Glue
tissue paper either white or colored about 1/2″ larger on all sides than cardstock

Instructions:
1. If you want a design on your faux silk, stamp it now on the piece of tissue paper. Then crumple the tissue paper into a tight ball.
2. Open the ball up and lightly smooth the tissue paper out leaving lots of wrinkles still in it.
3. Apply glue all over the cardstock using the broad end of the Multipurpose Liquid Glue.
4. Lay the tissue down on the glue pressing it down into the glue wrinkles and all. Allow to dry.
5. When dry, trim off the excess tissue paper and use this for a layer on your card. You could use a larger piece of cardstock and tissue paper and create a lovely paper for a small gift box.

To Make Card

Supplies:
Stamp Set – Timeless Tropical (151497)
Inks – Old Olive and Soft Suede Stampin’ Write Markers, Memento Ink Pad, Combo Flirty Flamingo Stampin’ Blends
Cardstock – Crumb Cake 11″ x 4 1/4″ scored and folded at 5 1/2″ for card base, Old Olive 5 1/4″ x 4″, Whisper White 4 7/8″ x 3 7/8″ plus scrap for greeting, Soft Suede scrap
Accessories – Stitched So Sweetly Dies (151690), Multipurpose Liquid Glue, white tissue paper, paper snips, SNAIL adhesive, Stampin0 Dimensionals

Instructions:
1. Ink the palm tree stamp with the markers and randomly stamp all over the piece of tissue paper.
2. Follow the instructions for the Faux Silk technique as above.
3. Adhere the Old Olive CS to card front and the faux silk layer to the Old Olive layer.
4. Stamp the greeting and the plumeria flower on scraps of Whisper White CS with memento ink. Color the flower with the Stampin’ Blends and cut out with the paper snips.
5. Die-cut the greeting with the third from inside Stitched So Sweetly rectangle die and use the next size up to cut a layer from the Soft Suede CS. This leaves a fairly large border around the white label so I cut the Soft Suede layer down a bit. I show you how in the video.
6. Layer the labels together with SNAIL and then adhere them to the card front. Add the flower with a Stampin’ Dimensional.

Now it’s your turn to do the Faux Silk Technique. I’d love for you to share your end results with me. Email or text me a photo of it.

It’s Fall and Paper Pumpkin Time – Flash Sale!

Banner for Flash Paper Pumpkin SaleBeen thinking about subscribing to Paper Pumpkin? Now is your chance to check it out for only $5. This is more than 50% off but the opportunity is only while a limited number of kits are available beginning this Monday! Check this video below out and then head to www.paperpumkin.com on Monday to subscribe. Please name me as your demo. Thanks!

cGet Set, Get Ready, Go Shopping!

Cover of 2018 Holiday Catalog


Now we can order from the exciting 2018 Holiday catalog! There are so many wonderful stamp sets, designer series papers, and accessories in this catalog to make creating your fall/winter themed cards, scrapbook pages, and home decor items.Watch this video from Stampin’ Up! to see some things created with the products.

Now click on the catalog picture on the side bar to go to access the Holiday catalog online. Better yet, if you haven’t already received a catalog, send me your address and phone number and I’ll contact you about sending you one. There really is nothing better than holding the catalog in your hands and drooling repeatedly on the wonderful things inside!

Leave a comment below about what your favorite item is.

Color Your Season Promotion

Picture of Stamin' Up!'s Color Your Season August Promotion


Stampin’ Up! is offering a very special Color Your Season bundle of a very versatile stamp set covering a variety of seasons and set of dies that contains dies to cut out some of the images in the stamp set plus three sizes of label dies that not only cut but also emboss stitching on both sides of the cut! At the same time, they are offering as a separate item, Watercolor Pencils Assortment 2, a second set of watercolor pencils in some of the new Stampin’ Up! colors. This set of watercolor pencils is on an ‘as supplies last’ basis but may be in a future catalog. The Color Your Season bundle is only available this month and as quantities last. Watch this video as Shannon West, one of the Stampin’ Up! employees demonstrates the versatility of this bundle and watercolor pencils. Then hurry over to my online store or click on the images below to order your bundle and set of watercolor pencils while they are still available. You will be so happy you did!


Back From On Stage Live!

Stamparatus header

The most exciting new product from Stampin’ Up! is the Stamparatus! Oh my goodness! We all went crazy when they demonstrated this new and innovative way to precisely position stamps on multiple cards at On Stage Live. The Misti is well-known by many stampers but Stampin’ Up! did not want to just sell Mistis, they designed an over-the-top product to accurately position stamps. Not only does it do this but so much more! Check out this video by Stampin’ Up! to introduce the Stamparatus.

So you are excited like I am?  I was all ready to order one the day after I got home from On Stage. However, Stampin’ Up! is trying a new way to launch a new product. They are trying a reservation system. There are three reservation windows:

  • November 16 at 2 pm MT – November 30, 2017 with delivery date approximately Feb 1, 2018
  • December 5 – 30, 2017 with delivery approximately March 19, 2018
  • January 15 – 30, 2018 with delivery approximately April 15, 2018

The price of the Stamparatus is $49 USD/$65 CAD. You have to provide credit card information at the time you make the reservation but it won’t be charged until the Stamparatus is shipped. You may participate in all three reservation  windows but can only order one at a time. Click here after 2 pm on Nov 16 to place your reservation.

Awesome Limited-Time Host Promotion

Merry Patterns Samples
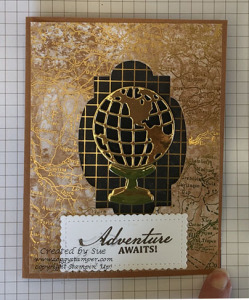
‘These are just some of the wonderful cards you can make with the Merry Patterns stamp set that is a free exclusive Host set. How do you get this set? By hosting a workshop of $300 or more in product sold. That’s all! Check out this video by Stampin’ Up! and then contact me to see how you can host a workshop. (It doesn’t have to be a real-time workshop in the Skagit Valley!)September Host Code

Z2CTPN2C Don’t use if your total is $150 or more

The 2017 Holiday Catalog Is Live!

photo of front of 2017 Holiday catalog

September 1st was the beginning of the 2017 Holiday Catalog sales period and I am so excited to share with you some of the many very cool stamps, papers, and accessories to be found between the covers of this catalog. You can download it here or better yet contact me so I can send you a free catalog for you to hold in your hands and pour over until it gets dog-eared. This video by Stampin’ Up! will give you a peek at some of the products. Check it out!

MDS Monday – Herringbone Technique

Digital birthday card with a herringbone background using Be Yourself designer series papers

Welcome to MDS Monday. This week our challenge is to make a herringbone background using narrow rectangles. Here is the challenge sketch:

MDSM86 challenge sketch using a herringbone backgroundI filled rectangles with various patterns of designer series paper from Be Yourself May Digital Download and solid colors chosen by the color picker to match the designer series paper. The grosgrain ribbon started out as Regal Rose and I recolored it with Rich Razzleberry color. The starburst came with the Game Daby Photobook template.

The technique is shared in this video by Juanita Golson

T

To order the downloads I used, click on the links below.

Remembering 9/11

I have been thinking about what I want to say today in remembering 9/11 and the people who died that day. To the families of those who died, the memories may be still very painful.

I just saw a video I want to share here because it honors a lot of ordinary people who accomplished an extraordinary feat on that infamous day. As you remember all those who died, also give thanks to those unsung heroes who helped thousands who lived through the horror of that day. Watch the video and say a prayer of thanks.

Check out this video!

Hey, guess what! I am finally creating videos! Yes, I am excited about this. So far, they are short ones showing a specific technique but I am officially vidoetaping. Check out this one on How to perfectly center an image in a punch.


Now go subscribe to my YouTube channel so you will get notification when I upload new videos.

My Digital Studio Monday – Video At Last

J&C's Anniversary card-001
A couple weeks ago I shared this card and said I would make a video showing some shortcuts I used in making the card. Check the blog post here for the details of the card. I finally finished the video tutorial! Wahoo! This is only my second video so I still have a lot of 'uhs' and 'ummms', sorry. I hope you enjoy it and find it helpful.

Thanks for watching it and for visiting My Digital Craft Corner today. Do come back tomorrow to see what new downloads Stampin' Up! has for MDS2.

Until next time…blessings,
Sue
sue@mydigitalstudio.com