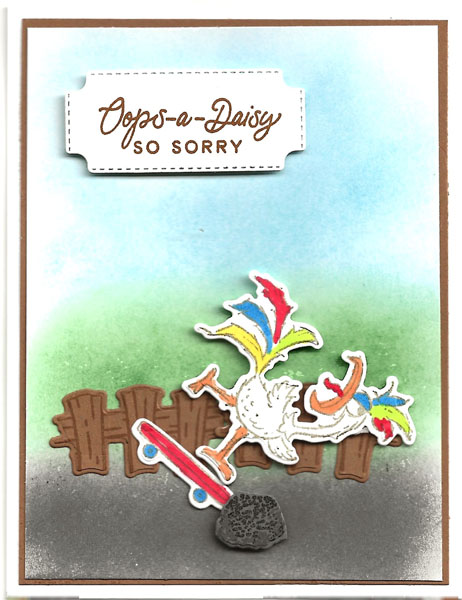
I sure will miss the funny Hey Chuck bundle. The Hey Chuck bundle works so well with the Hey Birthday Chick Bundle and the Hey Chick bundle that are already retired. The Hey Chuck stamp set has already sold out but the dies, Hey Chuck Dies (161552) are still available. If you have the stamp set but not the dies, snap them up now! They are on sale. These are my favorite cards using Hey Chuck.
I just checked my online store and only the dies of this bundle are still available. If you have the stamp set and did not get the dies, you NEED to get the dies right away! In three days they will be retired. On May 1, the only way you will be able to get them is on the secondary market. Click here to order them.
It’s Your Turn. Complete this Sentence. I Sure Will Miss The…
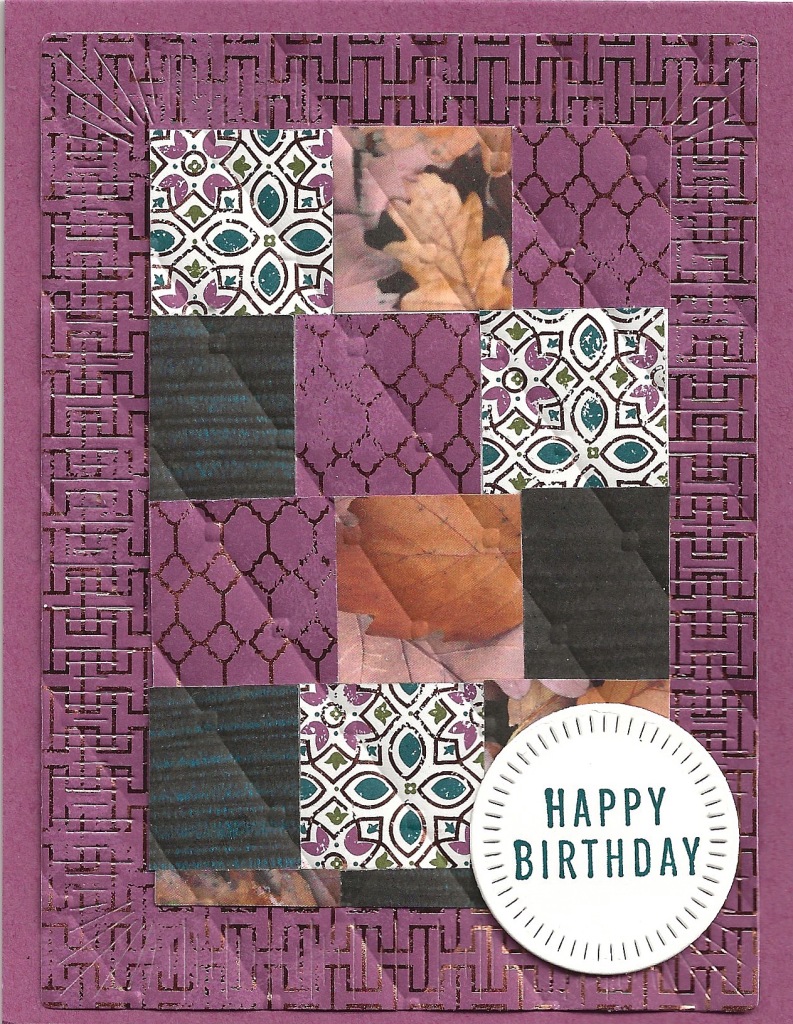
This beautiful quilted card is so easy to make! I love the new All About Autumn Specialty Designer Series Paper (162178) with it’s so many beautiful designs. One side of the paper is a print and the reverse side is copper embossed patterns. I cut 1″ x 6″ strips of a couple designs into 1″ squares. You could do this with a 1″ square punch if you have one but it might take more time. Then I glued them down alternating sides and patterns on a piece of Basic White cardstock and trimmed the cardstock to 2 3/4″ x 4 1/4″.
The next step was to adhere this layer to a piece of 5 1/4″ x 4″ designer series paper that had been die-cut with the large rectangle Radiating Stitches Dies. Embossing the piece with an embossing folder and the Stampin’ Cut & Emboss Machine simulates the quilting stitches. I used the retired Tufted embossing folder but other ones that don’t have a high degree of detail would work.
The final step was to adhere this focal piece to the Moody Mauve cardstock base. I stamped a greeting from Translucent Florals stamp set on Basic White cardstock with Pretty Peacock ink and die-cut it with the circle from Radiating Stitches Dies. This was adhered to the card front with a Stampin’ Dimensional.
Supplies Used for the Beautiful Quilted Card
Stamp set – Translucent Florals
Ink – Pretty Peacock Classic Stampin’ Pad
Paper – Moody Mauve Cardstock 8 1/2″ x 5 1/2″ Basic White Cardstock scrap and 5″ x 3″ All About Autumn Specialty Designer Series Paper 1 piece 5 1/4″ x 4″, strip of two or three different patterns 6″ x 1″
Embossing folder of choice – I used the retired Tufted embossing folder
Adhesives of choice – I used Multipurpose Liquid Glue and Stampin’ Seal
Stampin’ Cut & Emboss Machine
For your convenience, I have these items in a shopping cart in my online store. You can delete any item you already have.
September Gift with Purchase
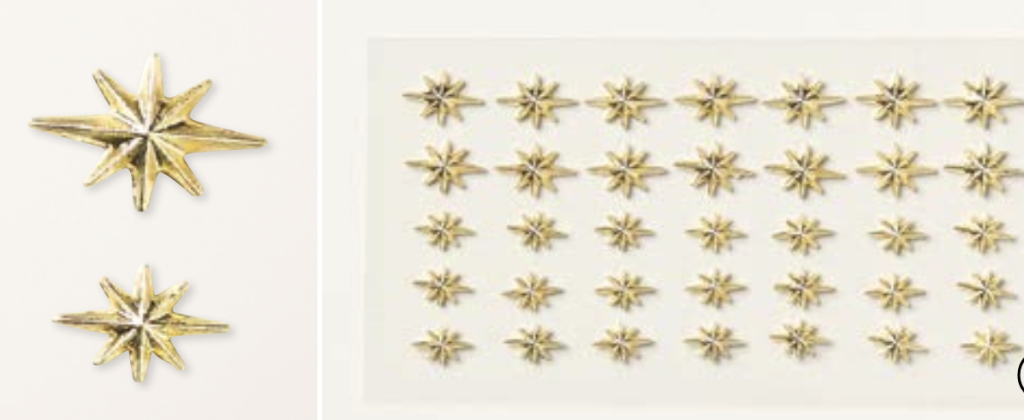
I truly appreciate my customers and thank them when they purchase $75 or more with a free gift. This month is the great Adhesive- backed star trinkets found in the new Sept-Dec mini catalog which goes active on Wednesday. If you live in the United States and don’t already have a demonstrator, I’d love to be yours. Email me with your name, mailing address and phone number and I’ll send you a free catalog.
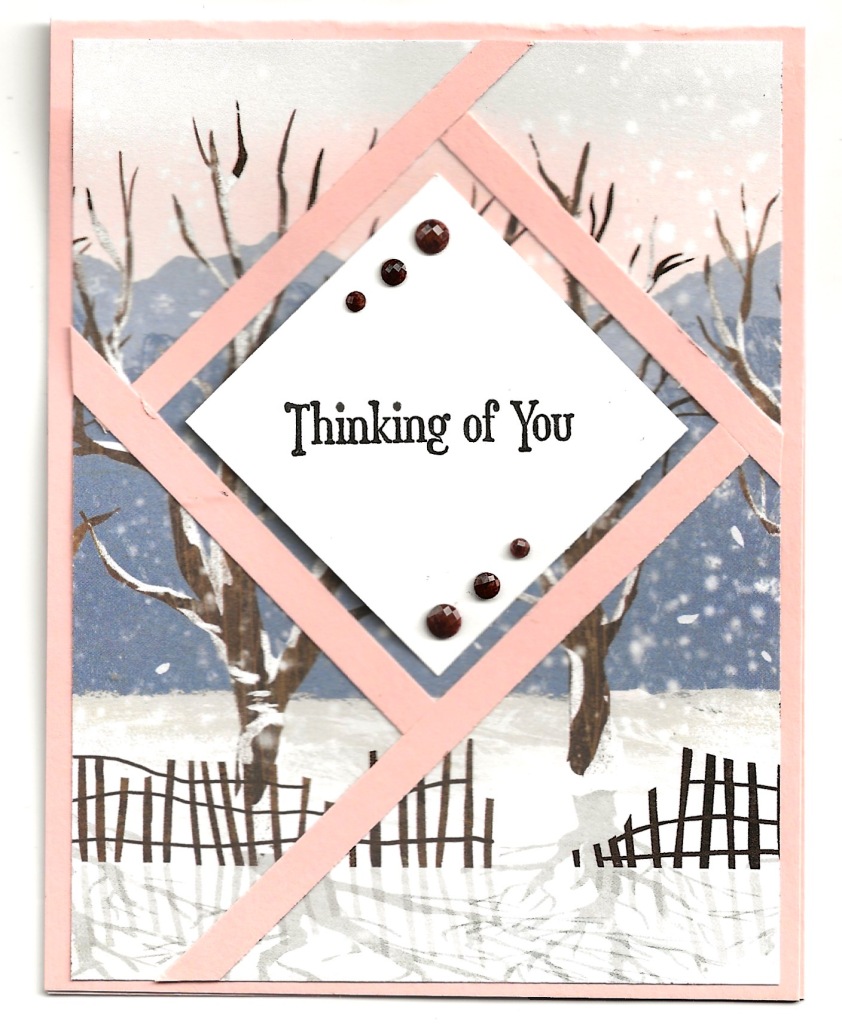
I created this card using the beautiful easy Fractured Card Technique. It is also called the Faux Shutter Technique and in a camera shutter. While it looks very complicated because it looks like the designer series paper has been cut into pieces and then adhered, it is really quite easy. Other Fractured Card techniques call for die-cutting the diamond out of the top and second layer, putting a piece of cardstock behind the opening, and then applying the strips of cardstock on top along the opening of the top layer.
In my technique, I put down a temporary 2 1/4″ mask in the center of the card and apply the strips around the mask. Then I remove it and add the top 2″ square that has been stamped with an image or greeting.
Supplies Used for this beautiful easy Fractured Card Technique
Quiet Meadow Stamp Set for greeting
Petal Pink Cardstock – 11″ x 4 1/4″ scored and folded at 5 1/2″ for card base. Four 1/4″ strips about 5″ long. For ease of adhering, apply Adhesive sheet material to back of cardstock before cutting the strips.
Basic White Cardstock – one piece 2 1/4″ square for a mask and one piece 2″ square
One Horse Open Sleigh Designer Series Paper – 5 1/4″ x 4″
Early Espresso Classic Stampin’ Pad
Natural Tones Stampin’ Blends Deep -dark to color gem
Adhesive-backed Solid Gems
Adhesive Sheet
Other adhesives of choice
Paper Trimmer
Paper Snips Scissors
Click here to find these items in a shopping cart in my online store for your convenience. You can delete any items you already have.
Once you have your needed supplies gathered, stamp along with me while watching my Facebook Live replay.
Thanks for joining me today. grab a cup of coffee or tea and take some time to look around my blog. I have lots of interesting projects. Please also leave a comment so I know you have been here.
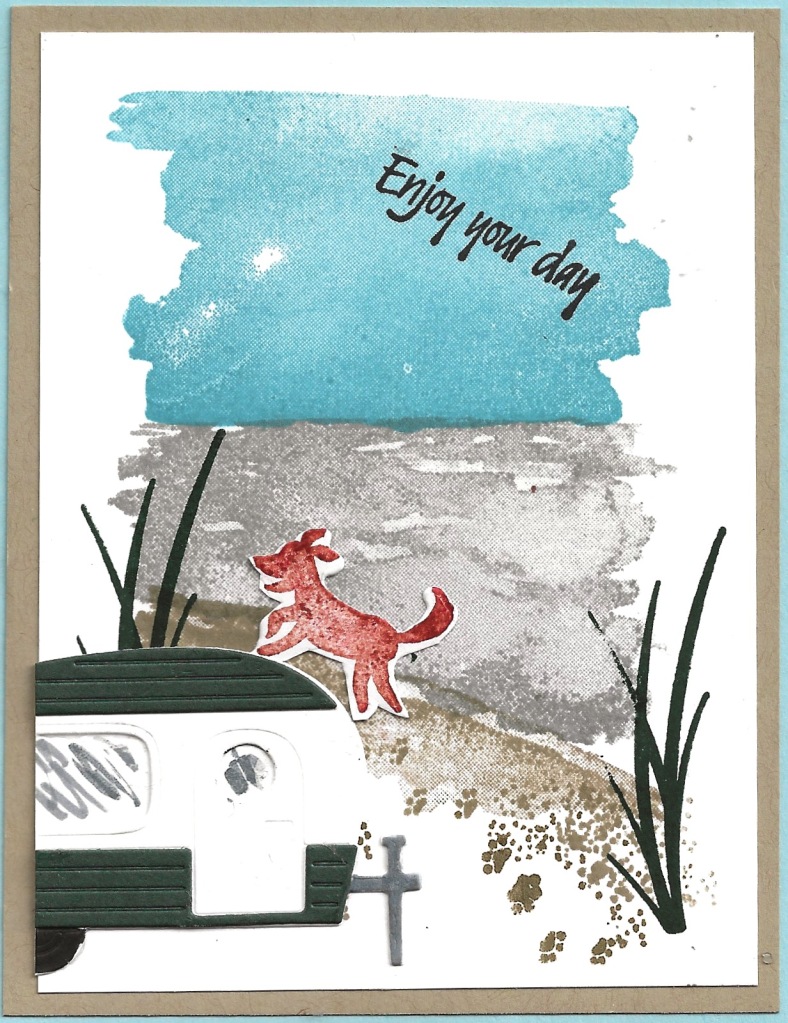
The Tree Lot Dies Go to the Beach in this last card featuring the Trees For Sale and Tree Lot Dies. The July Bundle of the Month is this combination of the Trees For Sale stamp set and the free Sale-a-Bration $100 level gift Tree Lot Dies. When you purchase the Trees For Sale and get the Tree Lot Dies from me during July, I will send you a free bundle of 5 tutorials to make the cards I have shared here on my blog and on my mailing list.
In making this card, I added the Oceanfront stamp set to the Tree Lot Dies to make a beach scene. The greeting comes from the Heron Habitat stamp set. My pooch sure is having fun running on the beach. Check out the previous cards I have shared using this ‘bundle’. You can find them here and here, and you can see some ideas the Stampin’ Up! concept artists stamped here.
Supplies for the Tree Lot Dies Go to the Beach card
Pool Party Cardstock 11″ x 4 1/4″ scored and folded at 5 1/2″ for card base
Crumb Cake Cardstock 5 1/2 ” x 4″
Basic White Cardstock 5″ x 3 3/4″, scraps for trailer and dog
Evening Evergreen Cardstock scrap
Tree Lot Dies (159938) Free with a $100 purchase
Multipurpose Liquid Glue
Stampin’ Seal
Paper Trimmer
Mini Stampin’ Cut & Emboss Machine
Here is the shopping cart with these supplies in my online store. You can remove the items you already have. You will need to add the Tree Lot Dies when you place your order.
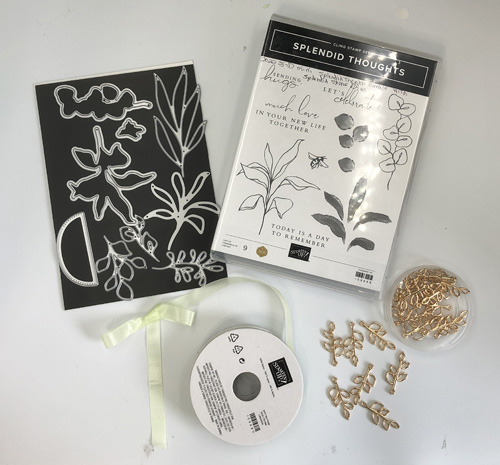
Here is a sneak peek at the beautiful Splendid Thoughts Suite. The stellar part of the suite is the Splendid Day Specialty Designer Series Paper. One side of each sheet of paper is embossed foil, gold, each design a different gorgeous color. I like to cut a 3″ square from each sheet, cut it in half diagonally and mount the squares showing the two sides on the cardboard that comes in the package.
As well as the Splendid Day Specialty Designer Series Paper, the Splendid Thoughts Suite includes the Splendid Thoughts Bundle, Soft Sea Foam seam binding ribbon, and Open Leaf Trinkets.
Sneak Peek of Beautiful Splendid Thoughts Suite Card
I cased a card by Christy Fulk that I saw on Facebook to make this card. The supplies and cutting measurements are listed below. Since the July – December mini catalog is not live yet (have to wait until July 1, sorry) I can’t give you links to the products in the suite. However, if you want to order this suite before July 1, join my team of demonstrators, start your own business, and have the privilege of pre-ordering new supplies. Contact me at sue@soggystamper.com or visit my demonstrator website for more information.
Splendid Day Specialty Designer Series Paper (159666) 5 1/2″ x 3″, 4″ x 3″
I also want to remind you that the January – July mini catalog shopping period ends June 30. While some of the product in this catalog carried on into the 2022-2023 Annual catalog, the rest of the products are on a last-chance basis with some discounted and some already sold out. this is your last chance to order them. Visit my online store to see what is discounted and what is still available. Be sure to order those items you have had your eye on before it’s too late!
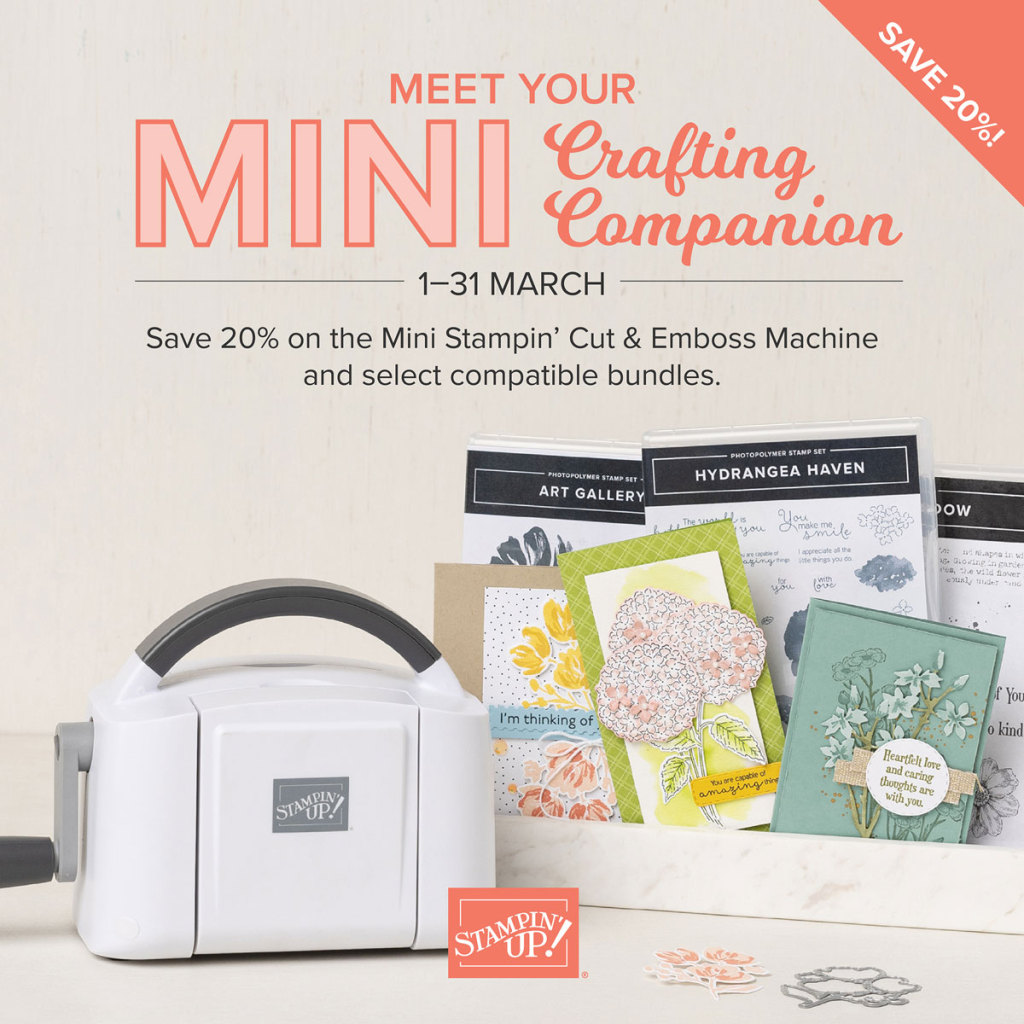
Today’s your last chance to get this great Mini Stampin’ Cut and Emboss machine and selected stamp/dies bundles at 20% off! This little die-cutting machine is the perfect size for a small crafting area as the platforms fold up taking less storage space. It is lightweight yet sturdy and most of our dies will fit on the cutting plates. an added incentive for buying it today is that the price is increasing with the new 2022-2023 Annual catalog.
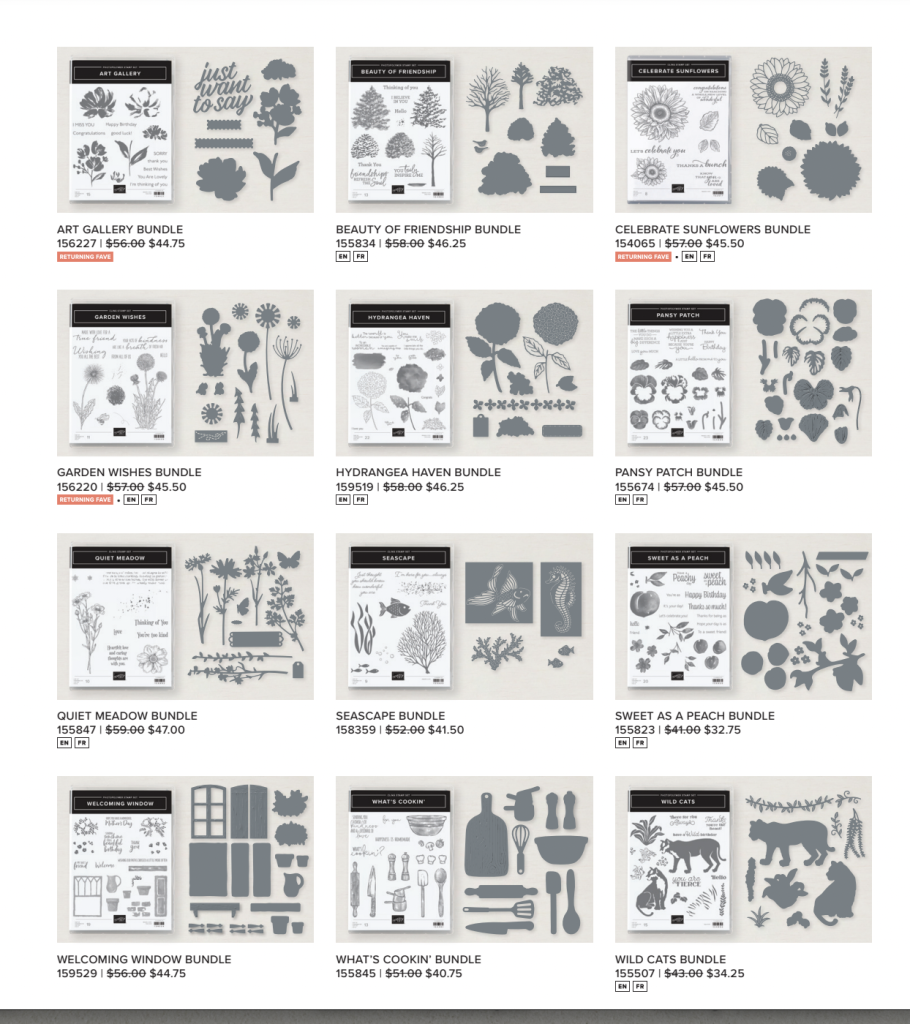
I don’t want you to miss out on getting these bundles either. Certainly some of them are on your wishlist and now is the time to get them. Check them out!
I have several of these bundles and want to share some of the cards I have made with them.
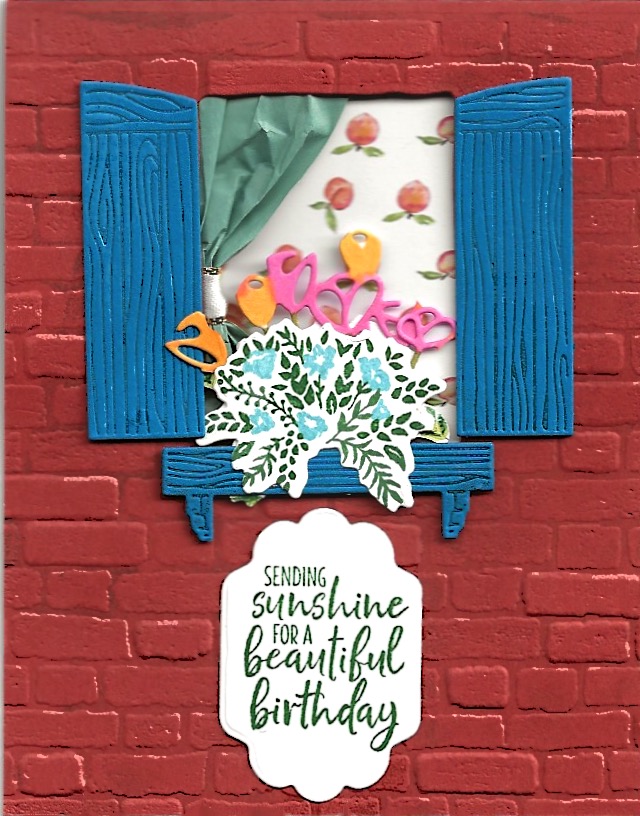
Welcoming Window Bundle
The first one is with the Welcoming Window bundle (159529) that I bought with this sale. I inked one side of the Brick & Mortar embossing folder (149643) to make it look aged. The dies for the shutters and window box were also inked for additional depth of the embossing. The curtain is a piece of cotton paper that was in the Eden’s Garden collection last fall.
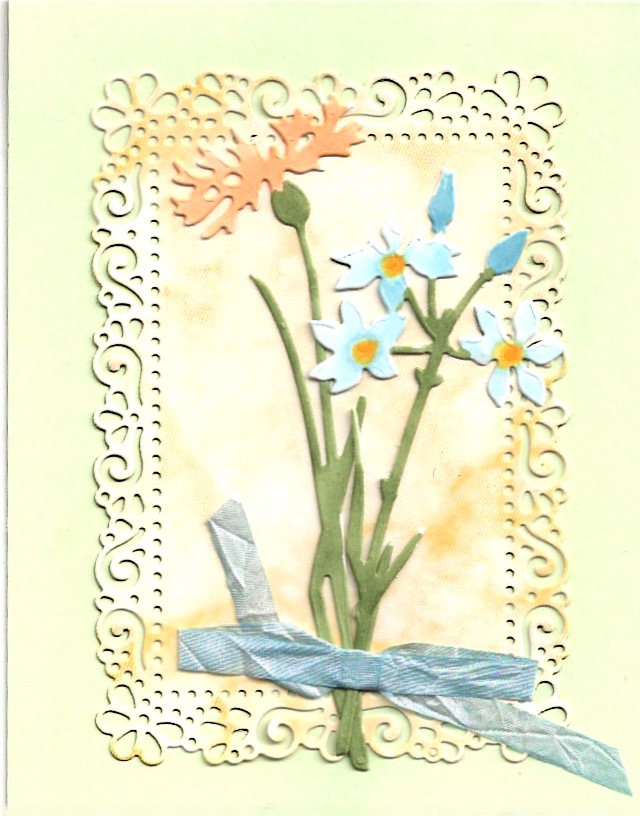
Quiet Meadow Bundle
The Quiet Meadow bundle (155847) is perfect for vintage and collage type cards. While the dies do not cut out any of the stamped images, they compliment the images. In the first card, I just used the dies cutting out two of the flowers from Basic White cardstock and coloring them with Stampin’ Blends. I cut a piece of designer series paper with one of the retiring Ornate Layers dies (152726) and used it as a subtle background. I colored a length of White 1/4″ Crinkled Seam Binding with a Balmy Blue Stampin’ Blend for the bow.
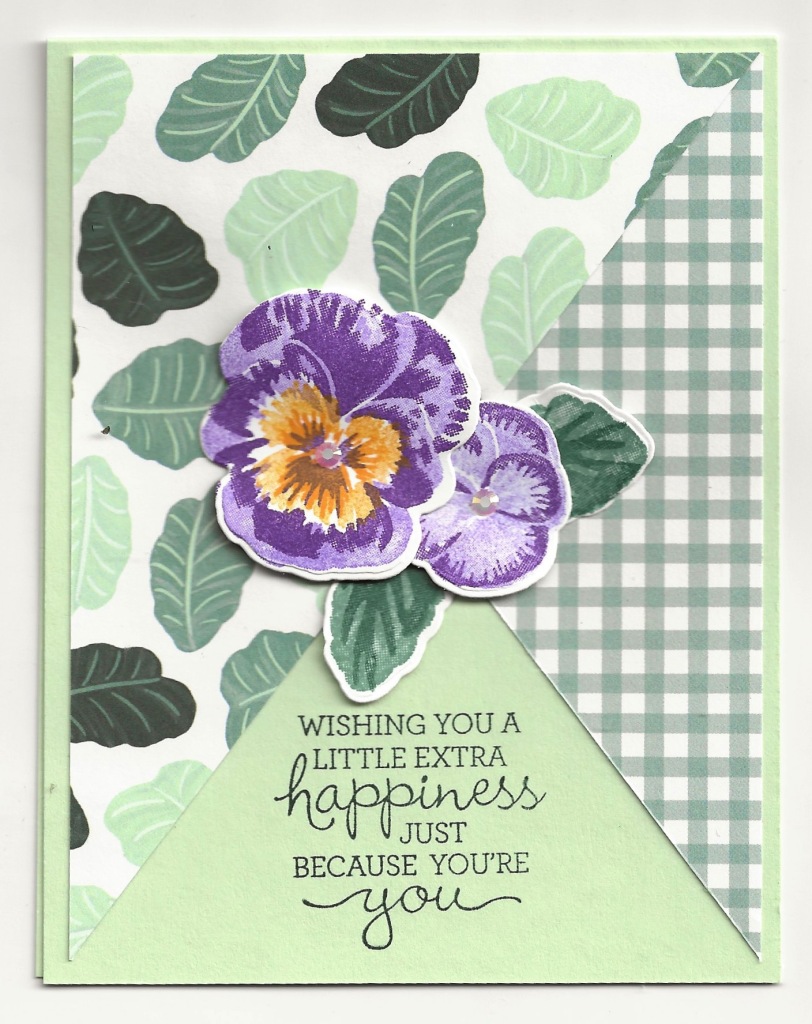
Pansy Patch Bundle
The last two cards I want to share with you are created with the Pansy Patch Bundle (155674). The first one uses one of the Pansy Petals designer series papers (155807) and stamped flowers die cut with the dies. Your creativity knows no limits when it comes to combining colors for these cheerful pansies. My second card features the dies to create three dimensions to the flowers. I used one of the Scalloped Contours dies (158356) to cut out a piece of the Pansy Petals designer series papers.
I hope you have enjoyed seeing these cards and that they will inspire you to buy a couple of the bundles today while they are on sale. Check out the sale ones here! I appreciate you ordering from me.
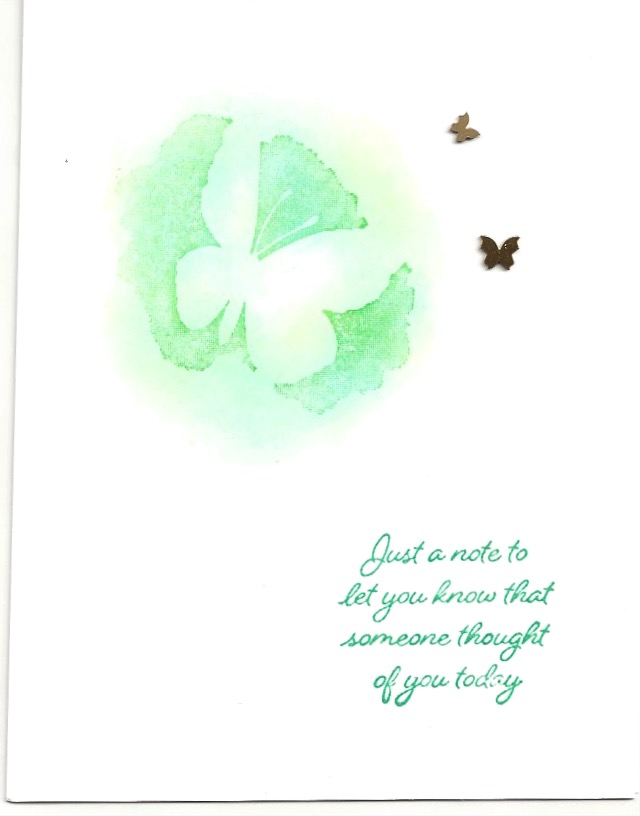
I created this Beautiful Amazing Silhouettes sneak peek for a couple of reasons. First, the weekly challenge on SUDSOL, an online group I belong to, was to create and share a Clean and Simple card. A Clean & Simple card is one where there is a lot of white space, space where there is no embossing, stamping, designer papers, or embellishments. A C & S card has minimal layers and clean lines.
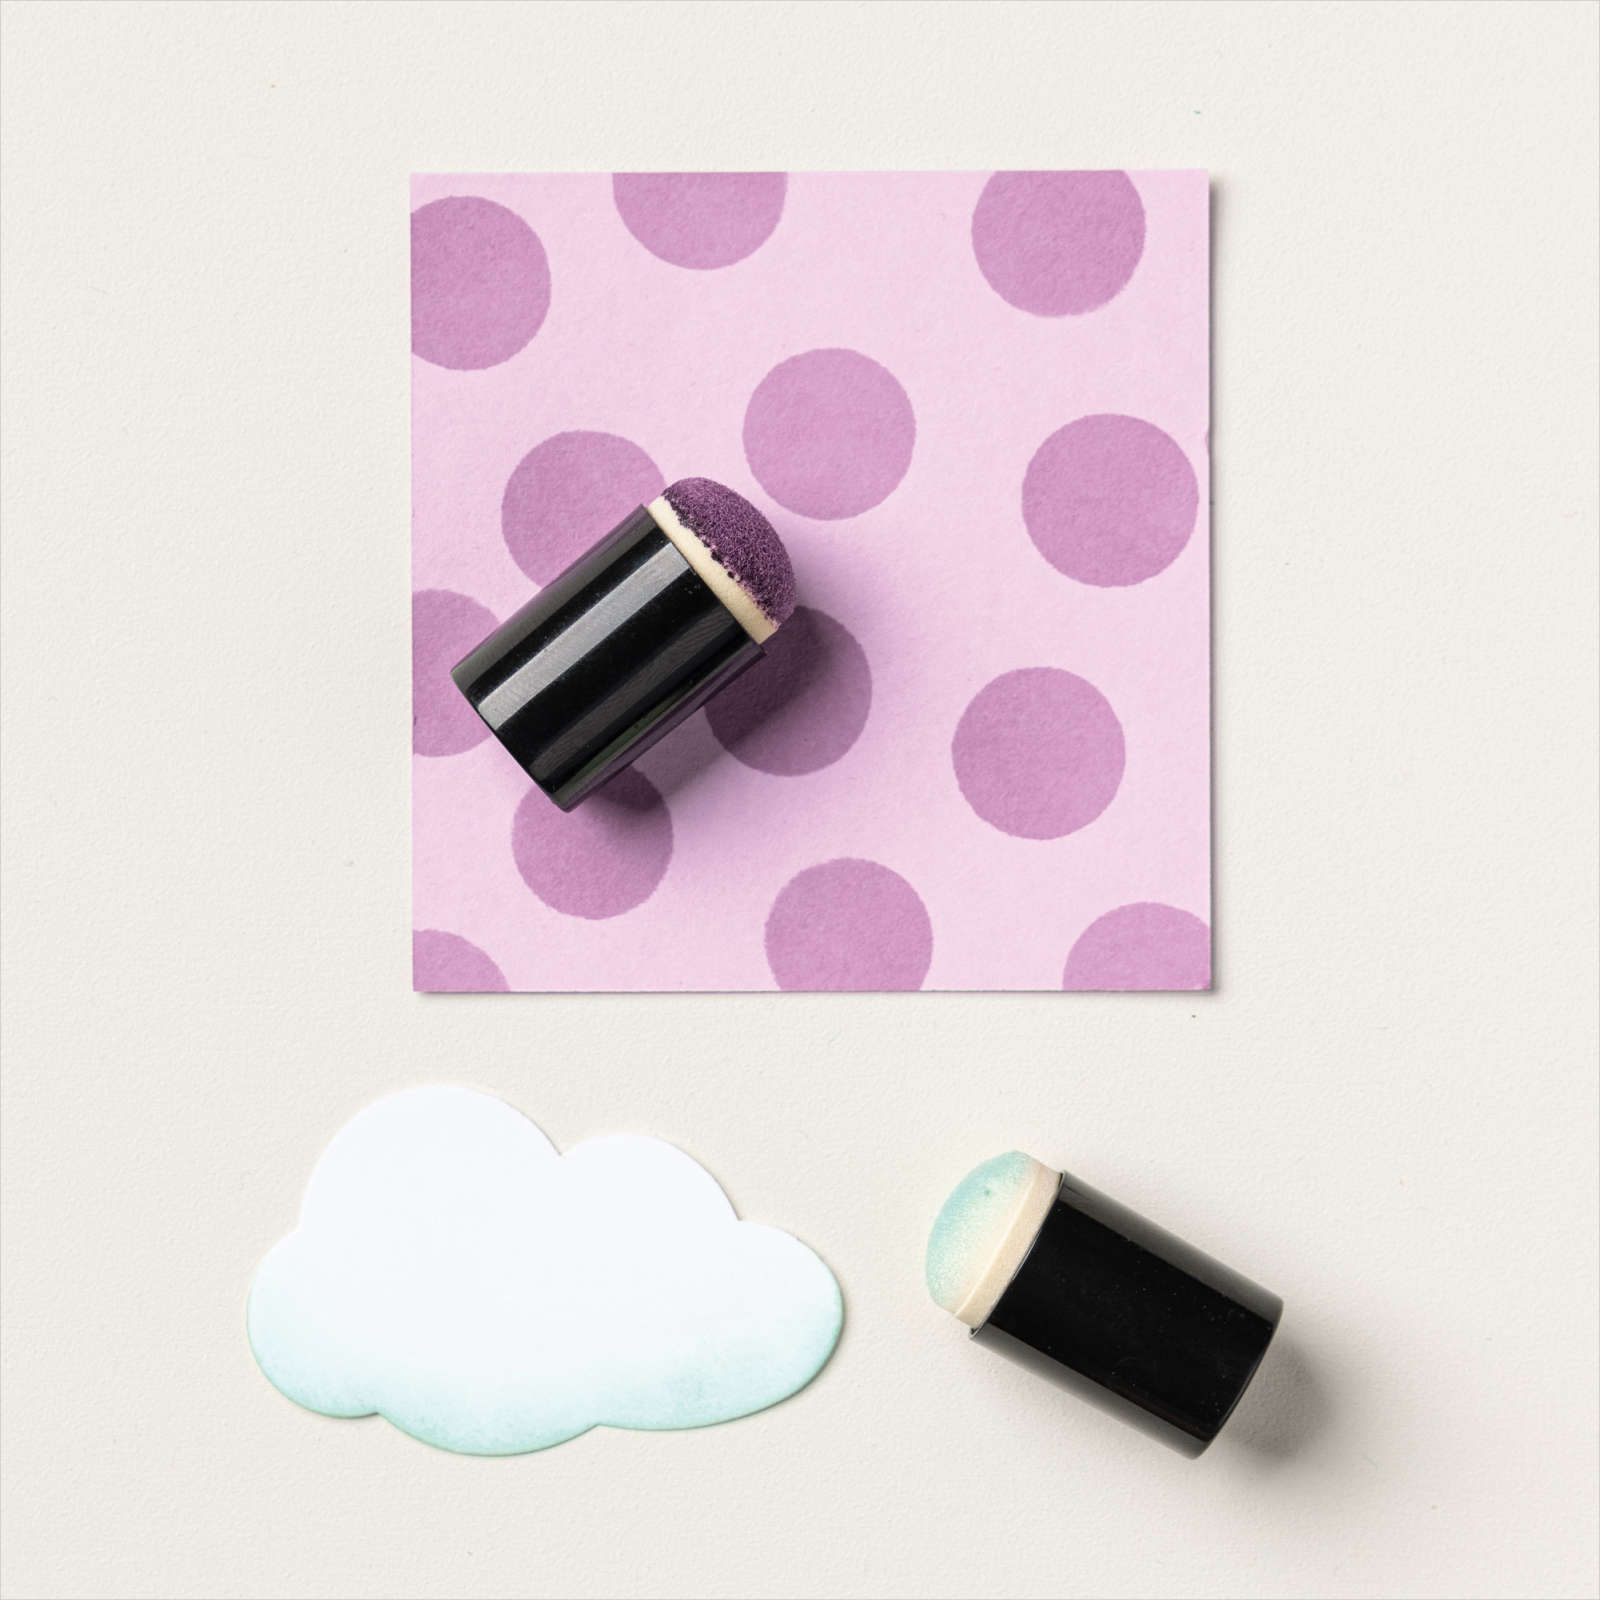
I received this Amazing Silhouettes stamp set as a prize during the Stampin’ Up! OnStage at Home virtual convention this November and originally thought I would trade with someone for a different set. The style of this set just wasn’t my style. But I started thinking of ways to use this set and came up with the poppin’ pastels technique.
To do this technique, you stamp the image on cardstock with versamark ink. Then you use a sponge dauber, q-tip, or your finger to burnish soft pastels chalk into the ink. it’s an easy and lovely way to enhance an image. I think it is perfect for this butterfly. I added a couple of Brushed Brass Butterflies which were also a prize for accent. The greeting from Encircled in Friendship is stamped in Coastal Cabana ink.
Supplies used to make this Beautiful Amazing Silhouettes Sneak Peek
Amazing Silhouettes stamp set – available January 4, 2022 or now if you join my team as a demonstrator – demonstrators get to preorder the month before a catalog goes live
Encircled in Friendship stamp set
Versamark Ink
Coastal Cabana ink
Soft Pastels – Granny Apple Green and Coastal Cabana
Brushed Brass Butterflies – available in new January – July mini catalog
Basic White cardstock 11″ x 4 1/4″ scored and folded at 5 1/2″
Click on the images below to go to my online store to order them. The Amazing Silhouettes stamp set and brushed brass butterflies are not available until Jan 4 If you want them now, contact me about becoming a demonstrator on my team. I’d love to have you join me in this great business.
This is Nature’s Harvest Bundle card #1 of a collection I am creating using the Nature’s Harvest Bundle (156813). I especially love the way this card came out. I started the creative process by stamping the image with Gray Granite ink on Basic White cardstock and coloring it with Stampin’ Blends. After I cut it out with the dies, I started looking for a way to highlight the image and found this beautiful pink design from the Expressions in Ink Specialty Designer Series Paper. And the card evolved from there. I love it when a project takes on a life of its own!
I have enjoyed sharing this Nature’s Harvest Bundle Card #1 with you. Come back to my blog again to see other cards I have made using the Nature’s Harvest Bundle
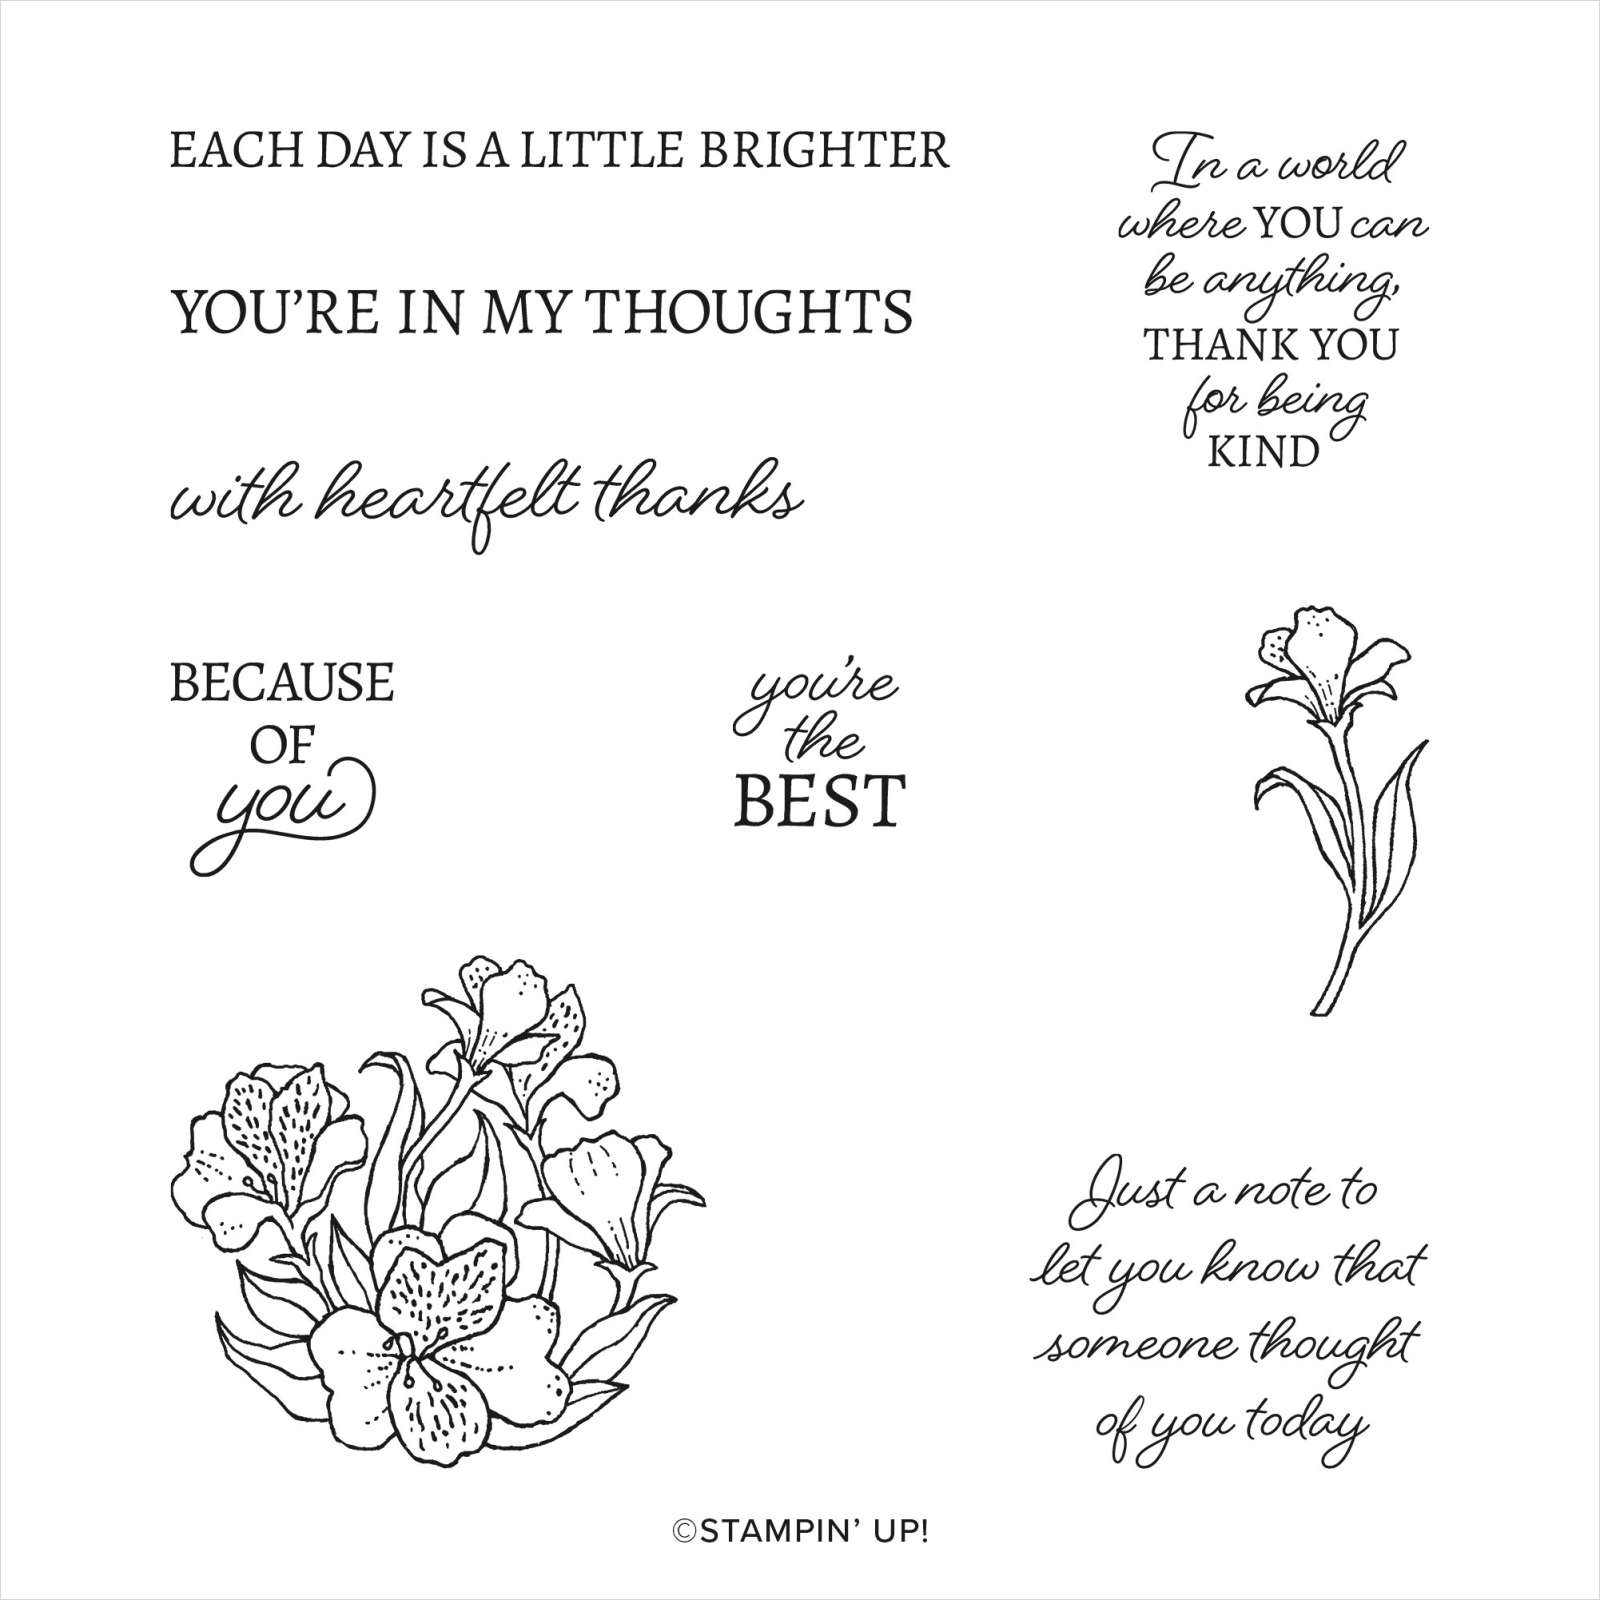
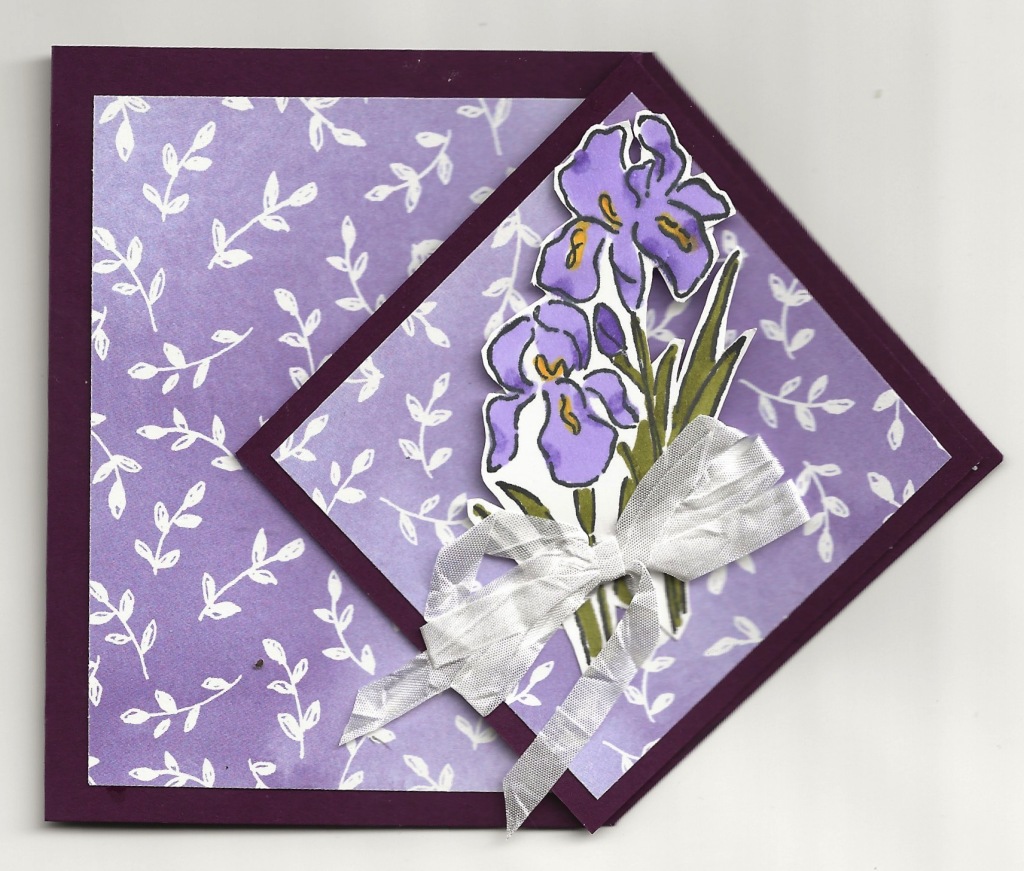
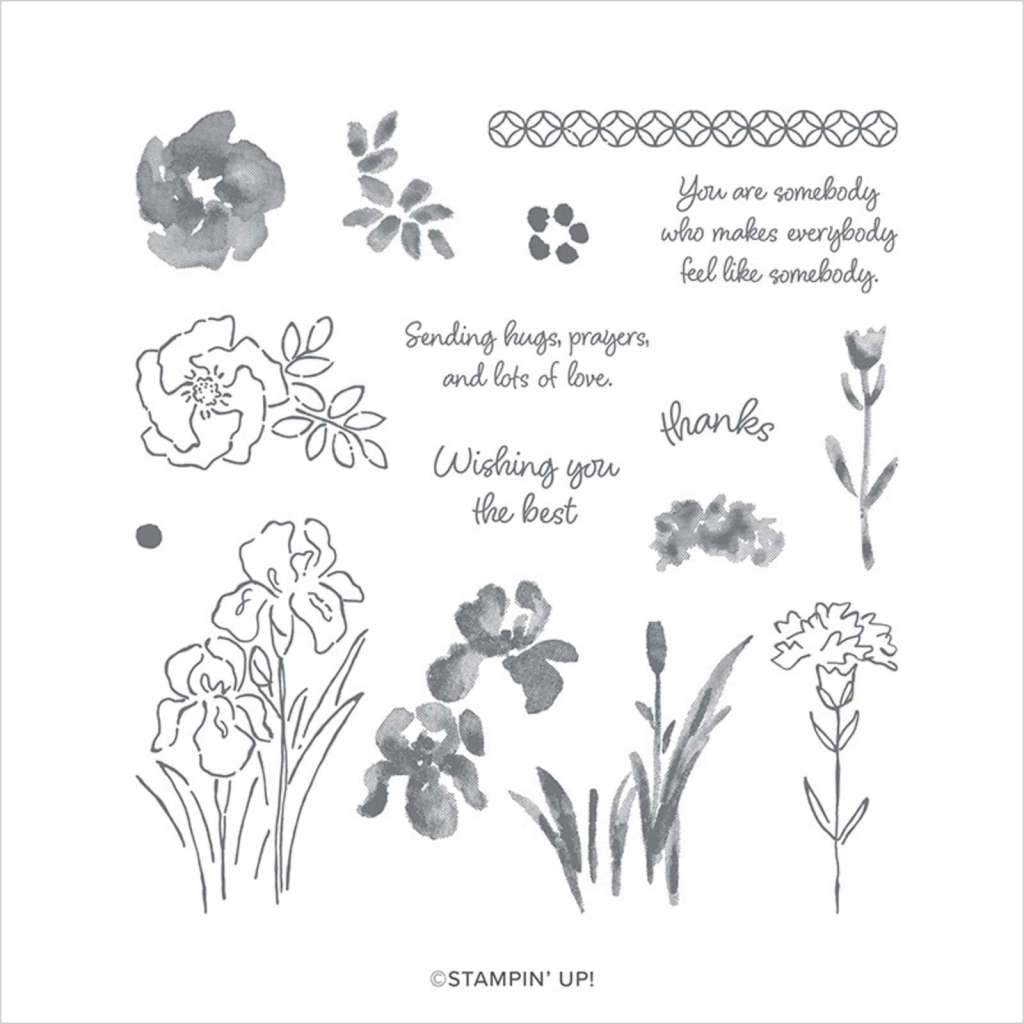
I will miss my favorite retiring Inspiring Iris! I love its images and the wonderful sayings included in this set. Check them out:
I also love making fancy fold cards so chose this Diamond Flip card to feature this lovely stamp set. I found the instructions on France Martin’s blog. The card at the top of this post is the end result. The designer series paper I used is a sneak peek of the Hand-Penned Designer Series Paper that is in the new 2021-2022 Annual catalog.
Supplies Used to Make My Favorite Retiring Inspiring Iris card
Inspiring Iris stamp set (149268)
Blackberry Bliss Cardstock (133675) 11″ x 4 1/4″ scored at 2 1/8″ and 5 1/2″, 3″ x 3″
Basic White Cardstock (159276) 5 1/4″ x 4″, 4″ x 3″, scrap
Hand-Penned Designer Series Paper (155499) available May 4
I am excited about the new 2021-2022 Annual catalog which will be live on May 4. Meanwhile there are lots of great products that are retiring to make way for the new. Check them out here and check out the new things on the clearance sale here. Thanks for stopping by.. Come back soon!
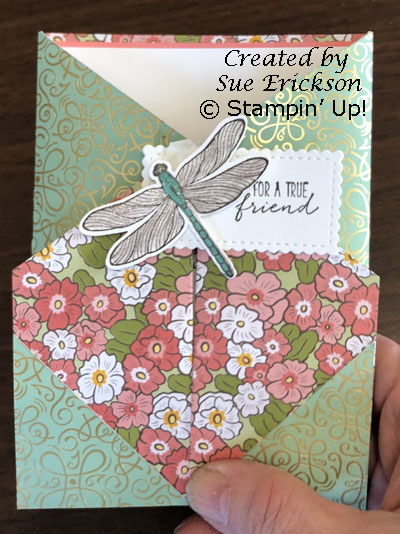
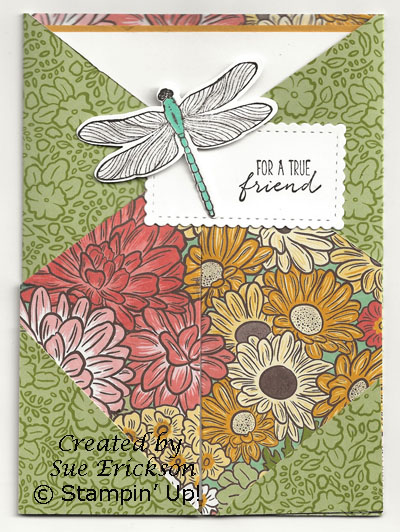
This beautiful dragonfly gatefold card is just the ticket when you love both sides of a designer series paper. It also is a good way to use your designer series papers rather than just having them sitting on your shelf…yeah…I know…we all tend to hoard our papers.
For this card, I used the beautiful retiring Ornate Garden Specialty Designer Series Paper. The Dragonfly Garden stamp set is part of the Ornate Garden Suite so naturally I used the dragonfly as an accent piece. I stamped the dragonfly with Early Espresso ink, then colored it with the Light Bermuda Bay Stampin’ Blend. Finally I brushed Clear Wink of Stella over the wings and the body of the dragonfly to give it a shimmery appearance. It’s too bad the camera couldn’t pick up the shimmer. The greeting, also from the stamp set, was stamped on Basic White cardstock with Early Espresso ink and cut out with the next to smallest rectangle of the Stitched So Sweetly dies. I love those dies!
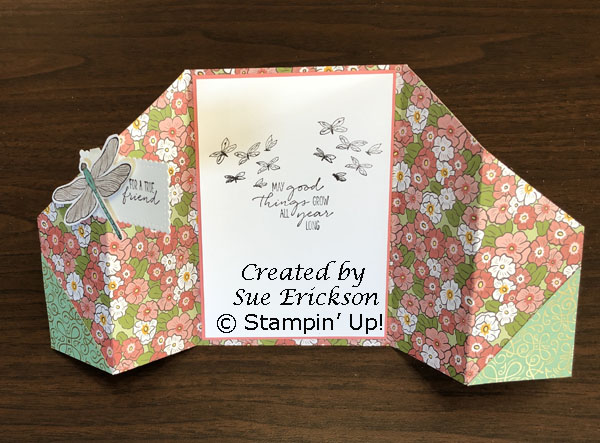
This is what this beautiful dragonfly gatefold card looks like when opened. I stamped the verse from the Dragonfly Garden stamp set and clusters of little dragonflies with Early Espresso ink. On the bottom corners of the card I glued triangles of the reverse side of the dsp.
Part of my purpose of making this card was to use up the Ornate Garden Specialty Designer Series paper since it is retiring May 3. I created another gatefold card using a different pattern in this set of papers. Which colorway do you like best? Leave a comment below.
Supplies Used to Make Beautiful Dragonfly Gatefold Card
Dragonfly Garden Bundle
Early Espresso Classic Stampin’ Pad
Light Bermuda Bay Stampin’ Blend Marker
Clear Wink of Stella
Ornate Garden Specialty Designer Series Paper 12″ x 5 1/2″ scored at 2″ and 4″ on each end
Basic White Cardstock 5 1/8″ x 3 5/8″, scraps for label and dragonfly
Bumblebee Cardstock 5 1/4″ x 3 3/4″
Flirty Flamingo Cardstock 5 1/4″ x 3 3/4″
Stitched So Sweetly Dies
Stampin Seal
Multipurpose Liquid Glue
Stampin’ Dimensionals
Paper Trimmer
You can order these supplies in my online store by clicking this link: https://s.tamp.in/jCB8RJ
The new 2021-2022 Annual Catalog comes out May 4. To make room in the warehouse for the new product, Stampin’ Up! has to retire product. This is your last chance to purchase the retiring items like designer series papers and the 2019-2021 In Colors. You can find these retiring items here. Some of the items are even on sale! You must go check the list out because many of the items will be selling out if they haven’t already. Also, tomorrow new items are being added to the Clearance sale. Check them out here. Then place an order with me. I appreciate your business as it helps feed my ‘rubber’ addiction, LOL!
I showed how to make this stunning offset triple time card on my Facebook Live this afternoon. The technique is really quite simple and yields beautiful results. The trick is to layer three different sized pieces of light colored cardstock either one on top of another or offset them as I have done. Then stamp an image that is large enough to cover parts of all three layers. The image will most likely not be stamped right up against the edge of the cardstock on top of it but that is OK as the pieces of cardstock are layered on a contrasting color like above. That layer covers the poorly stamped areas.
Products Used for Stunning Offset Triple Time Card
Beautiful Friendship stamp set
Soft Seafoam Cardstock – 11″ x 4 1/4″ scored and folded at 5 1/2″ for card base
Blackberry Bliss Cardstock – 5 1/4″ x 2 1/4″; 4 1/4″ x 2 1/4″; 3 1/4″ x 2 1/4″
Shimmery White Cardstock – 5″ x 2″; 4″ x 2″; 3″ x 2″
I used the stamparatus to stamp the flower for one important reason. I could stamp and then re- ink the stamp and stamp again several times until I got the depth of ink I desired. That is one of the wonderful benefits of the Stamparatus. Another hint I have is to put a couple small dots of the multipurpose liquid glue on the overlapping edge of each piece of Shimmery White cardstock. Use your finger to spread it out a bit and then let the glue dry. This makes it repositionable. Now when you place the pieces of cardstock in place, they will stay there while you stamp them.
Give this Offset Triple Time stamping technique a try. Play with different colors and different focal images. Black is often used for the mat layers or some other dark color. I toyed with the idea of using gold foil sheets for the mats which would also be stunning. If you do try this technique, I’d love to have you send me a photo of your card. I would share it on this blog with your permission.
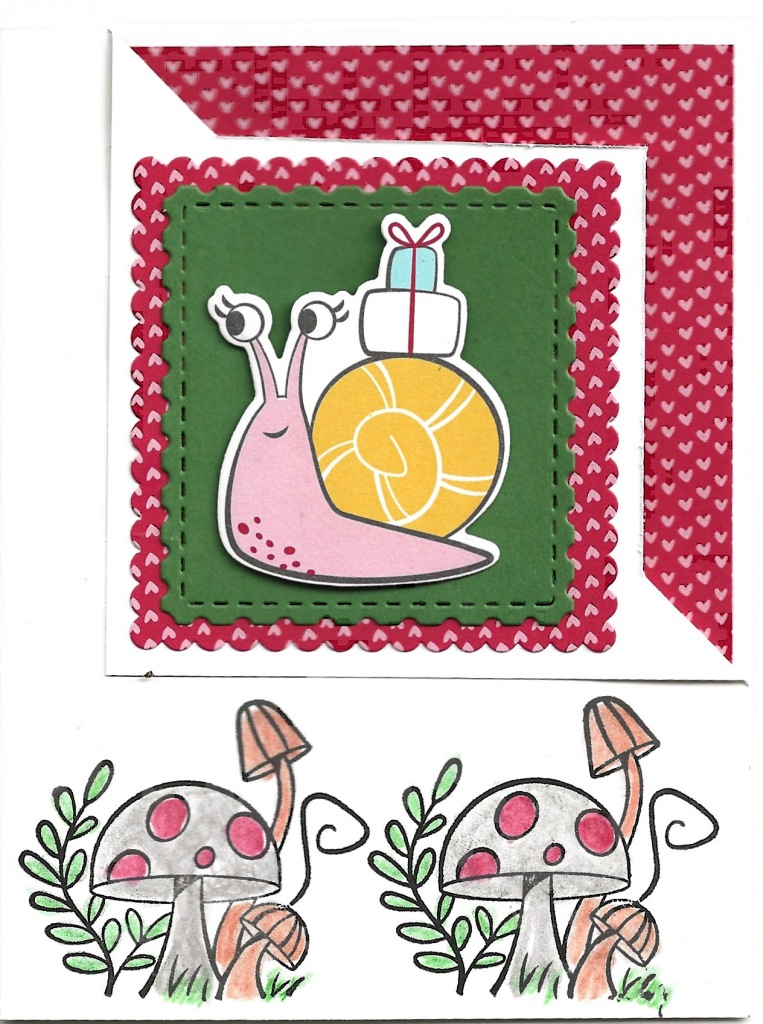
I’m so excited to share with you this Adorable Snailed It Nip & Tuck card I created for a Pattern challenge. I have been eying this Snailed It Suite (155986) of products ever since the January – June mini catalog came out. I finally bought it because I couldn’t resist the adorable snails in this stamp set. If only the snails that chew on my flowers were this adorable! Maybe then I would be more kind to them.
This suite includes the Snailed It stamp set (154472) and Snail Dies (154327) bundled together (156255) for a 10% savings, a package of Resin Hearts (154578), Snail Mail Twine Combo Pack (154579), and the darling Snail Mail Designer Series Papers (154577). An added benefit of the suite is that some of the dies cut out parts of the designer series paper like the snail on the front of this card.
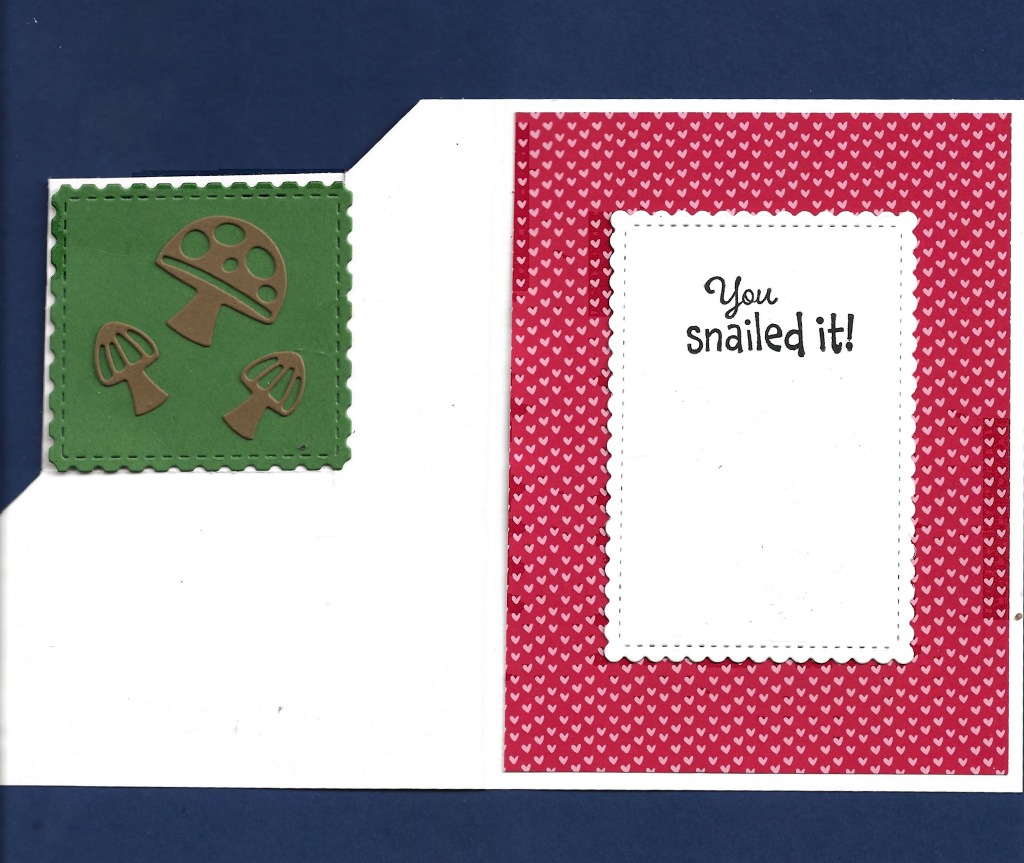
Check out the inside of this Adorable Snailed It Nip & Tuck card. The pattern leaves a plain square on the back of the card front. I embellished that square with a square of Garden Green cardstock and little die-cut mushrooms. The Night of Navy cardstock is not part of the card. It is just there to give contrast so the shape of the card is seen.
Supplies Used for This Adorable Snailed It Nip & Tuck Card
Basic White Cardstock 8 1/2″ x 5 1/2″ folded in half, scrap
Garden Green Cardstock – scraps
Soft Suede Cardstock – scrap
Snail Mail Designer Series Paper, red pattern – 5 1/4″ x 4″, scrap large snails pattern scrap with snail that has presents on it;’s back
Memento Ink Pad
Snailed It Bundle
Stitched So Sweetly Dies – next to largest rectangle
Layering Squares Dies – next to largest scalloped square
Watercolor Pencils and Watercolor Pencils Assortment 2
This week’s series of cards are featuring Berry Delightful DSP part of a free bundle with the Berry Blessings stamp set in the 2021 Sale-A-Bration brochure. I will be sharing a variety of cards this week showing the designs of this beautiful designer series paper and various greetings in the stamp set.
I think the double folded fancy fold technique shows off this designer series paper in a lovely unique way. To achieve this fold, follow the diagram below. The designer series paper is cut 10″ x 5″ and scored at 1″, 1 1/2″, 2 1/2″, 3″, 4 “, 4 1/2″, 5 1/2″, 6″, 7″, 7 1/2″, 8 1/2″, and 9″ along the long side. Then mark 2″ and 3” up the sides from the bottom and cut from that mark to the center score lines. Then pleat along the scores, make the first fold on each side of the center a valley fold followed by a mountain fold. Tape the pleats down on the reverse side. Then apply to card base or a layer of the card front.
Supplies used to make this card featuring Berry Beautiful DSP
Granny Green Cardstock 8 1/2″ x 5 1/2″ scored at 5 1/2:”
Basic White Cardstock 5 1/4″ x 4″, scrap
Blackberry Bliss Cardstock 5″ x 3 3/4″
Berry Delightful Designer Series Paper, raspberry design 10″ x 5″ scored as described SAB Free item
Berry blessings stamp set – Free SAB item
Metallic edged ribbon – white colored with Blackberry Bliss Stampin’ Blend
Here is another design of the Berry Delightful Designer Series Papers . I used Basic White and Pacific Point cardstock and one of the other greetings in the Berry Blessings stamp set. You can order the supplies for this card here.
Come back later this week for a couple more cards using this cheery designer series paper and Berry Blessings stamp set. The stamp set and paper come as a bundle for FREE with a $100 or more order during Sale-A-Bration. Sale-A- Bration is over February 28. Place an order with me at my online store now or email me with your order and I’ll place it for you.
Welcome to Featuring Approaching Perfection Week! I have decided to feature a different free stamp set each of the last three weeks of Sale-A-Bration and use the fabulous free designer series paper found in the Sale-A-Bration brochure. You are able to get a choice of these stamp sets and designer series papers w ith each $50 you spend in product. Contact me for more information
This week I am using the Approaching Fabulous stamp set of birthday greetings and the Flower & Field Designer Series Papers. The supplies for the card above are listed below.
Basic White Cardstock 8 1/2″ x 5 1/2″ scored at 4 1/4″ and folded for card base
Flower & Field Designer Series Paper blue flowers pattern 5 1/2″ x 2″ FREE
Reverse side of blue flowered paper 5 1/2″ x 2 3/4″ – FREE
A Second Card for Featuring Approaching Perfection Week
This card uses the Curvy Dies in a different way. It also features one of the other greetings in the Approaching Perfection stamp set and another design in the Flower & Field Designer Series Papers. Remember this dsp and stamp set are free with $50 purchases. The details of this card are below
Approaching Perfection SAB Free stamp set
Seaside Spray Cardstock 5 1/4″ x 4″
Basic White Cardstock 8 1/2″ x 5 1/2″ folded in half for card base
Flower & Field Designer Series Paper 5 1/4″ x 3″ SAB Free item
Sale-A-Bration lasts only two months this year as there will be another two months of Sale-A-Bration in July and August. That means you have only three weeks left to get these exclusive products for free. after the end of February, you will have to buy them from individuals. Place your orders now in my online store or contact me.
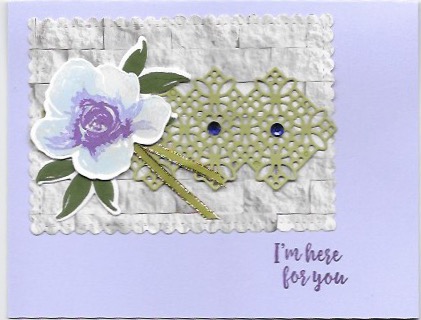
The beautiful All Things Fabulous Bundle is one of my favorite bundles in the 2020-2021 Annual Catalog. I introduced you to it last week in this blog post. Today I’m sharing another card I made with the beautiful All Things Fabulous Bundle.
I started with a card base of Purple Posy cardstock 8 1/2″ x 5 1/2″ scored and folded at 4 1/4″. Then I cut out a piece of one of the patterns in the In Good Taste Designer Series Paper using the largest rectangle of the Stitched So Sweetly Dies. I adhered this to the cardfront. One of the dies in the All Things Fabulous Bundle creates that lacy die-cut from Pear Pizzazz cardstock.
The All Things Fabulous stamp set is a three step stamp set. Normally you would use three different colors of ink to stamp it. Stampin’ Up! only has two Lighter shades of purple inks so I used the Highland Heather ink stamped off once for the lightest shade, the same ink not stamped off, and finally Gorgeous Grape for the darkest ink. I stamped the leaves with Mossy Meadow ink so they would contrast nicely with the Pear Pizzazz die-cut.
When all the stamping was done, I cut the images out with their corresponding dies from the Fabulous Florals Dies. I used Gorgeous Grape ink to stamp the greeting on the card base. I added a piece of the Old Olive ribbon from the All The Trimmings Ribbon Combo pack found in the Holiday catalog. This ribbon has a beautiful gold metallic edge. The two rhinestone gems came from the retired Noble Peacock adhesive rhinestone gems.
I know you would be able to make beautiful cards and 3D products with this bundle. To order the supplies I used in this card except for the retired rhinestones, click on the photo. You will be taken to a shopping cart in my online store. Deselect the items you may already have then click add all to my cart. Easy peasy! Remember this is my birthday month and I’m celebrating by giving YOU the gift of the Snowflake Adhesive-backed Embellishments on pg 29 of the Holiday catalog when you place an order with me by the end of the month.