Merry & Bright Online Extravaganza Tomorrow

Banner for Mewrry & Bright Online Extravaganza

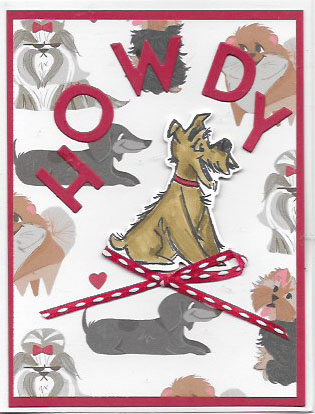
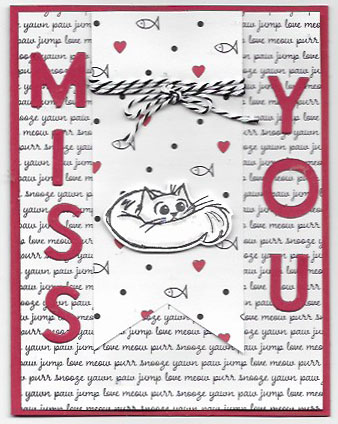
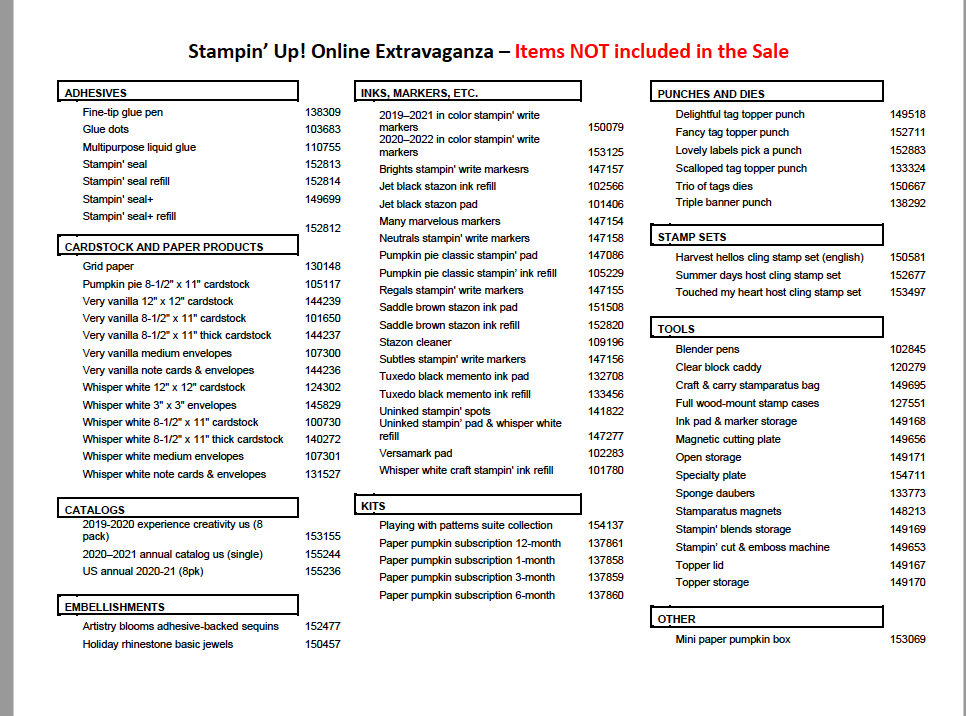
Check out Stampin’ Up!’s Merry & Bright Online Extravaganza Tomorrow! It is a 24 hour sale where almost everything in the 2020 – 2021 Annual Catalog is on sale for 10% off. Yes…almost everything including most of the suites and bundles! That makes the bundles 20% off the price of buying the stamp set and punch or die separately. Now is the time to buy those items you have been eyeing but haven’t ordered yet. And…it is a great time to buy gifts for your crafty friends. Now there are some things that are not on sale. The list is below.

List of items not included in the Merry & Bright Online Extravaganza

Since this is for only 24 hours, don’t put off making your list and placing an order. Black Friday sales are about to begin. Consider this your stamping Black Friday sale and treat yourself to some guilty pleasure. You deserve it!I have my list of things I want to order ready and waiting for the Merry & Bright Online Extravaganza Tomorrow. You can either place your order online or email it to me and I’ll be happy to place it for you. If you do send me the order, you can pay me through Paypal or call me with your credit card number.

Darling Shaker Card for Zeke

Darling shaker card for Zeke using Pampered Pets Bundle

Here is a darling shaker card for Zeke. Zeke is our youngest great-grandchild and he turns 4 on Monday. It is so very gratifying when you can create such a cute shaker card in less than 30 minutes. I showed you on this post Wednesday how to make this type of easy shaker card and included a video in the post. Check it out.

Today’s card features the Pampered Pets bundle and the Playful Pets designer series paper. I think they are perfect for a four-year-boy who has three dogs in his family. I used the following supplies to make this card.

  • Stamps – Pampered Pets, Approaching Perfection (Free SAB stamp set available Jan 2021)
  • Real Red Cardstock 11″ x 4 1/4″ scored and folded at 5 1/2″
  • Whisper White Cardstock 5 1/4″ x 4″ for inside, scraps
  • Playful Pets Designer Series Paper 5 1/4″ x 4″
  • Inks – Memento, Real Red, Stampin’ Blend Combos – Basic Black, Real Red, Cinnamon Cider
  • Accessories – Pets Dies, Holiday Rhinestone Basic Jewels, Clear medium envelope, Tear & Tape, Stampin’ Snail, Stampin’ Dimensionals, Scotch Tape

To order the supplies to make this darling shaker card for Zeke, just click on this link. The products will be added to your shopping cart. You can delete any of them that you already have. Of course, the card you make most likely won’t be for a Zeke. Leave a comment below with the name of the person you create this card for.

Easy and Quick Shaker Card

Easy and quick shaker card using the  Poinsettia Place designer series paper, Gift Wrapped stamp set, Christmas Gleaming stamp set, and Poinsettia Petals stamp set

One of the demonstrators presenting at OnStage@home this year shared a easy and quick shaker card. It is so easy that I want to share the technique with you.

To make this easy and quick shaker card you need

  • Poinsettia Petals stamp set – Merry Christmas greeting
  • Gift Wrapped stamp set – plaid bow
  • Christmas Gleaming stamp set – holly cluster
  • Real Red cardstock 8 1/2″ x 5 1/2″ scored at 4 1/4″ and folded for card base, scrap
  • Whisper White cardstock scrap
  • Poinsettia Place designer series paper – holly design 5 1/4″ x 4″
  • Inks – Memento, Cherry Cobbler, Stampin’ Blends – Old Olive, Mossy Meadow, Real Red, and Cherry Cobbler
  • Accessories – Bow Builder Punch, Holiday Rhinestone Basic Jewels, Tear & Tape, Stampin’ Seal, Clear medium envelope, Scotch Tape, Stampin’ Trimmer, Paper Snips

Click on this link to add these products to your shopping cart.Check out my Facebook Live presentation of how to make this card.

This technique is so versatile that you can create the card to fit any occasion, wedding, birthday, Thinking of You, etc. All you have to do is change out the designer series paper design and add coordinating images/embellishments to the front of the card. Here is another sample I have made with this technique. In this sample I used Feels Like Frost Specialty Designer Series Paper (153512), Snowflake Sequins (150443), Peaceful Boughs stamp set (150541) and Beautiful Boughs Dies (150661). You can add these supplies to your shopping cart here.

Photo shows an easy and quick shaker card using Feels Like Frost Specialty Designer Series Paper

Last Day to Subscribe for Jolly Gingerbread

Photo shows parts of Jolly Gingerbread Paper Pumpkin Kit as it's the last day to subscribe to Jolly Gingerbread

Today is the last day to subscribe for Jolly Gingerbread. This Jolly Gingerbread kit features gingerbread men. How cute is that?!! This kit includes all the product you need to create

  • 15 gift card carriers and coordinating envelopes.
  • Kit contents can also be used to design traditional holiday cards, gift tags, and other paper projects.
  • Contents arrive in a collectible, special-edition box!
  • Project size: 2-1/4″ x 4″
  • Envelope size: 2-3/4″ x 4-3/8″
  • Coordinating colors: Cinnamon Cider, Daffodil Delight, Calypso Coral, Mint Macaron, Shaded Spruce, Blushing Bride, and Whisper White

Paper Pumpkin is a monthly subscription to have Stampin’ Up! mail you a craft kit each month. All the supplies you need to create the month’s project are included except for scissors. The included photopolymer stamp set is exclusive to each month’s kit. The projects vary from month to month and are always a pleasant surprise. To subscribe click here. Do it now so you don’t forget! It’s the last day to subscribe for Jolly Gingerbread kit.

An added benefit to subscribing to the Paper Pumpkin kit is that you are able to join me via Zoom to put our kits together while we visit. During this time of COVID distancing, we crave contact with others. This is a delightful way to ‘see’ each other and visit in a safe and fun way. You will really enjoy making the kits or alternative cards using the kit supplies. Should you need to skip a month or stop your subscription, all you have to do is notify them by the 10th of the month. If you have any questions, contact me. I’m happy to answer them for you.

Candle Triple Side-step Card

Handmade Christmas Card using the Curvy Cgleaming Specialty Designer Series Paperhristmas stamp set and Brightly

I’m very excited to share with you this Candle Triple Side-step card! Last Saturday, I shared another Triple Side-fold Christmas card here and told you the design suggested to me a row of candles. Ta daa! Here is the creation.

I used the same Night of Navy cardstock for the base but changed the dsp to another Brightly Gleaming Specialty Designer Series paper design. This time I used copper foil sheets as a layer under the dsp. The smaller of the Gleaming Ornaments Punch Pack was used to punch out the copper foil and then I hand-cut the shape of the flames. I happened to have a piece of Very Vanilla cardstock that had been embossed with the Subtle embossing folder. That was perfect for the candles.

I cut branches from Mossy Meadow cardstock using the Beautiful Boughs dies. I stamped the little pine cones from the In the Woods stamp set on Soft Suede cardstock using Early Espresso ink. Then I used the little pinecone die from the In The Woods Dies to cut them out. The greeting and swoosh of stars were stamped on Very Vanilla with Night of Navy ink using stamps from the Curvy Christmas stamp set. The Curvy Christmas stamp set is part of the Quite Curvy Variety Bundle special starting November 3.

Supplies for Candle Triple Side-step Card

  • Night of Navy Cardstock – 10″ x 7″
  • Very Vanilla Cardstock – 4″ x 1 1/2″, 6 3/4″ x 2 3/4″ for inside, 1″ x 3″, 2 pieces 2″ x 3/4″
  • Mossy Meadow Cardstock – scrap
  • Soft Suede Cardstock – scrap
  • Copper Foil Sheets – 4 3/4″ x 2 3/8″, 4 1/4 x 1 3/4″, 2 pieces 2 7/8″ x 2 1/8″, scrap
  • Brightly Gleaming Specialty DSP – 2 pieces 2 5/8 ” x 1 7/8″, 2 1/8″ x 4 1/2″
  • Night of Navy and Early Espresso Ink
  • Curvy Christmas stamp set – available Nov 3
  • Winter Woods stamp set – pine cone
  • Beautiful Boughs and In the Woods dies
  • Paper Trimmer
  • Stampin’ Cut Emboss Machine
  • Multipurpose Liquid Glue

You can order the supplies for this card here.

Triple Side-step Christmas Card

Handmade Christmas Triple Side-step card

Check out this beautiful triple side-step Christmas card! I love the way there are three levels to the card. I created it with the gorgeous Brightly Gleaming Specialty Designer Series Paper (150429) , Gold Foil Sheets (132622) and the Poinsettia Petals Bundle (155148).

Supplies Used for Triple Side-step Christmas Card

  • Night of Navy Cardstock – 10″ x 7″
  • Very Vanilla Cardstock – 1 piece 2 3/4″ x 2 1/4″, 2 pieces 2 3/4″ x 2″, 1 piece 6 3/4″ x1 3/4″, 1 piece 6 3/4″ x 2 3/4″ for inside
  • Mossy Meadow – scrap for leaves
  • Gold Foil Sheets – 2 7/8″ x 2 3/8″, 2 pieces 2 7/8″ x 2 1/8″, 1 piece 6 7/8″ x 1 7/8″, 1 piece 6″ x 5″ for poinsettia petals
  • Brightly Gleaming DSP – 1 piece 2 5/8″ x 2 1/8″, 2 pieces 2 5/8″ x 1 7/8″
  • Poinsettia Petals Bundle
  • Stampin’ Trimmer
  • Stampin’ Cut Emboss Machine
  • Multipurpose Liquid Glue

To order these supplies to make this card, click here.
I want to thank Karen Eagan of Crafty Karen Designs for her great tutorial I used to make this card. You can find my tutorial here and my Facebook Live video of this card here.

The design of this card makes me think of Christmas candles. I’m mentally designing another card with this fold. Come back in the next couple of days to see what evolves. While Karen’s card was the inspiration for this card, my next card will be an inspiration from God.

Stunning Shimmery Halloween Card

Handmade stunning shimmery Halloween card

This stunning shimmery Halloween card is easy to make using the split-circle technique. I designed this card for an Facebook Groups class I’m holding Sunday afternoon. Due to copyright laws, we aren’t allowed to include stamped images in card kits. Therefore I used a collection of dies to make this card.

The split-circle technique gives that swoop of color in the center of the card. You cut out four circles in increasing size using alternating colors/designs of cardstock/designer series papers. In this case I used the Rainbow Glimmer paper on the purple to yellow side of the sheet. I used the layering circle dies starting with the smallest circle. I labeled the dies in increasing size starting with the smallest being one and the largest being 8. I used #1 – #4 dies for the circles. Then cut the circles in half and adhere together as shown. For your convenience I have listed the place to position each circle on your paper trimmer to have them cut in half. Notice that each die goes up exactly 1/8″ plus the 1/16″. I could have given the measurements all in sixteenths but I found it easier to find the eights on the ruler and then add the 1/16″.

  • #1 4/8″ + 1/16″
  • #2 5/8″ + 1/16+
  • #3 6/8″ + 1/16″
  • #4 7/8″ + 1/16″

I used the next to the largest stitched rectangle to cut the Basic Black background. The frame was cut from the Rainbow Glimmer paper by nesting the third largest die inside the next larger die. I placed #2 and #4 circle dies inside the rectangles to conserve paper.

Supplies Used for the Stunning Shimmery Halloween Card

  • Mango Melody Cardstock – 8 1/2″ x 5 1/2″ scored at 4 1/4″ and folded for card base
  • Basic Black Cardstock – 4 3/4″ x 3 1/2″
  • Rainbow Glimmer Paper – purple to yellow edge of sheet 5 1/2″ x 5″
  • Black Glitter Paper – 4″ x 2″
  • Layering Circles Dies
  • Stitched Rectangles Dies
  • Word Wishes Dies
  • Halloween Magic Dies

Are you ready to make your own stunning Halloween card? Then click on the photo of the card to go to the shopping cart filled with the supplies you need. I have a video demonstrating how to make this on my YouTube channel. While you are there, subscribe so you receive notification when I upload my next video.

Stunning Double Fan-Fold Card

This image is of a stunning Double Fan Fold Star Card

I love this stunning double fan-fold star card. If you have been following my posts you may have learned that I love fancy folds. Here and here are a couple other fancy fold cards I have shared. I thank Lavonne Schwendeman for sharing a template with the measurements and scoring directions on one of our facebook groups. This card can stand by itself and folds up to fit into a standard A2 envelope for mailing. I did a Facebook live demonstration of how to make this card yesterday and am sharing that video today with you. First, though, here are the supplies, cutting dimensions and scoring directions I used.

Supplies for the Double Fan Fold Star Card

  • Stamp set – Itty Bitty Christmas
  • Ink – Memento
  • Very Vanilla Cardstock 7 ½” x 5 ½” scored at 1¼”, 2½”, 5”, 6¼”. Then diagonally from top left corner to bottom of 2½” score and top of 2½” score to bottom left corner. Repeat with other end, scrap
  • Brightly Gleaming Specialty dsp – Night of Navy with copper stars 5” x 2”, 2 pieces 4¾” x 2”
  • Copper Foil Sheets – 5¼” x 2¼”, 2 pieces 5” x 2¼”, scrap
  • Accessories – Stitched So Sweetly dies, Starlight Thinlits Dies (retired), Blue Adhesive-backed Gems, Stampin’ Seal, Multipurpose Liquid Glue, Stampin’ Dimensionals

To get the supplies I used to make this stunning double fan-fold star card, click here.

Now Only Four Hours Left!

Flyer for Only Four Hours Left!

There are now only four hours left to subscribe to my mailing list in order to receive my 12 Weeks of Christmas gift to my mailing list subscribers. Don’t miss receiving these free weekly Christmas tutorials. Each Wednesday beginning today until Christmas I’ll be sending my mailing list subscribers and only them an exclusive tutorial for a Christmas card, gift to make, or tags/wraps. The first five weeks will be Christmas cards. If you were to make each card in multiples of say four, by the first week of November you would have 20 cards finished and ready to mail. Just think, your card would be the first a friend or relative received this year! What an impression that would make on them!

The thing is that there are now only four hours left to subscribe. Once I send the first tutorial, you won’t be able to get in for a month and you will have missed all but one of the Christmas card tutorials. Fill out the form in the upper right corner of this page to subscribe or follow this link to subscribe.

Subscribers Get Free Tutorials

Flyer about subscribers get free gifts during the 12 Weeks of Christmas

Subscribers get free tutorials starting in just 23 hours. What is the 12 Weeks of Christmas you ask? It is my Christmas gift to my subscribers. Each Wednesday starting tomorrow until Christmas I will email them an exclusive Christmas tutorial for a card, gift, or tag/wrap you will love making and giving. The only thing is that you must be subscribed to my mailing list by 1:00 pm tomorrow, October 7 to receive these tutorials. Just fill out the form on the upper right corner to subscribe.

I will be sending you tutorials to make Christmas cards for the first five weeks of 12 Weeks of Christmas. Your problem of what Christmas cards to make has been solved for you. If you make multiples, even just four, each week, you will have 20 beautiful, handmade Christmas cards ready to address and mail by the second week of November. Hey…your cards might be the very first ones to be received if you mail them when you finish them.

Then the next three weeks I’ll send you a handmade gift tutorial. You will have fun making these gifts be proud to give them to family and friends. It is easy to just order something in the mail but your personal touch and the idea that you actually made the gift will show you really love the recipient. It is a win/win situation all around.

Finally, your last three gifts of my 12 Weeks of Christmas will be tutorials for ways to wrap your gifts and an idea of tags to put on the gift . This is a wonderful opportunity and you won’t want to miss even a single tutorial. But only subscribers get free tutorials! Sign up now over in the upper right corner or click here now so you can receive your first tutorial tomorrow.

One-Day-Only Sale

Flyer about Stampin' Up!'s One-Day-Only Sale of selected stamps at 15% off

A One-Day-Only Sale is tomorrow, Wednesday, September 23. I’m so excited because a couple of the stamps I have on my wish list are one sale! I have my list made and I’m ready to place my order on Wednesday. The sale starts at 12:01am Mountain time and ends at 11:59 pm. Check out and download the list of stamps on sale here.

This One-Day-Only Sale is offered by Stampin’ Up! only once a year on selected stamp sets. The stamp sets have been discounted by 15%. Make out your list today then visit my online store tomorrow.

Poinsettia Bay Window Fancy Fold

photo is of Poinsettia Bay Window Fancy Fold card created with the Bay Window Fancy Fold technique and Plush Poinsettia specialty paper

I love this beautiful Poinsettia Bay Window Fancy Fold! If you have been reading my blogs, you have discovered that I love fancy folds. This fold is a really easy one that you will like to make.

I used the Plush Poinsettia Specialty Paper (153486) on the bay window part as it looks like lace curtains to me. It is one of the products in the Poinsettia Place Suite (155109). Another product is the Poinsettia dies (153522) which I used to cut out and emboss the flowers from Red Foils Sheets (153510). The greeting is from the Peaceful Boughs stamp set (150541) found in the 2020-2021 Annual catalog.

Supplies Used for Poinsettia Bay Window Fancy Fold:

  • Shaded Spruce cardstock – 4 1/4″ x 11″ scored parallel to the short side at 3/8″, 1-7/8″, 3-5/8″, 5-1/8″, and 5-1/2″
  • Whisper White cardstock – scrap for greeting, 4″ X 3-3/8″ for inside
  • Plush Poinsettia Specialty Paper – 2 pieces 4-1/8″ x 1-3/8″, 4-1/8″ x 1-5/8″
  • Red Foil Sheet – scraps for poinsettias
  • Poinsettia Dies – smallest and next smallest flowers
  • Tear & Tape, Stampin’ Seal

Learn how to make this card by joining me on my Facebook Live tomorrow at 3 pm Pacific time. You’ll find me on the Soggy Stamper Facebook page. I’ll be demonstrating this technique and a second sample using other supplies. After I’m through with the live presentation, you can watch the video on the Soggy Stamper YouTube channel. While you are at my channel, click the subscribe button to receive notification when a new video is uploaded. I’d love to have you leave a comment here on this post and on the video when you watch it so I know you have been visiting.

Beautiful All Things Fabulous Bundle

Handmade greeting card using the beautiful All Things Fabulous Bundle

The beautiful All Things Fabulous Bundle is one of my favorite bundles in the 2020-2021 Annual Catalog. I introduced you to it last week in this blog post. Today I’m sharing another card I made with the beautiful All Things Fabulous Bundle.

I started with a card base of Purple Posy cardstock 8 1/2″ x 5 1/2″ scored and folded at 4 1/4″. Then I cut out a piece of one of the patterns in the In Good Taste Designer Series Paper using the largest rectangle of the Stitched So Sweetly Dies. I adhered this to the cardfront. One of the dies in the All Things Fabulous Bundle creates that lacy die-cut from Pear Pizzazz cardstock.

The All Things Fabulous stamp set is a three step stamp set. Normally you would use three different colors of ink to stamp it. Stampin’ Up! only has two Lighter shades of purple inks so I used the Highland Heather ink stamped off once for the lightest shade, the same ink not stamped off, and finally Gorgeous Grape for the darkest ink. I stamped the leaves with Mossy Meadow ink so they would contrast nicely with the Pear Pizzazz die-cut.

When all the stamping was done, I cut the images out with their corresponding dies from the Fabulous Florals Dies. I used Gorgeous Grape ink to stamp the greeting on the card base. I added a piece of the Old Olive ribbon from the All The Trimmings Ribbon Combo pack found in the Holiday catalog. This ribbon has a beautiful gold metallic edge. The two rhinestone gems came from the retired Noble Peacock adhesive rhinestone gems.

I know you would be able to make beautiful cards and 3D products with this bundle. To order the supplies I used in this card except for the retired rhinestones, click on the photo. You will be taken to a shopping cart in my online store. Deselect the items you may already have then click add all to my cart. Easy peasy! Remember this is my birthday month and I’m celebrating by giving YOU the gift of the Snowflake Adhesive-backed Embellishments on pg 29 of the Holiday catalog when you place an order with me by the end of the month.

Only Three Days Left For Gift!

photo shows Adhesive backed Snowflakes. There are only three days left to place an order and receive these embellishments for free.

There are only three days left for gift! That is…three days left to place an order with me and receive a free package of Adhesive-backed Snowflakes. August is my birthday month and to celebrate I’m giving YOU a gift when you place an order with me. The new Holiday catalog just went live this month and this is a good time to plan for you holiday cards. Check out the new catalog here.

August is also the month to redeem the coupons you earned in July. Check you emails for the coupon codes Stampin’ Up! sent you and them apply them to your order. I hope you saved the codes because I have no way to know what they are.

Remember time is running out for both offers! Order now and thanks.

Happy National Dog Day

Greeting card with dog and saying "What's For Dinner" created with the Pampered Pets Bundle and the Playful Alphabet Dies

Here are two Happy National Dog Day cards. I created them with the Pampered Pets Bundle (154069) and the Playful Alphabet dies (152706). The first card base is one of the retired Summer Nights Add-on card bases that were available to expand the July Paper Pumpkin Kit. Where did I get the apostrophe you ask? One of the alphabet dies has a cedilla, Ç. I just cut off the squiggle from that character.

handmade card for Happy National Dog Day using the Pampered Pet Bundle and Playful Pets Designer Series Paper.

For the second Happy National Dog Day card, I used the same Pampered Pets bundle and Playful Alphabet dies. This time I used one of the designs from the Playful Pets Designer Series Paper for the background. We have two dachshunds so I of course had to be sure that the dachsies were not covered up! LOL!

Handmade card created with the Pampered Pets bundle and Playful Pets Designer Series Paper.

The Pampered Pets bundle also includes a couple of very cute cat images. On this card, the dog is wishing the cat a day that is a real treat. The smug look on the cat makes me smile every time I look at it.

Miss you card created with the Pampered Pets bundle, Playful Pets Designer Series Paper and Playful Alphabet Dies.

I was having so much fun with the Playful Alphabet dies and the Pampered Pets bundle that I had to make a fourth card using the last cat image. This cat looks like he is sad to me. It is the perfect image for a Miss You sentiment.

I’ll bet you are imagining all kinds of other cards you could make with the Playful Pets Suite of products. To order the supplies I used for these cards, click on the photos to go to the shopping cart on my online store. You will be able to delete any of the supplies you already have before checking out. Remember, this is my birthday month and I’m giving YOU a gift of the Snowflake Adhesive-backed Embellishments when you place an order this month.