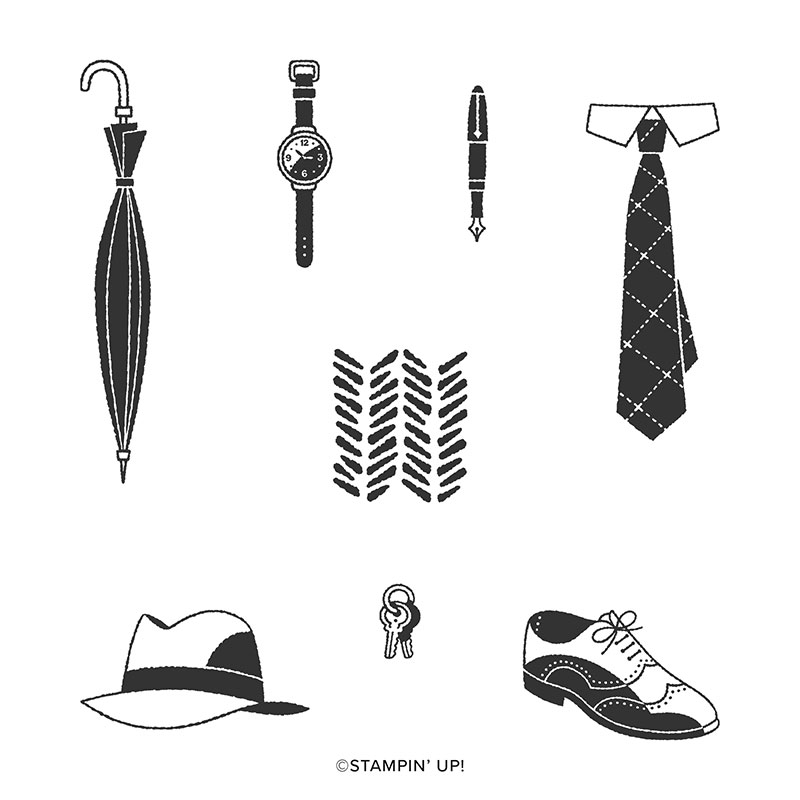
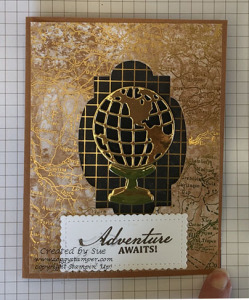
This Stunning World of Good Grad Card is made with the wonderful World of Good Suite of products. This suite is shown on pgs 24 – 26 in the 2020-202 Annual Catalog and includes the Beautiful World stamp and dies bundle (154091), brass embossed World of Good Specialty Designer Series Paper (152491), Faux Suede Trim (152472), World of Good Memories & More Card Pack (153600), Old World Paper 3D Embossing Folder (153200), Antique Corners & Slides (152471) , and Brass Foil Sheets (153057). You can order all of this with just one number (154140).
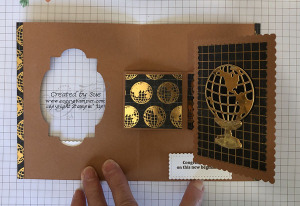
I used the rectangle Rocker technique to make this card. When you open the card, the image behind the cut-out window on the card front rotates to the right. Interactive cards are such fun to make and receive. Watch the video below to learn how to do the technique.
The cutting measurements of the papers are: –Cinnamon Cider Cardstock (153078) 8 1/2″ x 5 1/2″ scored at 4 1/4″ for card base; 5 1/2″ x 2″ scored at 1/2″, 2 3/4″, and 4″, 3″ x 2″ scored on all sides at 1/2″ for mechanism: and 4 1/4″ x 3 1/4″ for moving panel –Basic Black Cardstock ( 121045) scrap –Whisper White Cardstock (100730) scrap –Brass Foil Sheets (153057) scrap 
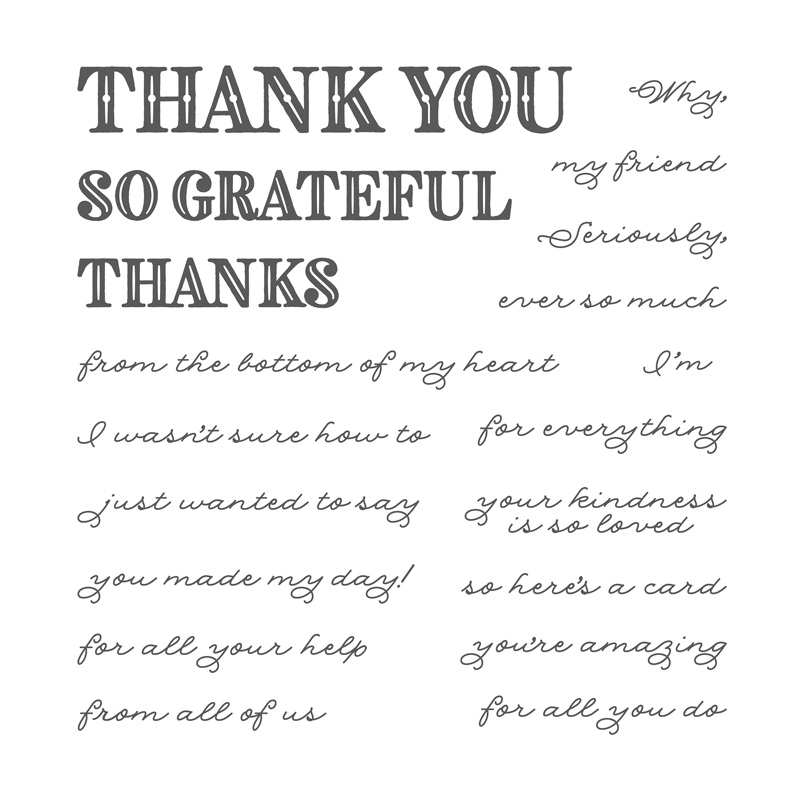
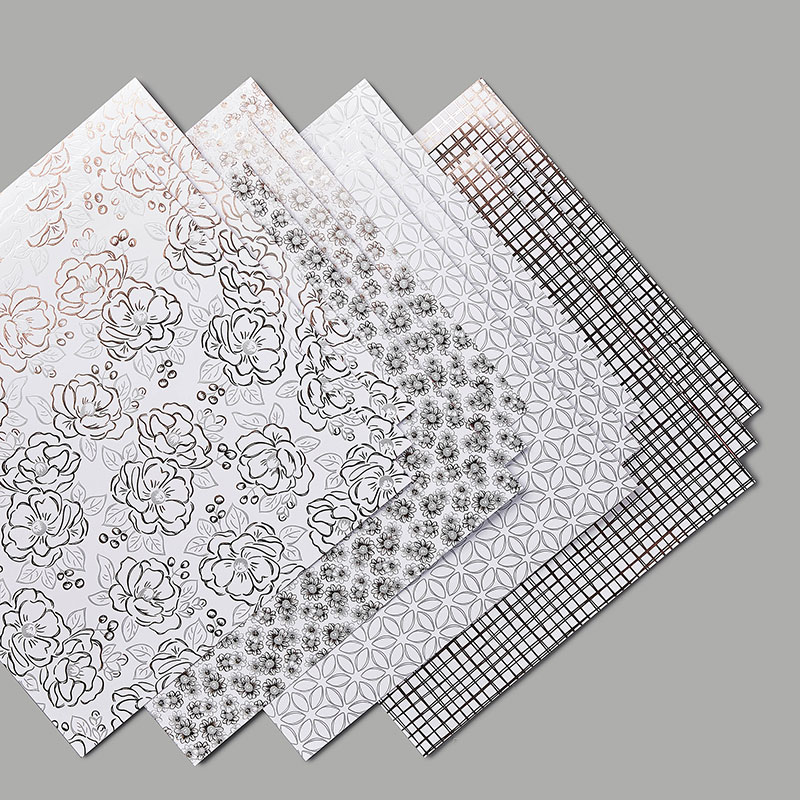
– World of Good Specialty Designer Series Paper (152491) Cinnamon Cider embossed map design 5 1/4″ x 4″ Checkered Black design 4″ x 3″ Black with globe design 2″ x 1-7/8″, 1-7/8″ x 1″
You can order the supplies I used to make this Stunning World of Good Grad card by visiting my online store or clicking on the links to be taken to each item’s location in my store.
Here are the six top reasons to subscribe to my mailing list! If you haven’t subscribed, you are missing out on lots of cool projects!
Receive a monthly newsletter with several exclusive projects and tips
Get a weekly email with a tutorial for a new project and updates
Receive an exclusive free tutorial for a 3D project when you subscribe.
First notice of upcoming classes and events I am holding
Receive occasional subscriber-only offers.
tay connected to what’s happening at Stampin’ Up!
Now that you have seen the top six reasons to subscribe to my mailing list, fill out the form on the right or click here. The June edition will be published tomorrow and you won’t want to miss it!
Today I am going to show you three faux watercolor techniques. Yes, there are three ways to achieve a water-colored look without actually pulling out your watercolors.
In the card above I used the first of three faux watercolor techniques.
Color directly on the rubber stamp with markers. You can use different colors in different spaces if desired.
Lightly Spritz the air above the stamp with water and allow the mist to fall on the ink. For a more detailed water-colored look, use just a little water. To have a less defined image use more water.
Stamp onto your cardstock and allow to dry. You can gently blot image with a paper towel if there is too much bleeding and water.
This next card demonstrates the second of Three Faux Watercolor Technique,s a watercolor wash. The background has been created with this type of faux watercolor.
Scribble on an acrylic block with one color of marker.
Above that scribble a second and third color. You can even blend them at the color junctures.
Lightly spritz the air above the block with water allowing the mist to fall on the block. You will want the block to have enough water on it that the colors start running into each other.
Stamp the block on a piece of cardstock.
Blot excess water and ink with a paper towel.
When cardstock dries, stamp an image over the watercolor wash.
This is the third Faux Watercolor Technique.
Lightly mist cardstock, preferably watercolor paper, with water.
Stamp image with a water-based ink.
Mist the cardstock again so the ink starts to run. When it has run as much as you want, blot excess water with a paper towel.
When cardstock is dry, stamp greeting below the water-colored image.
To recreate these cards yourself you will need the following products:
Misty Moonlight, Soft Seafoam and Just Jade cardstock 8 1/2″ x 5 1/2″ scored at 4 1/4″ and folded for card bases
Thick Whisper White cardstock scraps for first two cards
Fluid 100 Watercolor Paper scrap for third card
Forever Greenery Designer Series Paper 5 1/4″ x 4″ for the first two cards
Forever Gold Laser-Cut Specialty Paper on third card
Forever Fern stamp set
Inks – Misty Moonlight, Old Olive, Pear Pizzazz ink pads: Stampin’ Write Markers – Shaded Spruce, Old Olive, Pear Pizzazz, Granny Apple Green
Accessories – Misty Moonlight 1/4″ Ribbon, Stitched Nested Lables Dies, Stitched So Sweetly Dies
Most of these supplies are new to the 2020-2021 Annual catalog which will go live on June 3. If you live in the United States and don’t have a current demonstrator and would like your own copy of the new catalog, contact me and I’ll be happy to mail you one.
Subscribe to the Paper Pumpkin and receive a Box of Sunshine, the June Paper Pumpkin kit. Once you have made the cheerful cards in this kit, you can fill the box with all sorts of yellow, sunshiney items in addition to a card or two. Then send it to a friend or relative who needs a bit of sunshine. The kit even includes a mailing label and stickers to decorate the box. This cheerful yellow box will brighten their day!
Now you might have not heard of the Paper Pumpkin. Stampin’ Up! has created a subscription to a monthly craft box filled with everything you need except scissors to create a paper-crafting project. The projects might be cards, or treat bags, or… Each month is a surprise but all the projects contain Stampin’ Up!’s high quality paper, inks and embellishments. Each month also includes a stamp set designed specifically for that month’s project but versatile so you can use it for other creative projects.
Now to receive this Box of Sunshine you have to subscribe before June 10. Subscribe here now as quantities may get limited closer to June 10. You will receive a monthly Paper Pumpkin kit in the mail (happy mail) once you subscribe. However, you can omit a month or stop the subscription as long as you do it before the 10th of a month. If you change your subscription after the 10th, you will receive that month’s kit but not after that.
I’m excited to introduce you to the beautiful new 2020-2022 In Colors! Every year Stampin’ Up! introduces a set of five new colors to be used the next two years. This keeps our color palette fresh and current with the design industry without having to change the complete color palette. The new 2020-2022 In Colors are Bumblebee, Cinnamon Cider, Misty Moonlight, Just Jade, and Magenta Madness. As you can see in the card above, the colors complement each other magnificently! Check out swatches of them in the photo above.
Now let me show you how these beautiful colors work in a card.
Cardstock [CS]: Cinnamon Cider (153078) * 8 ½” x 5 ½” scored at 4 ¼” and folded to make card base plus scrap for branch Just Jade (153079) * 5 ¼” x 4” plus scrap for branch Misty Moonlight (153081) * scrap Bumblebee (153077) * scrap Magenta Madness (153080) scraps for greeting and flowers Whisper White (100730) 5” x 3 ¾”
Die-cut with appropriate dies two Misty Moonlight birds, one Just Jade branch, one Cinnamon Cider branch, two Magenta Madness flowers, Magenta Madness Happy Birthday and one Bumblee sun using the flower center die from Poppy Memories Dies.
Adhere Just Jade and Whisper Whte layers to card front.
Cut the leaves off the Just Jade branch and glue to the Cinnamon Cider branch. Also glue the flowers on.
Adhere the die-cut pieces to card front.
Add eyes to the Bumblebee sun.
Which of these new In Colors is your favorite? Leave your answer below in a comment. If you live in the United States and don’t have an active demonstrator, Id love to be your demonstrator. Contact me if you would like your own catalog.
I’m sharing My Lovely Mother’s Day card with you all to wish all the moms and women who serve as mother figures a very Happy Mother’s Day. Although we can’t go out to dinner or have family members that don’t live with us come visit I do hope you find the day filled with countless blessings.
This Mother’s Day card came about because I had the pieces of Parisian Blossoms Specialty Designer Series paper planned and already cut for another project. I added the swirly circle cut from Champagne Foil Sheets and the label cut from Petal Pink cardstock using dies from the Painted Labels Dies. I also added the poppy cut from Petal Pink and Basic Black cardstock using dies from the Poppy Moments Dies. A length of Petal Pink Metallic-edged ribbon grounded the poppy. The greeting is from the retiring Tea Together stamp set.
Instructions: 1. Adhere the floral side of the DSP to the left side of the card. 2. Flip the 1″ strip to the reverse side and adhere to card. 3. Cut out the poppy pieces, the label, and the swirly circle using the appropriate dies and die-cutting machine. 4. Adhere the Champagne Foil swirly circle to the card front with SNAIL adhesive. 5. Put the pieces of the poppy together with Multipurpose Liquid Glue. Put a couple strips of SNAIL on the back of the poppy and adhere the looped ribbon to the SNAIL. Add to the swirly circle with Stampin’ Dimensionals. 6. Stamp Happy Mother’s Day on pink label with Memento ink and adhere to card front with Stampin’ Dimensionals.
Now it is your turn to share your Mother’s Day card you created. Email me a photo of it. I’d love to share it here on my bloig.
I made this beautiful card using the Faux Silk Technique. This technique is easy to do and gives a lovely texture to your background. You can stamp on the faux silk portion of the card or leave it a solid color.
How to do the Easy Faux Silk Technique –
Supplies: Stamp set of your choice’ Ink colors of your choice Piece of cardstock of desired size Multipurpose Liquid Glue tissue paper either white or colored about 1/2″ larger on all sides than cardstock
Instructions: 1. If you want a design on your faux silk, stamp it now on the piece of tissue paper. Then crumple the tissue paper into a tight ball. 2. Open the ball up and lightly smooth the tissue paper out leaving lots of wrinkles still in it. 3. Apply glue all over the cardstock using the broad end of the Multipurpose Liquid Glue. 4. Lay the tissue down on the glue pressing it down into the glue wrinkles and all. Allow to dry. 5. When dry, trim off the excess tissue paper and use this for a layer on your card. You could use a larger piece of cardstock and tissue paper and create a lovely paper for a small gift box.
To Make Card
Supplies: Stamp Set – Timeless Tropical (151497) Inks – Old Olive and Soft Suede Stampin’ Write Markers, Memento Ink Pad, Combo Flirty Flamingo Stampin’ Blends Cardstock – Crumb Cake 11″ x 4 1/4″ scored and folded at 5 1/2″ for card base, Old Olive 5 1/4″ x 4″, Whisper White 4 7/8″ x 3 7/8″ plus scrap for greeting, Soft Suede scrap Accessories – Stitched So Sweetly Dies (151690), Multipurpose Liquid Glue, white tissue paper, paper snips, SNAIL adhesive, Stampin0 Dimensionals
Instructions: 1. Ink the palm tree stamp with the markers and randomly stamp all over the piece of tissue paper. 2. Follow the instructions for the Faux Silk technique as above. 3. Adhere the Old Olive CS to card front and the faux silk layer to the Old Olive layer. 4. Stamp the greeting and the plumeria flower on scraps of Whisper White CS with memento ink. Color the flower with the Stampin’ Blends and cut out with the paper snips. 5. Die-cut the greeting with the third from inside Stitched So Sweetly rectangle die and use the next size up to cut a layer from the Soft Suede CS. This leaves a fairly large border around the white label so I cut the Soft Suede layer down a bit. I show you how in the video. 6. Layer the labels together with SNAIL and then adhere them to the card front. Add the flower with a Stampin’ Dimensional.
Now it’s your turn to do the Faux Silk Technique. I’d love for you to share your end results with me. Email or text me a photo of it.
This Easy Faux Bokeh Technique is fun to do and makes a wonderful background! The bokeh effect comes from photography where the background is out of focus with pinpoints of light like this. The focus is distinctly on the main image.
Easy Faux Bokeh Technique
Supplies: Cardstock Vellum At least three colors of Stampin’ Blends – darker colors show up better – I used dark Pumpkin Pie, dark Granny Apple Green, and dark Pineapple Punch paper towel
Instructions: 1. Make a circle with one of the stampin’ blends and immediately burnish with the paper towel. Don’t even take time to recap the marker. Otherwise, the edge of the circle will dry and you won’t get the blurred effect. 2. Repeat this step several times with the first color randomly on the piece of cardstock vellum. 3. Change colors and repeat as desired.
To Make Sample Card
Supplies: Stamp Set – Timeless Tropical Inks – Memento and Pear Pizzazz ink pads Stampin’ Blends – Dark Pumpkin Pie, Dark Pineapple Punch, Dark Granny Apple Green for bokeh background; Calypso Coral Combo, Dark Granny Apple Green, Dark Pineapple Punch Cardstock – Whisper White 11 x 4 1/4″ scored and folded at 5 1/2″ for card base, 5″ x 3 3/4″, scraps for flower, leaves and greeting; Granny Apple Green 5 1/4″ x 4″; cardstock vellum 5″ x 3 3/4″ Accessories – In the Tropics Dies, Stitched So Sweetly Dies (next to the smallest rectangle), SNAIL adhesive, mini glue dots, Stampin’ Dimensionals, Gold Metallic Edged Ribbon colored with Light Calypso Coral Blend
Instructions: 1. Adhere Pear Pizzazz cardstock to Whisper White card base with the SNAIL 2. Do the technique on the Cardstock Vellum 3. Adhere the vellum to card front with SNAIL adhesive placing the adhesive in areas that will be covered up with the other elements. 4. Color length of gold metallic edge ribbon with the light Calypso Coral blend. Then tie an overhand know and adhere to left side of card with glue dot. 5. On Whisper White scraps stamp the leaves with Pear Pizzazz ink and the hibiscus flower with Memento ink. Color in the flower with the blends. Then cut out with the appropriate dies. 6. Stamp greeting on another scrap of Whisper White with Memento ink. Cut out with next to the smallest Stitched So Sweetly rectangle die. 7. Adhere the leaves to card front with SNAIL and the flower and greeting with Stampin’ Dimensionals.
If you need any of the supplies I used for this card, visit my online store. Use the host code when you order and I’ll send you a small thank you gift.
Order the 2018-2020 In Color Products now! With all that’s been going on this Spring, I have almost completely forgotten that May is just around the corner. And for those of us who love crafting with Stampin’ Up! products, that means that it’s not long at all before we will have to say, “Goodbye,” to the bright and cheery 2018‑2020 Stampin’ Up! In Colors.
I
remember in June of 2018 when I was so excited that we were finally going to
have a group of bright colors. Those brights include three beautiful primary
colors – Blueberry Bushel, Lovely Lipstick and Pineapple Punch. Those, along
with two gorgeous secondary colors – Call Me Clover and Grapefruit Grove – helped
me create vibrant projects throughout the next two years. Now, before I know it,
the colors will be gone! I’ll miss them.
Sometimes
I think of the In Colors – actually any Stampin’ Up! colors – in terms of paper
and ink. But Stampin’ Up! does so much more with its colors. In this set of
cards, I’ve used not only all five inks and cardstock in all five color. But
I’ve also used the 6” square Designer Series Paper stack for the 2018‑2020 In
Colors, and the matching 1/8” Grosgrain ribbons for Grapefruit Grove, Call Me
Clover, and Lovely Lipstick. Oh, and then there’s a bit of embellishments on
the stamped element – the beautiful Happiness Blooms Enamel Dots. While the
colors aren’t all the same (the blue is Navy and the orange is Coral), they’re
pretty close! I could have used the 2018‑2020 In Color Buttons, which are just
as bright and cheerful as everything else related to this group of colors. But
my cards started screaming, “Enough!”
Now
here’s the thing: these are VERY popular colors, as you’d expect. But once
Stampin’ Up! retires them as of June 3rd of this year, they’re most likely gone
from the collection forever. That’s not 100% sure as Stampin’ Up! has brought
some colors back after a couple of years in recent memory. But that’s rare. And
what’s going to happen as the month of May progresses, is that a lot of
products related to these In Colors are going to run out. So, if you’re interested
in keeping these colors around for a while longer, now would be a good time to
start stocking up.
Don’t wait. Order the 2018-2020 In Color Products now! Products that include the retiring In Colors and the Stampin’ Up! order numbers are listed below. You can also order the 2018-2020 In Colors in individual ink pads and cardstock packages. Just log in to my Stampin’ Up! online store (or call or e-mail me) to order any of them. The sooner the better – before they run out!
2018-2020 In Color Assortments:
146973 8-1/2” x 11” Cardstock 146974 12” x 12” Cardstock 149618 6” x 6” Designer Series Paper 147153 Classic Stampin’ Pads 147159 Stampin’ Write Markers 149608 In Color Buttons 146932 (Retired but still in the Clearance Rack) In Color Binder Clips
Individual 2018-2020 In Color Items:
Ink Refills 147176 Blueberry Bushel 147178 Call Me Clover 147179 Lovely Lipstick 147180 Pineapple Punch 147181 Grapefruit Grove
1/8” Grosgrain Ribbon (3.2mm) 146950 Blueberry Bushel 146951 Call Me Clover 146952 Lovely Lipstick 146953 Pineapple Punch 146954 Grapefruit Grove
Here is another Ornate Floral 3D Embossing Folder (152725) Idea. I shared my first card in this blog post. This time I also used one of the Ornate Border Dies (152724) along the right side of the card. This border die is so delicate that you really have to have it mounted on another piece of cardstock. In this case, I used Mossy Meadow cardstock for the card base. See the detail of the embossing folder in this close up photo.
To Make this Card:
Fold 8 1/2″ x 5 1/2″ piece of Mossy Meadow in half to form card base.
Die-cut right edge of 5 1/2″ x 4 1/4″ piece of Petal Pink cardstock with Ornate Border Die and die-cutting machine.
Use the Ornate Floral 3D Embossing Folder and the die-cutting/embossing machine to emboss the Petal Pink cardstock after the side is die-cut. To emboss first would cause the embossing to flatten when run through the machine to die-cut the edge.
Glue the Petal Pink layer to the card front with Multipurpose Liquid Glue or the Fine-Tip Glue Pen.
Stamp the greeting from Free as a Bird stamp set (149468) on Whisper White cardstock with memento ink and the plumeria flower from the Timeless Tropical stamp set (151497) on another scrap of Whisper White cardstock.
Die-cut the greeting with the next to the smallest Stitched So Sweetly Dies (151690) and the die-cutting machine.
Color the plumeria flower with the Calypso Coral Combo Stampin’ Blends (144045) and then either fussy-cut the flower out or use the corresponding die from the In the Tropics Dies (151495). Save 10% by purchasing the stamp set and dies together in the Timeless Tropical Bundle (153811). Then use a glue dot to attach it to the label.
Put some SNAIL adhesive on the back of the label and attach loops of gold and silver metallic thread to the SNAIL.
Use Stampin’ Dimensionals to adhere the label to the card front.
You can get the supplies needed to make this project by clicking on the items. They are linked to their location in my online store. When you place your order use the host code EQAYGMPG to receive a small thank you gift from me. Don’t use the host code if your order is $150 or more. With that amount you are your own host and will receive host benefits.
The Ornate Floral 3D Embossing Folder (152725) is one of the items in this month’s featured Ornate Style Suite that will be in the new 2020-2021 Annual catalog. This embossing folder embosses tiny flowers and leaves sprinkled across your cardstock. It makes a subtle texture as a background for a focal image or, as in this card, the Ornate Floral embossing of this folder can be the focus of the card. It is so pretty that I didn’t want to cover it up!
The tops of the Ornate Floral 3D embossed strips looked like they were missing something, so I embellished them with white flowers die-cut with dies from the Ornate Borders Dies (152724) that are also a part of the Ornate Style Suite. I shared a card I created with these border dies here. I added leafy vines die-cut from Mossy Meadow cardstock with dies from the Garden Gateway Dies (151512).
Fold 8 1/2″ x 5 1/2″ piece of Pear Pizzazz in half to form card base
Cut 4″ x 1 1/4″ strip of Pineapple Punch, Mango Melody, and Flirty Flamingo cardstock
Place these strips in Ornate Floral 3D Embossing Folder and run through die-cutting machine
Adhere to card front as shown with favorite adhesive
Die-cut one each of the leafy vine dies from the Garden Gate Dies from Mossy Meadow cardstock. Glue them to the top of the embossed strips.
Die-cut from Whisper White cardstock two large flowers, three medium flowers, and two small flowers from the Ornate Border dies. glue them over the vines.
Stamp the sentiment on Whisper White cardstock with Memento ink and die-cut with one of the Stitched So Sweetly dies. Adhere it to the card front with Stampin’ Dimensionals.
Come back on Wednesday to see more ideas for using the Ornate Floral 3D Embossing Folder. For more inspiration like my Soggy Stamper Facebook page and subscribe to my mailing list. The subscription form is in the upper right corner of my blog.
Today I am sharing two Thank You cards created with the Ornate Thanks Bundle (154115). This bundle is part of the Ornate Garden Suite (154153) which is in the upcoming 2020=2021 Annual Catalog. If you are an avid stamper like me, you will love this chance to buy the suite now instead of having to wait until June. Click here to see the whole Ornate Garden Suite.
This is the first card I created when I started playing with the Ornate Thanks Bundle. I was immediately drawn to the Ornate Border Dies shown here.
I love this new Ornate Thanks stamp set(149471) because it’s a photopolymer set, I love the script font of the various sayings you can add to the big, bold thanks stamps. For this card I chose to add ‘for all you do’ to the ‘Thanks’. These cards are going to a couple friends who are highly stressed nurses right now.
To Make This Card:
Fold Bermuda Bay cardstock 8 1/2″ x 5 1/2″ in half for card base
Die-cut Pool Party cardstock 5 1/2″ x 1 1/2″ with the two dies in the upper right corner and adhere diagonally across the card front with Multipurpose Liquid Glue
Stamp greeting from Ornate Thanks stamp set on Whisper White with Bermuda Bay ink and die-cut with die from Stitched So Sweetly Dies (151690) and applied to card front with stampin’ dimensionals
Tie an overhand knot in Silver metallic edged ribbon and affixed to card front with mini glue dot.
This is the second Thank You card I created with the new Ornate Thanks Bundle.
To Make This Card:
Fold Pineapple Punch cardstock 8 1/2″ x 5 1/2″ in half for card base
Die-cut Call Me Clover cardstock 5 1/2″ x 1 1/4″ with Ornate Border die and adhered to card front
Stamp greetings from Ornate Thanks stamp set on card base with Call Me Clover ink
Add four sequins to flower centers with Multipurpose Liquid Glue
Now go order this new Ornate Thanks Bundle and begin creating gorgeous but easy cards with it. Share a photo of your card with me and I’ll share it here on my blog.
Here is a Flowering Foils Specialty DSP card. This specialty designer series paper has both rose gold foil and silver foil embossing. It is my favorite of all the Sale-A-Bration free products. I love coloring the paper with Stampin’ Blends with stunning resluts. The paper is only one-sided and a little lighter in weight than Stampin’ Up!’s regular designer series paper but that is fine with me as the Stampin’ Blends soak through more leaving a soft water-colored effect on the reverse side. That is what I used as the background for the beautiful flower I colored and fussy-cut for the card It comes in a package of four different designs, three 12 x 12″ sheets each. Check out the patterns below.
To make this card use the following supplies:
Whisper White Cardstock, 8 1/2″ x 5 1/2″, scored and folded at 4 1/4″ for card base
Granny Apple Green Cardstock, 5 1/4″ x 3″
Flowering Foils Specialty Designer Series Paper – large floral design 5 1/4″ x 2 3/4″, scrap with one complete large flower
Combo Flirty Flamingo Stampin’ Blend Markers
Combo Granny Apple Green Stampin’ Blend Markers
Granny Apple Green Classic Stampin’ Pad
Happy Birthday To You Stamp Set – a free Sale-A-Bration item with a $50 purchase
SNAIL Adhesive
Stampin’ Dimensionals
I colored the larger piece of Flowering Foils Specialty Designer Series Paper and the scrap with the stampin’ blends and fussy cut the single flower. The Granny Apple Green cardstock was adhered to the card front. Then the larger piece of the dsp was turned over and adhered to the card front. The single flower was popped up with Stampin’ Dimensionals. Finally the Happy Birthday was stamped in the bottom right corner with Granny Apple Green ink.
Here is another Flowering Foils Specialty DSP card I created and you can see two others I shared here.
If you don’t already have this gorgeous Flowering Foils Specialty Designer Series Paper go order it here and then share with me what you create by email. I’ll feature it on a blog post.
Subscribe to Paper Pumpkin by March 10th to receive this special Paper Pumpkin kit. This month Paper Pumpkin turns 7 and Stampin’ Up! is celebrating by including an extra stamp set in the kit. Yes, there have been seven years of crafters have been receiving a monthly paper-crafting kit in the mail. Each month includes everything except scissors needed to create cute projects.
January’s Paper Pumpkin kit included everything to make 10 3″ x 3″ Valentine cards with envelopes and 20 paper treat bags for Valentine candy. The kit enabled me to quickly make enough Valentine things to send something to each of our 10 grandchildren and 10 of our great-grandchildren.
There are a couple of ways to subscribe. 1. You can go to www.paperp
umpkin.com and subscribe on a month-to-month basis. If you do please designate me as your demonstrator. Each month is $22. 2. You can purchase a 3 month prepaid subscription (137859) for $63. This is a small savings for you but most importantly this month you get to choose a free $50 item from the Sale-A-Bration brochure with your 3 month prepaid subscription. 3. You can purchase a 6 month prepaid subscription (137860) for $114 and during Sale-A-Bration you can choose a $100 Sale-A-Bration item or 2 $50 items. 4. Purchase a 12 month subscription (137861) for $220 and choose 2 $100 items, one $100 item and 2 $50 items, or 4 $50 items.
Subscribe to Paper Pumpkin by March 10th to get the wonderful March kit. Check it out!
Today Stampin’ Up! added five new Sale-A-Bration gifts to your choices when you order from me during Sale-A-Bration. This is the last month of Sale-A-Bration, the time you can choose free items when you purchase $50 or more excluding shipping and tax. Check out the great new items below!
With each $50 purchase:
This Flowering Foils Specialty Designer Series Paper (152312) has rose gold and silver foil embossing. It comes in 12″ x 12″ size with 3 sheets each of four designs. It is beautiful by itself but really stunning when color is added like I did in these two cards.
A second New Sale-a-Bration Gift is this great masculine stamp set (152300). It will be great for making all sorts of masculine cards.
The third New Sale-A-Bration Gift that you can choose with a $50 purchase is the So Very Vellum Specialty Designer Series Paper. This vellum is embossed with a dotted pattern. These 12″ x 12″ sheets come with 3 each of 3 colors.
The fifth New Sale-A-Bration Gift is the Rise & Shine stamp set (152303). This set coordinates with the Cup of Cheer Dies (151150).
Now that you have seen the fFive New Sale-A-Bration Gifts, go shopping! Click on the inks to find these items in my online store or contact me to place your order. These items are on an ‘as quantities last’ basis. Some of the earlier SAB items have sold out so go shopping now. There is only this month left of Sale-A-Bration!